VTEX
VTEX is an enterprise digital commerce platform that enables you to quickly create an online store with built-in capabilities. For more information, visit the official VTEX website
Prerequisites
Before integrating PayU with VTEX, ensure you have the following:
- An active PayU Latam account.
- An active PayU Enterprise (PaymentsOS) account in production/live mode. For details on how to enable live mode, refer to Activating Your PayU Enterprise Account.
- A VTEX account with sufficient rights and permissions to access the VTEX administrative panel. This account must have two-factor authentication enabled.
Availability by Country and Payment Methods
The table below outlines VTEX’s availability by country and the supported payment methods:
| Country | Credit Cards | Cash Payments | Other Methods |
|---|---|---|---|
 Argentina Argentina |
Credit cards, Google Pay | Cash payments | - |
 Brazil Brazil |
AMEX, MasterCard, Visa, Google Pay | Boleto Bancário | - |
 Colombia Colombia |
AMEX, Codensa, Diners, MasterCard, Visa, Google Pay | Efecty, Su Red, bank reference | PSE, Nequi |
 Chile Chile |
Credit cards, Google Pay | Cash payments | - |
 Mexico Mexico |
Credit cards, Google Pay | Cash payments | SPEI |
 Peru Peru |
AMEX, MasterCard, Visa, Google Pay | - | Yape |
Activating Your PayU Enterprise Account (Live Mode)
By default, new accounts are set to test mode. To enable live transactions, contact your account manager and submit a request with the following details:
- Merchant ID: Locate your LATAM account’s Merchant ID in the PayU Management Panel.
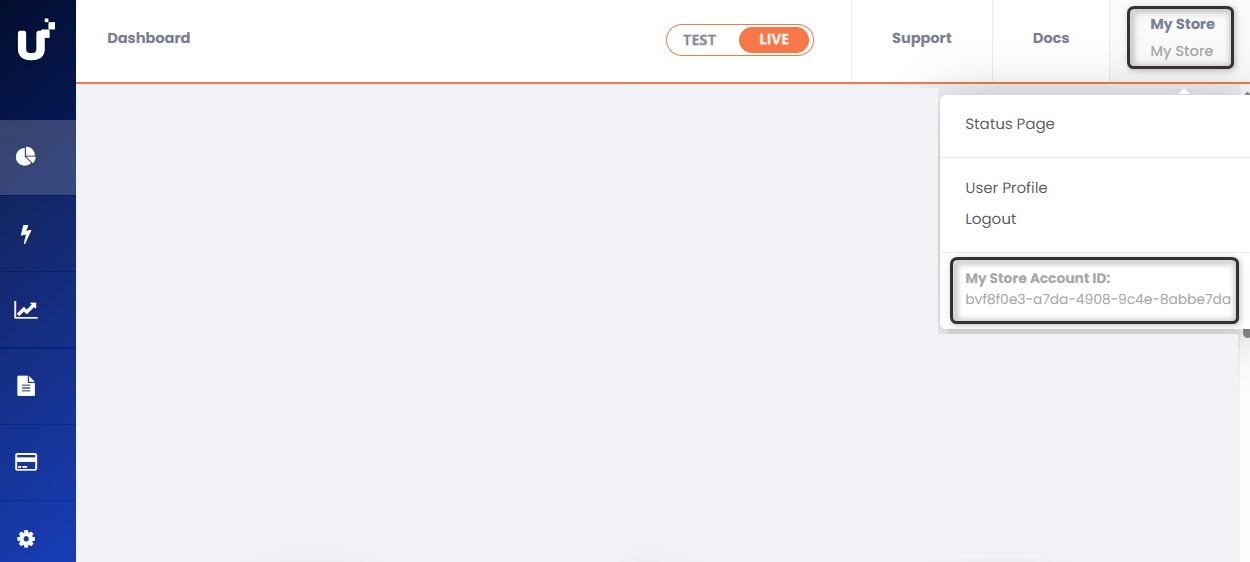
- Account ID: Find your Account ID in the PayU Enterprise control panel by clicking your username in the upper-right corner.
Configuring Your PayU Enterprise Account
To configure payment methods in VTEX for processing through our gateway, follow the steps below. The configuration consists of two stages. Before proceeding, ensure that you have met the prerequisites listed above.
1. Initial Setup
PayU Enterprise operates through PaymentsOS, which acts as middleware between PayU Latam and VTEX. The first step is to configure the following components within your PayU Enterprise account:
- Provider configuration
- Business unit
- Webhook
You can configure these components using one of the following methods:
- Configuring the account using Postman.
- Configuring the account manually using PayU Enterprise dashboard.
Configuring the Account Using Postman
Follow these steps to configure your account using Postman:
- Click the button below to import our Postman collection (refresh the page if the button does not work).
-
After importing the collection, set the global variables. Download the globals file here.
-
In Postman, click Import next to your workspace name and select the downloaded JSON file.
-
Click Import to finalize the process.
-
Run the collection methods in the displayed order. First, select the
POSTmethod called1. Login, then navigate to the Body tab.
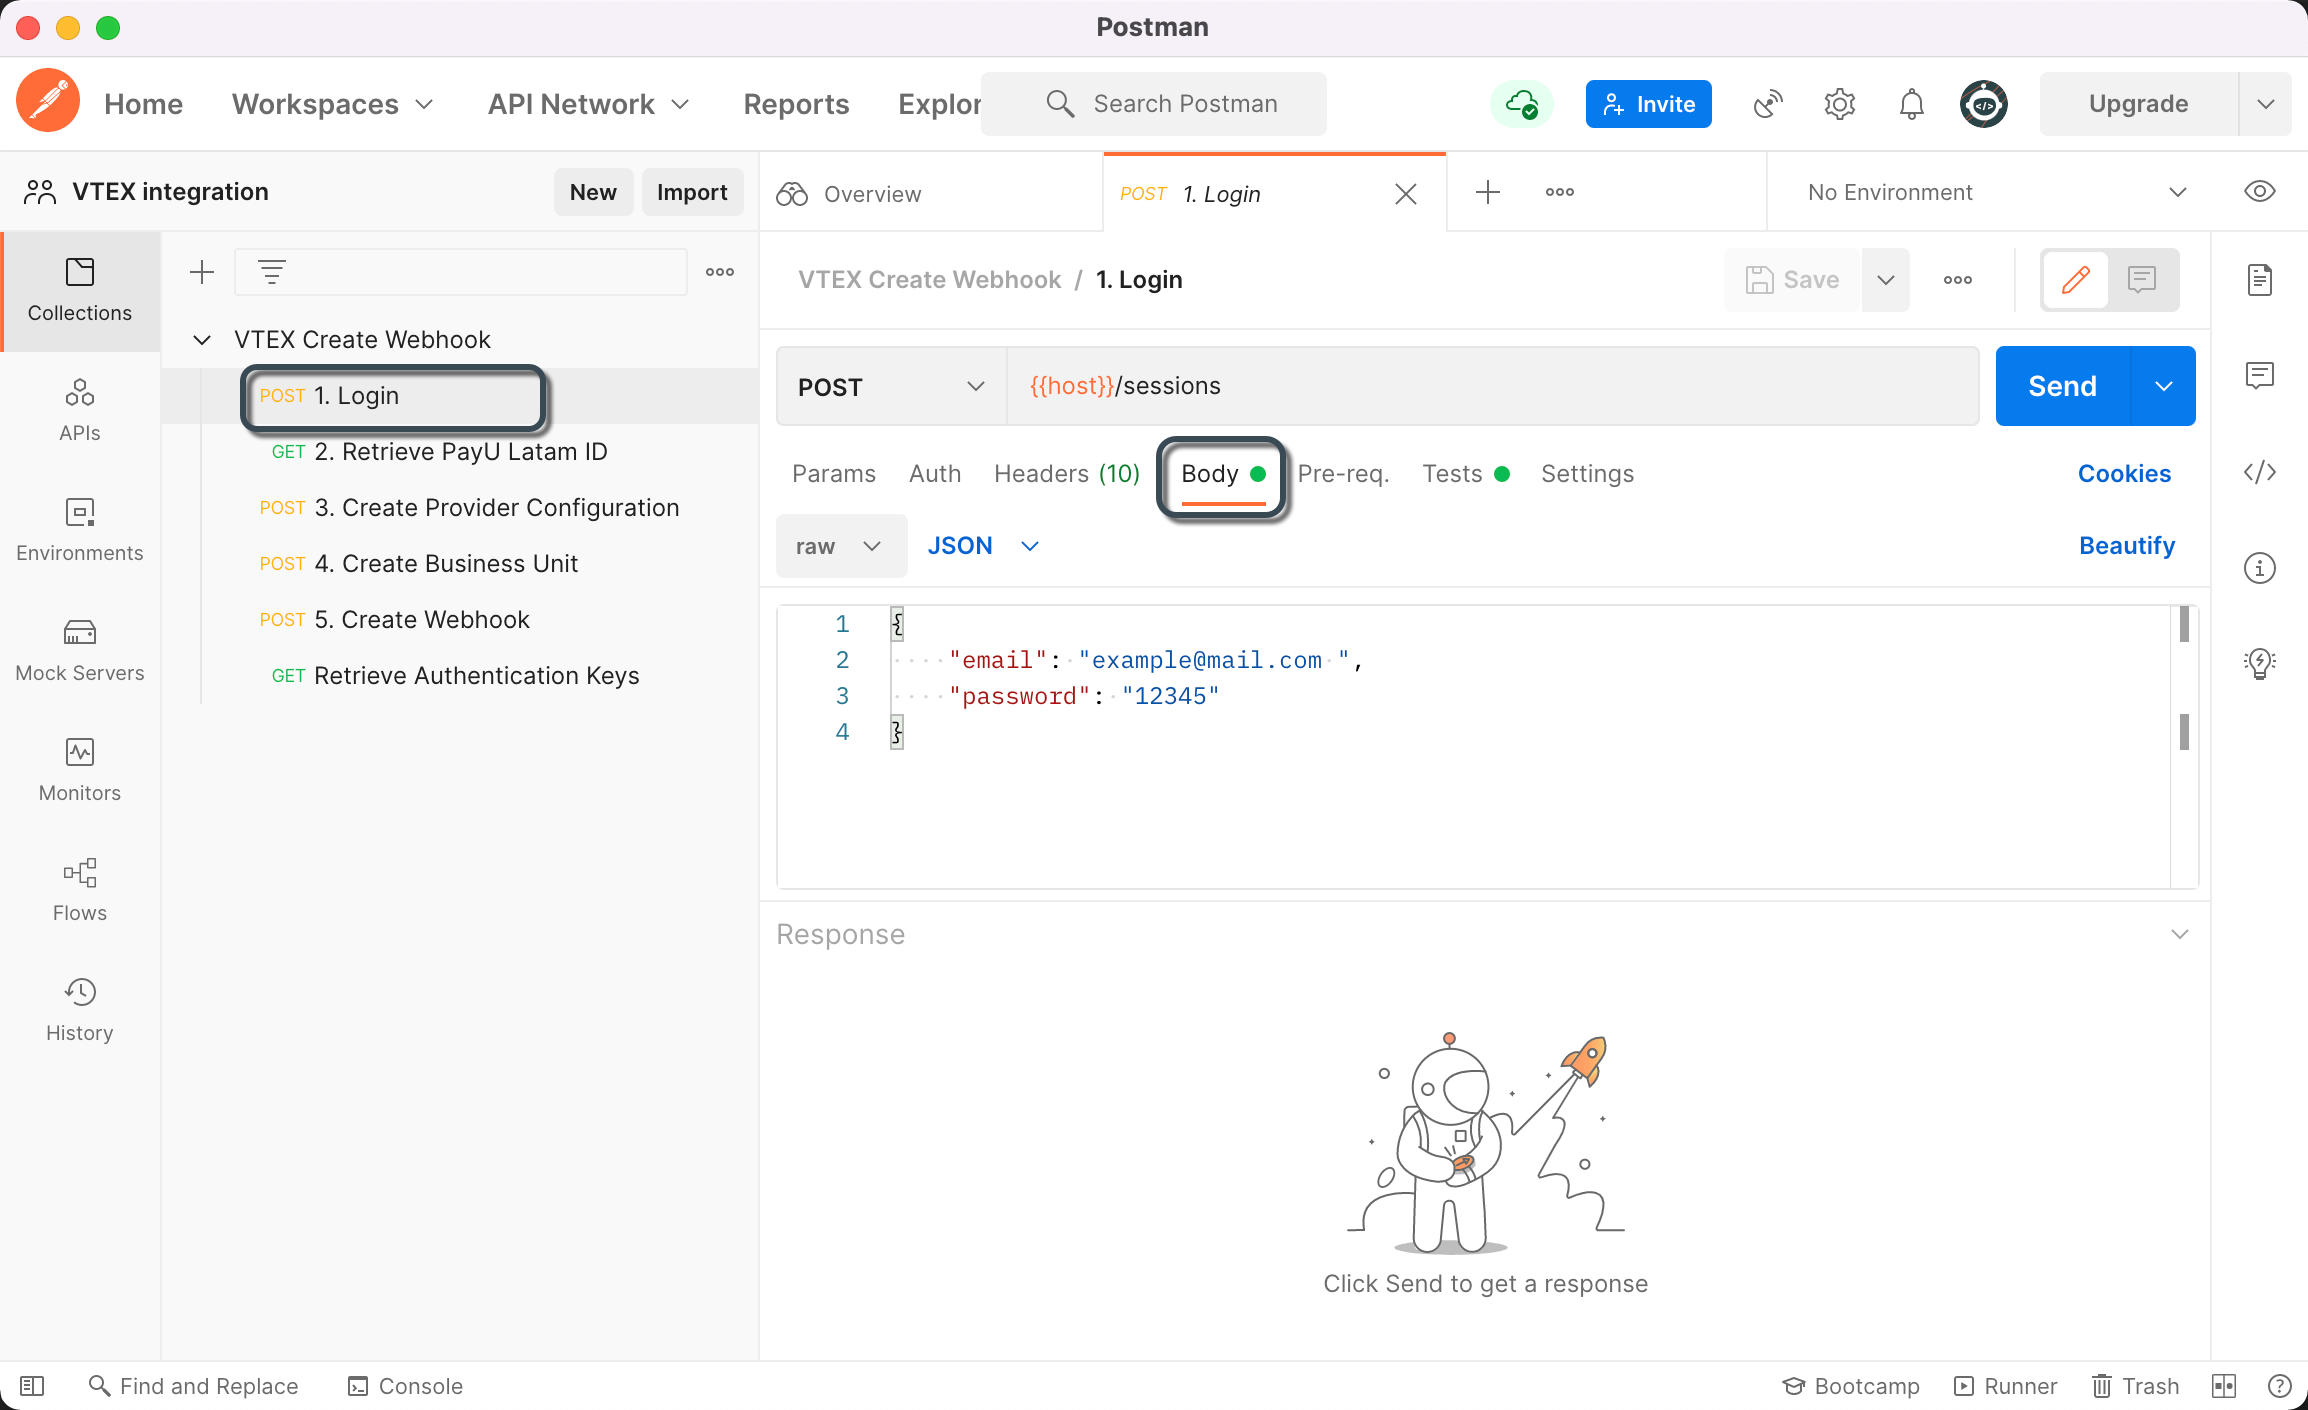
-
Enter the email and password for your PayU Enterprise account, then click Send. If the login is successful, the authentication data will be set for the next method.
-
Click the
GETmethod2. Retrieve PayU Latam ID. -
In the top-right corner, click the eye icon to locate the
envparameter. Click the pencil icon and set it totestfor the test environment orlivefor production.
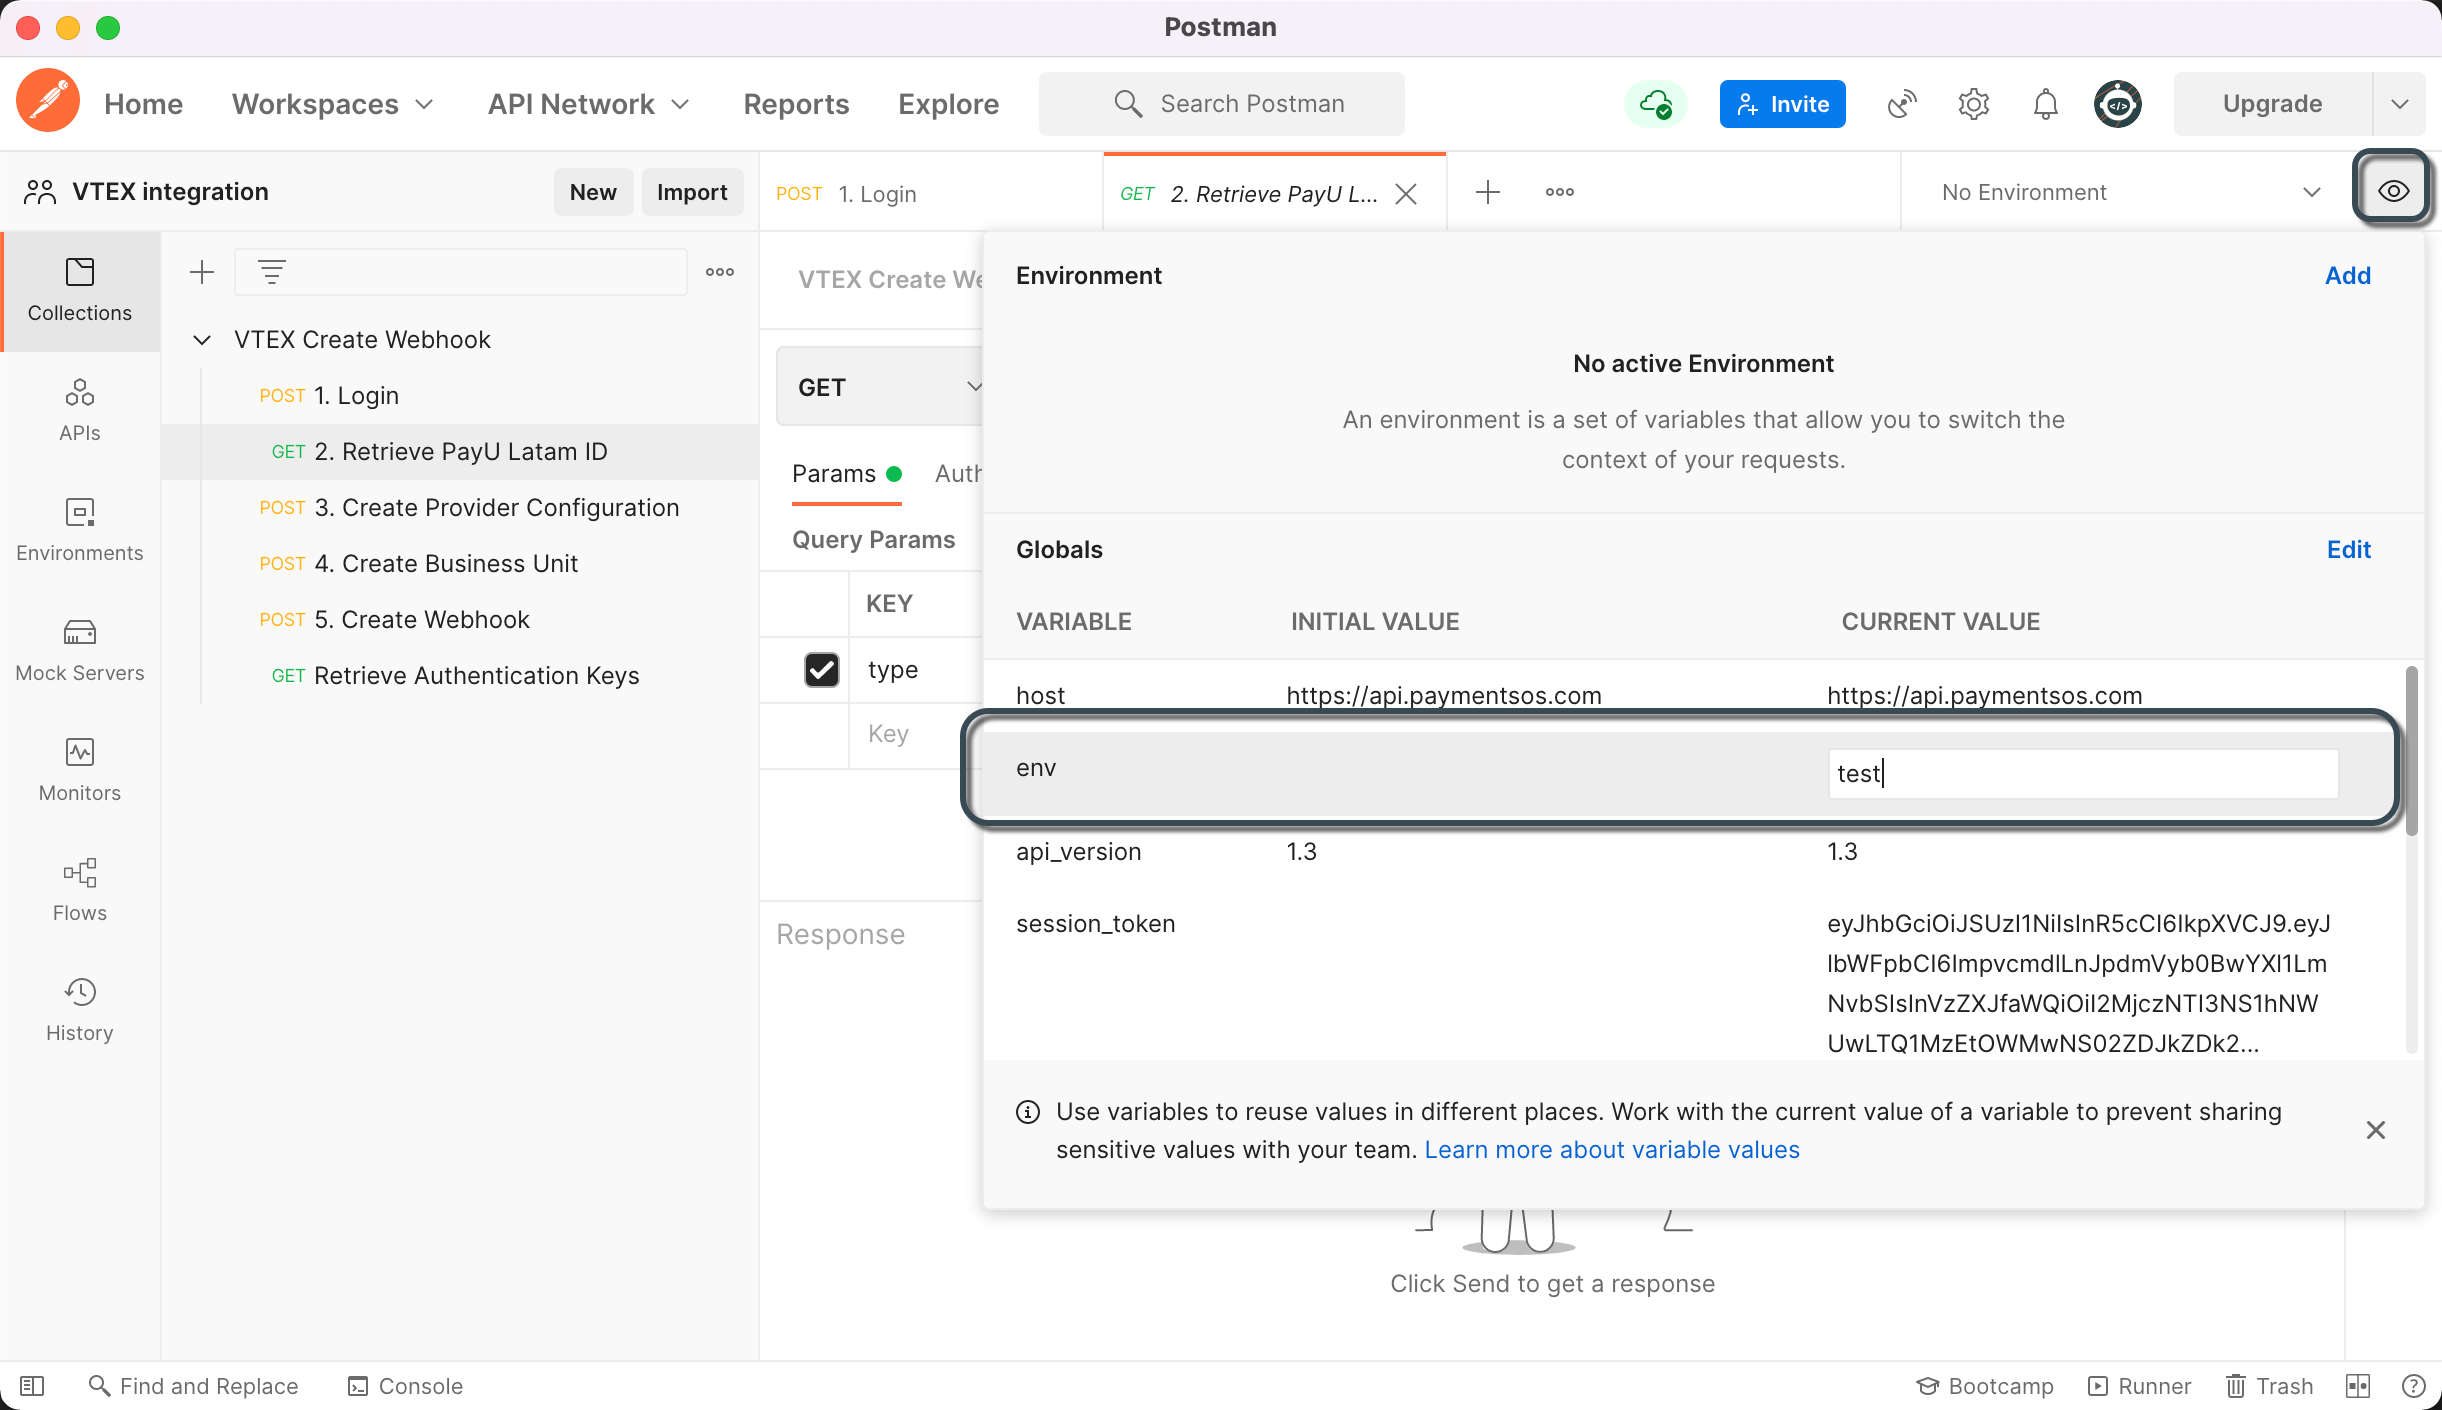
-
Click Send to proceed.
-
Next, configure a provider, which stores your payment-processing credentials. Select the
POSTmethod3. Create Provider Configurationand navigate to the Body tab.
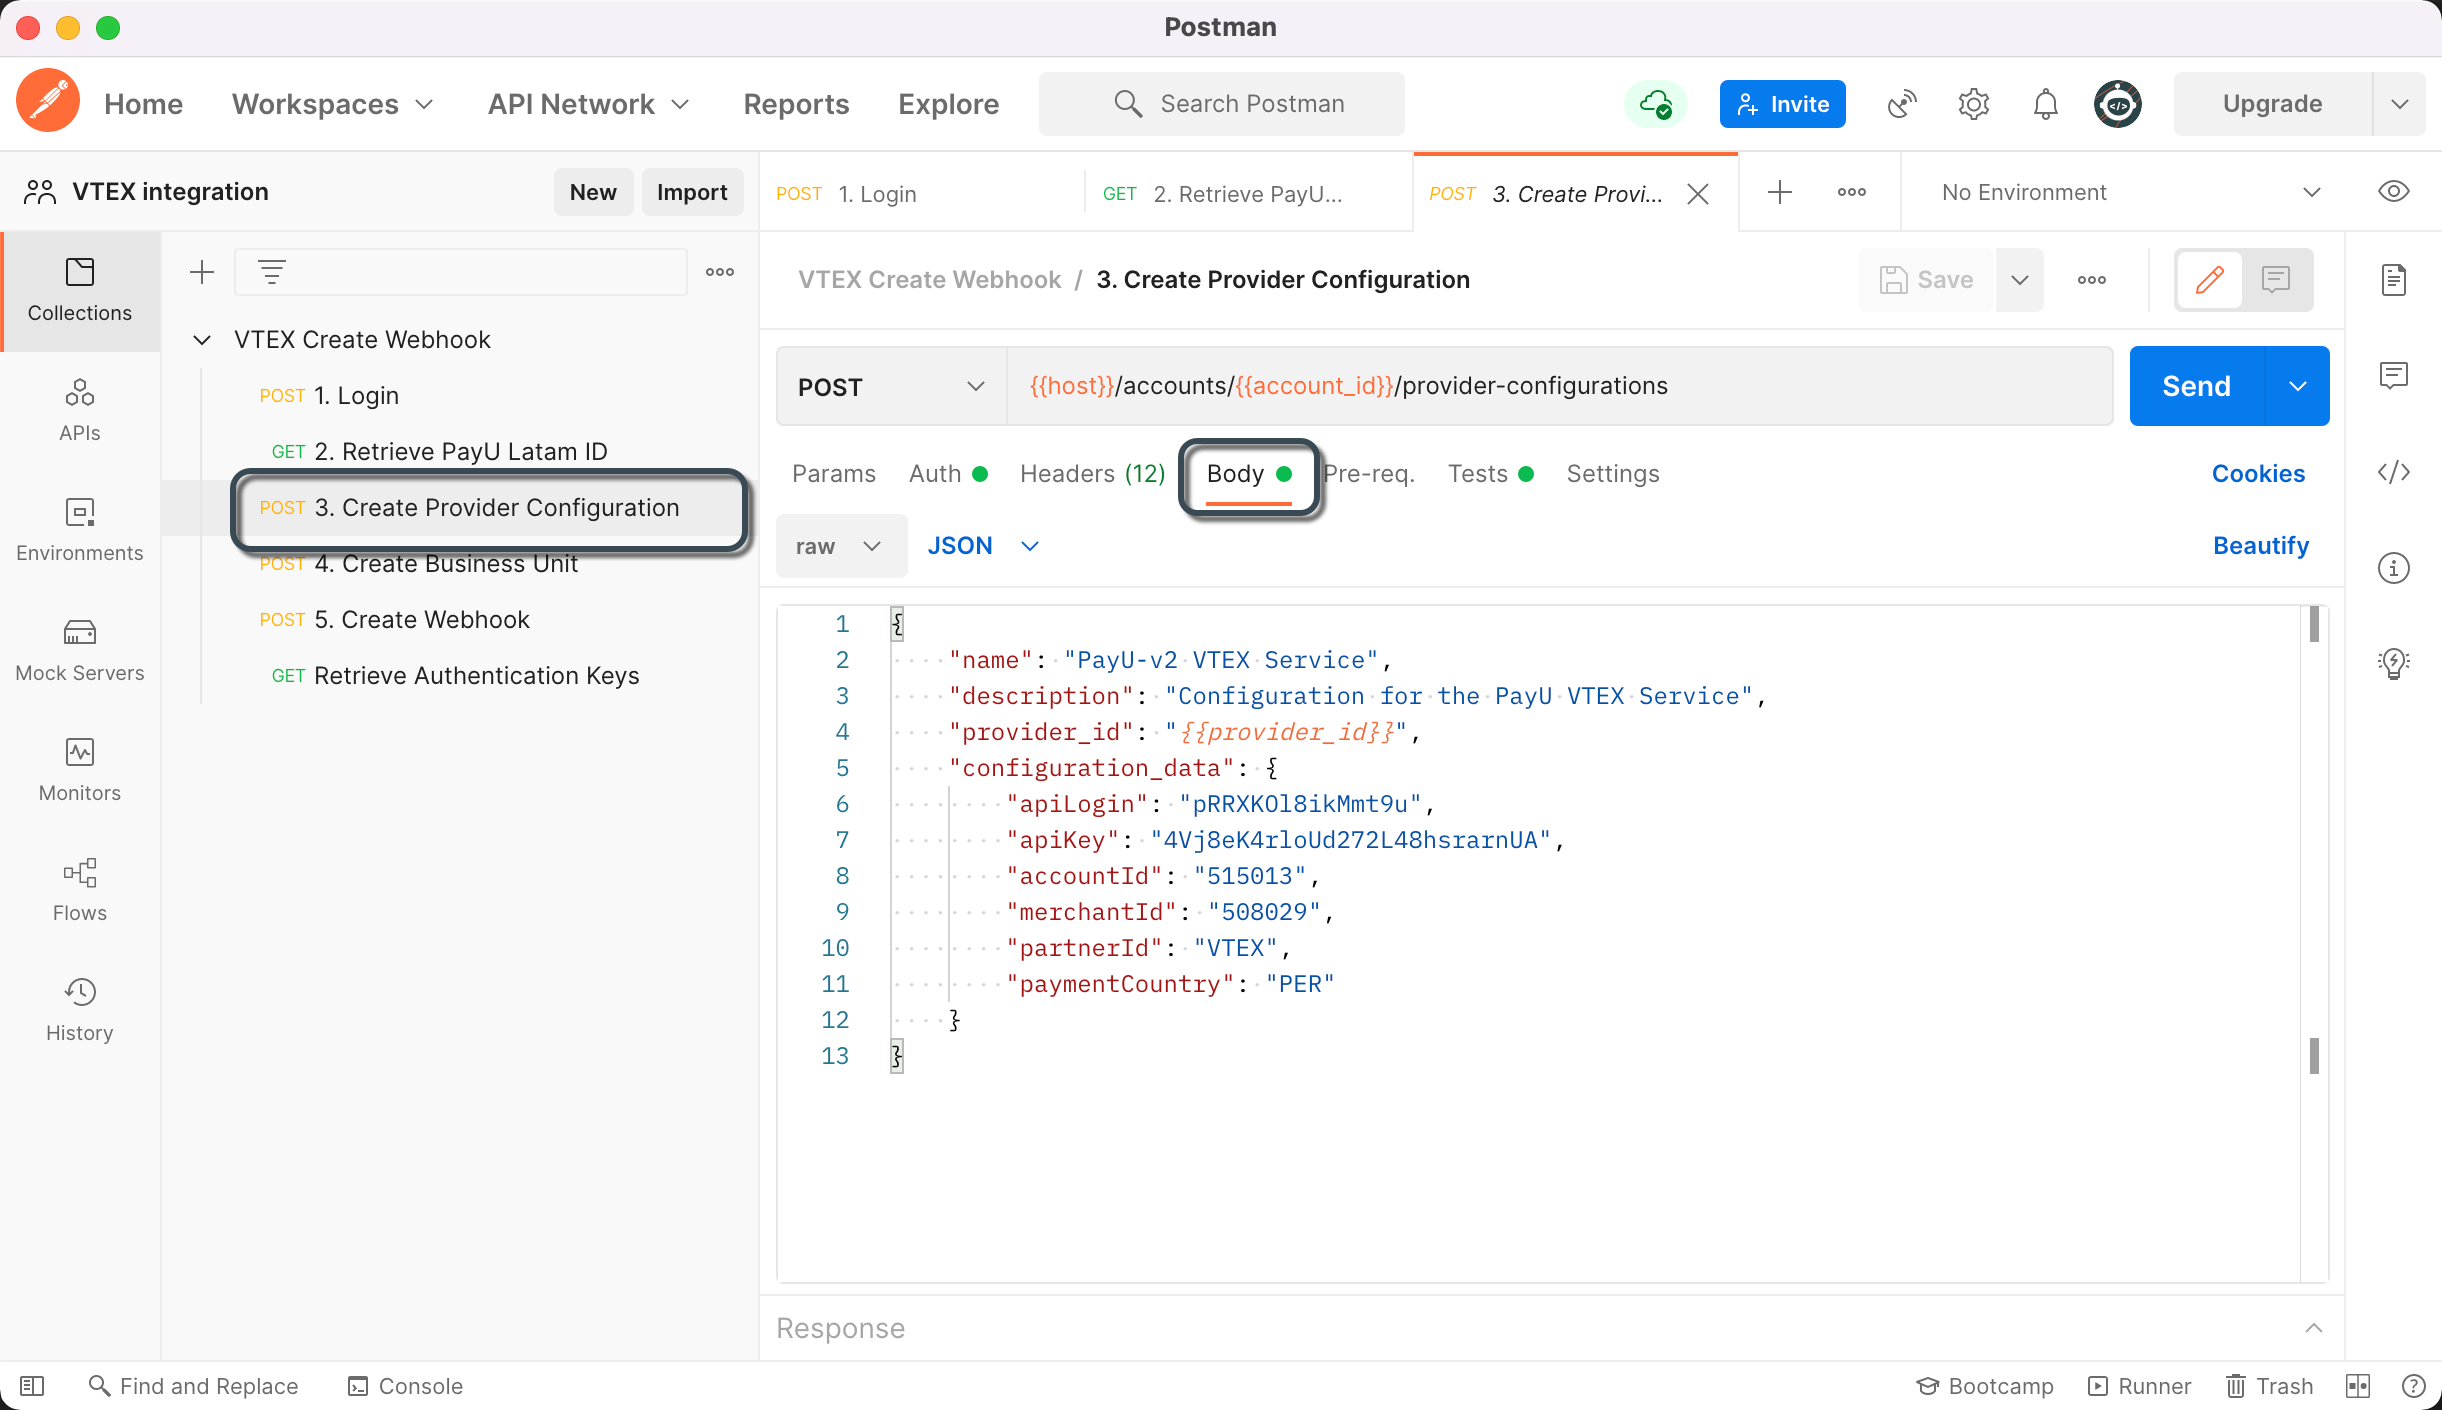
Fill in the following details:
| Parameter | Description |
|---|---|
| name | Enter a name for the provider configuration. |
| description | Provide an optional description. |
| configuration_data.apiLogin | Username or login provided by PayU. How do I get my API Login |
| configuration_data.apiKey | Unique key of your commerce. How do I get my API Key |
| configuration_data.accountId | PayU account ID based on your operating country. |
| configuration_data.merchantId | Your commerce ID in PayU Latam. |
| configuration_data.paymentCountry | Processing country in ISO 3166 Alpha-3 format. |
| configuration_data.partnerID | PayU identifier. Enter ZOOZ_VTEX_V2. |
| configuration_data.cashRedirect | Set to true to ensure proper order flow with cash payments in VTEX. |
Note
Theprovider_id parameter is automatically assigned by the response from method 2. Retrieve PayU Latam ID. Do not modify this value.
- Configure a business unit, which links the provider configuration with PayU Enterprise API credentials for processing transactions. Select the
POSTmethod4. Create Business Unit, then navigate to the Body tab.
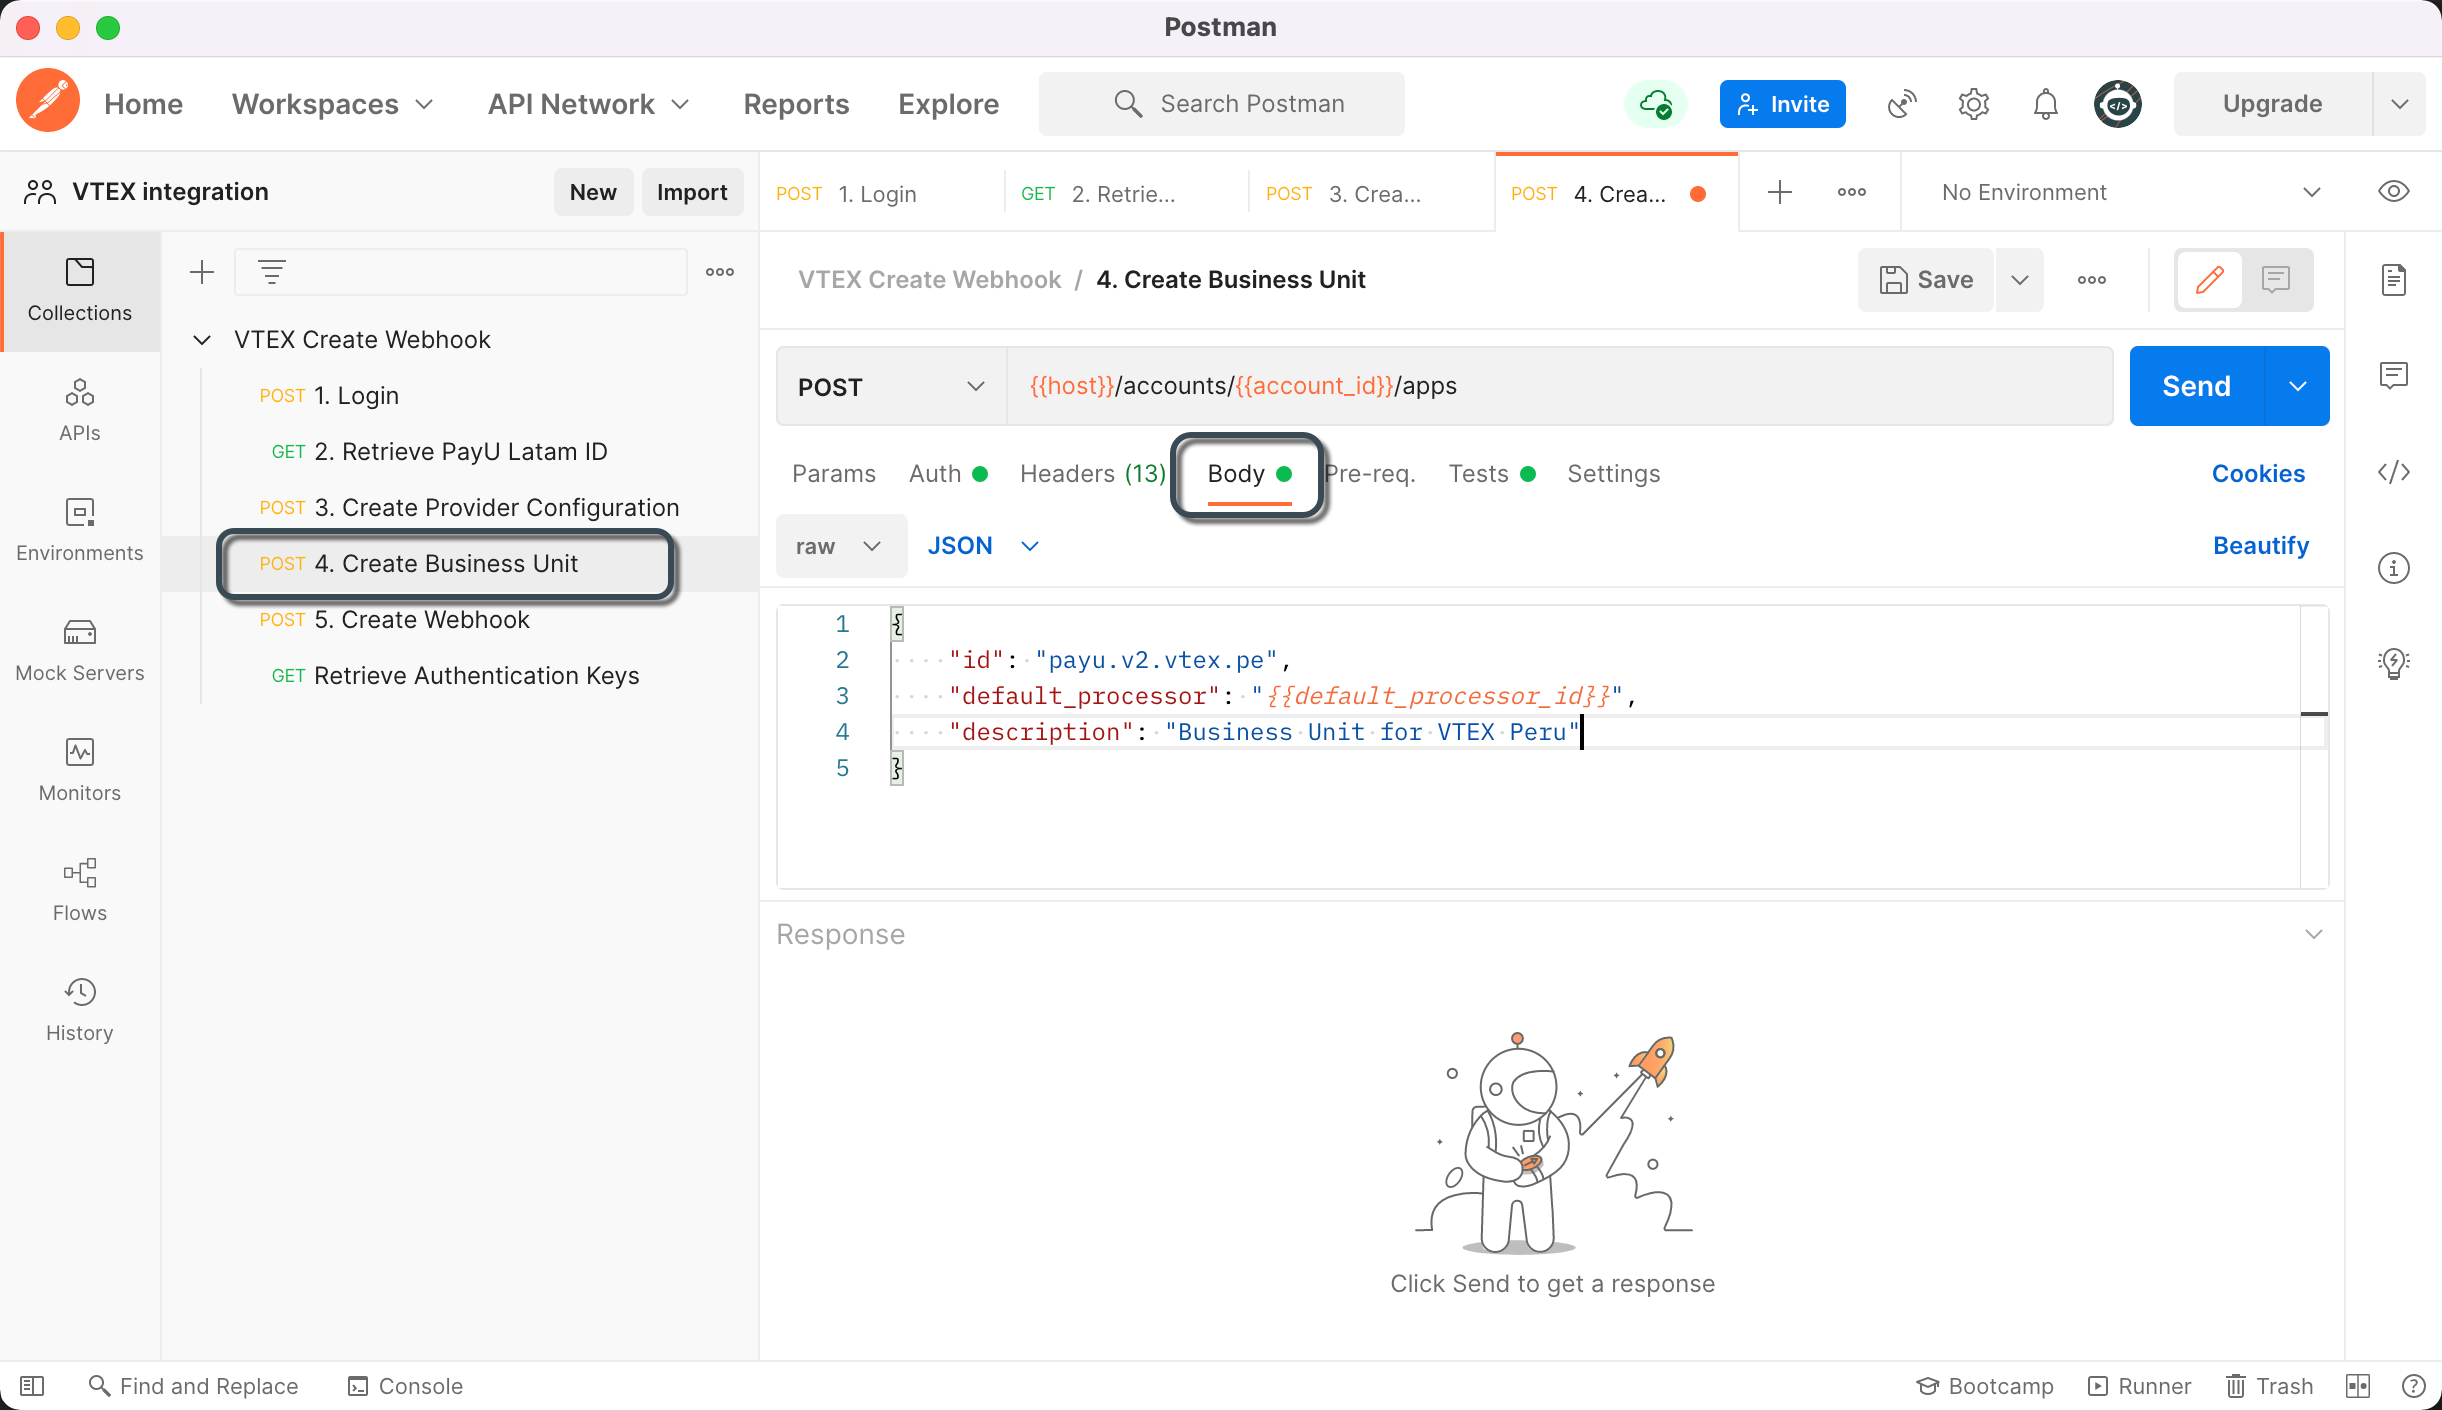
Fill in the following details:
| Parameter | Description |
|---|---|
| id | Identifier of the business unit (lowercase, no spaces). This value cannot be changed later, so ensure accuracy. |
| description | Optional description. |
Note
Thedefault_processor parameter is automatically assigned by the response from method 3. Create Provider Configuration. Do not modify this value.
- Create the webhook, which receives notifications from VTEX when a transaction changes status. Select the
POSTmethod5. Create Webhook, then navigating to the Body tab.

Set the endpoint parameter based on your environment:
- Test:
https://sandbox.api.payulatam.com/vtex-payments-integration/paymentsos/webhook - Live:
https://api.payulatam.com/vtex-payments-integration/paymentsos/webhook
Leave all other parameters at their default values.
At this point, your PayU Enterprise account using PaymentsOS is configured. The next step is Configuring the VTEX Provider.
Configuring the Account Using PayU Enterprise Dashboard
Follow these steps to configure your account using PayU Enterprise dashboard.
- Create the Provider Configuration
A provider stores your payment-processing credentials. Follow these steps to configure one:
1.1 In the PayU Enterprise dashboard, navigate to Configurations > Providers.
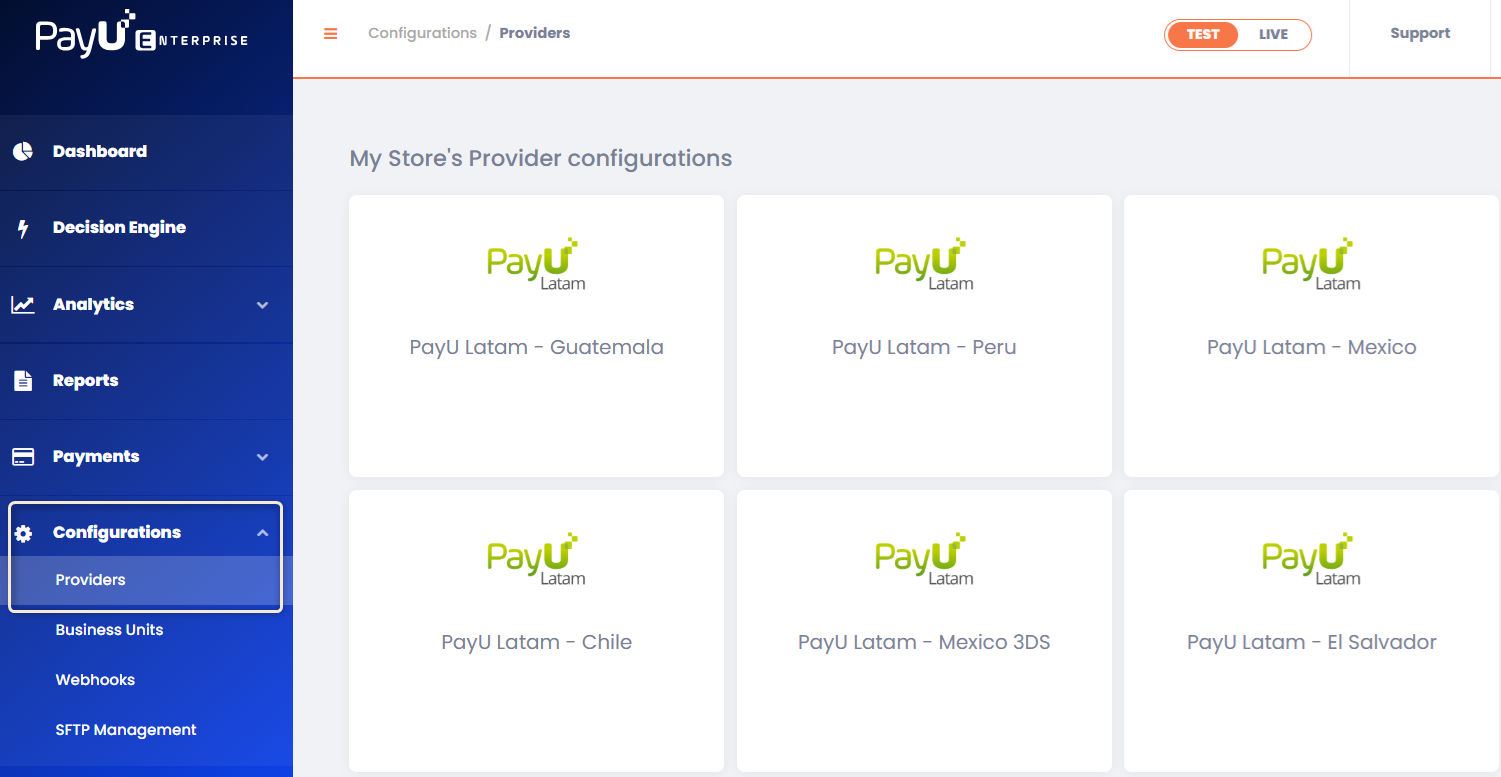
1.2 Click the module corresponding to the country or division you are configuring.
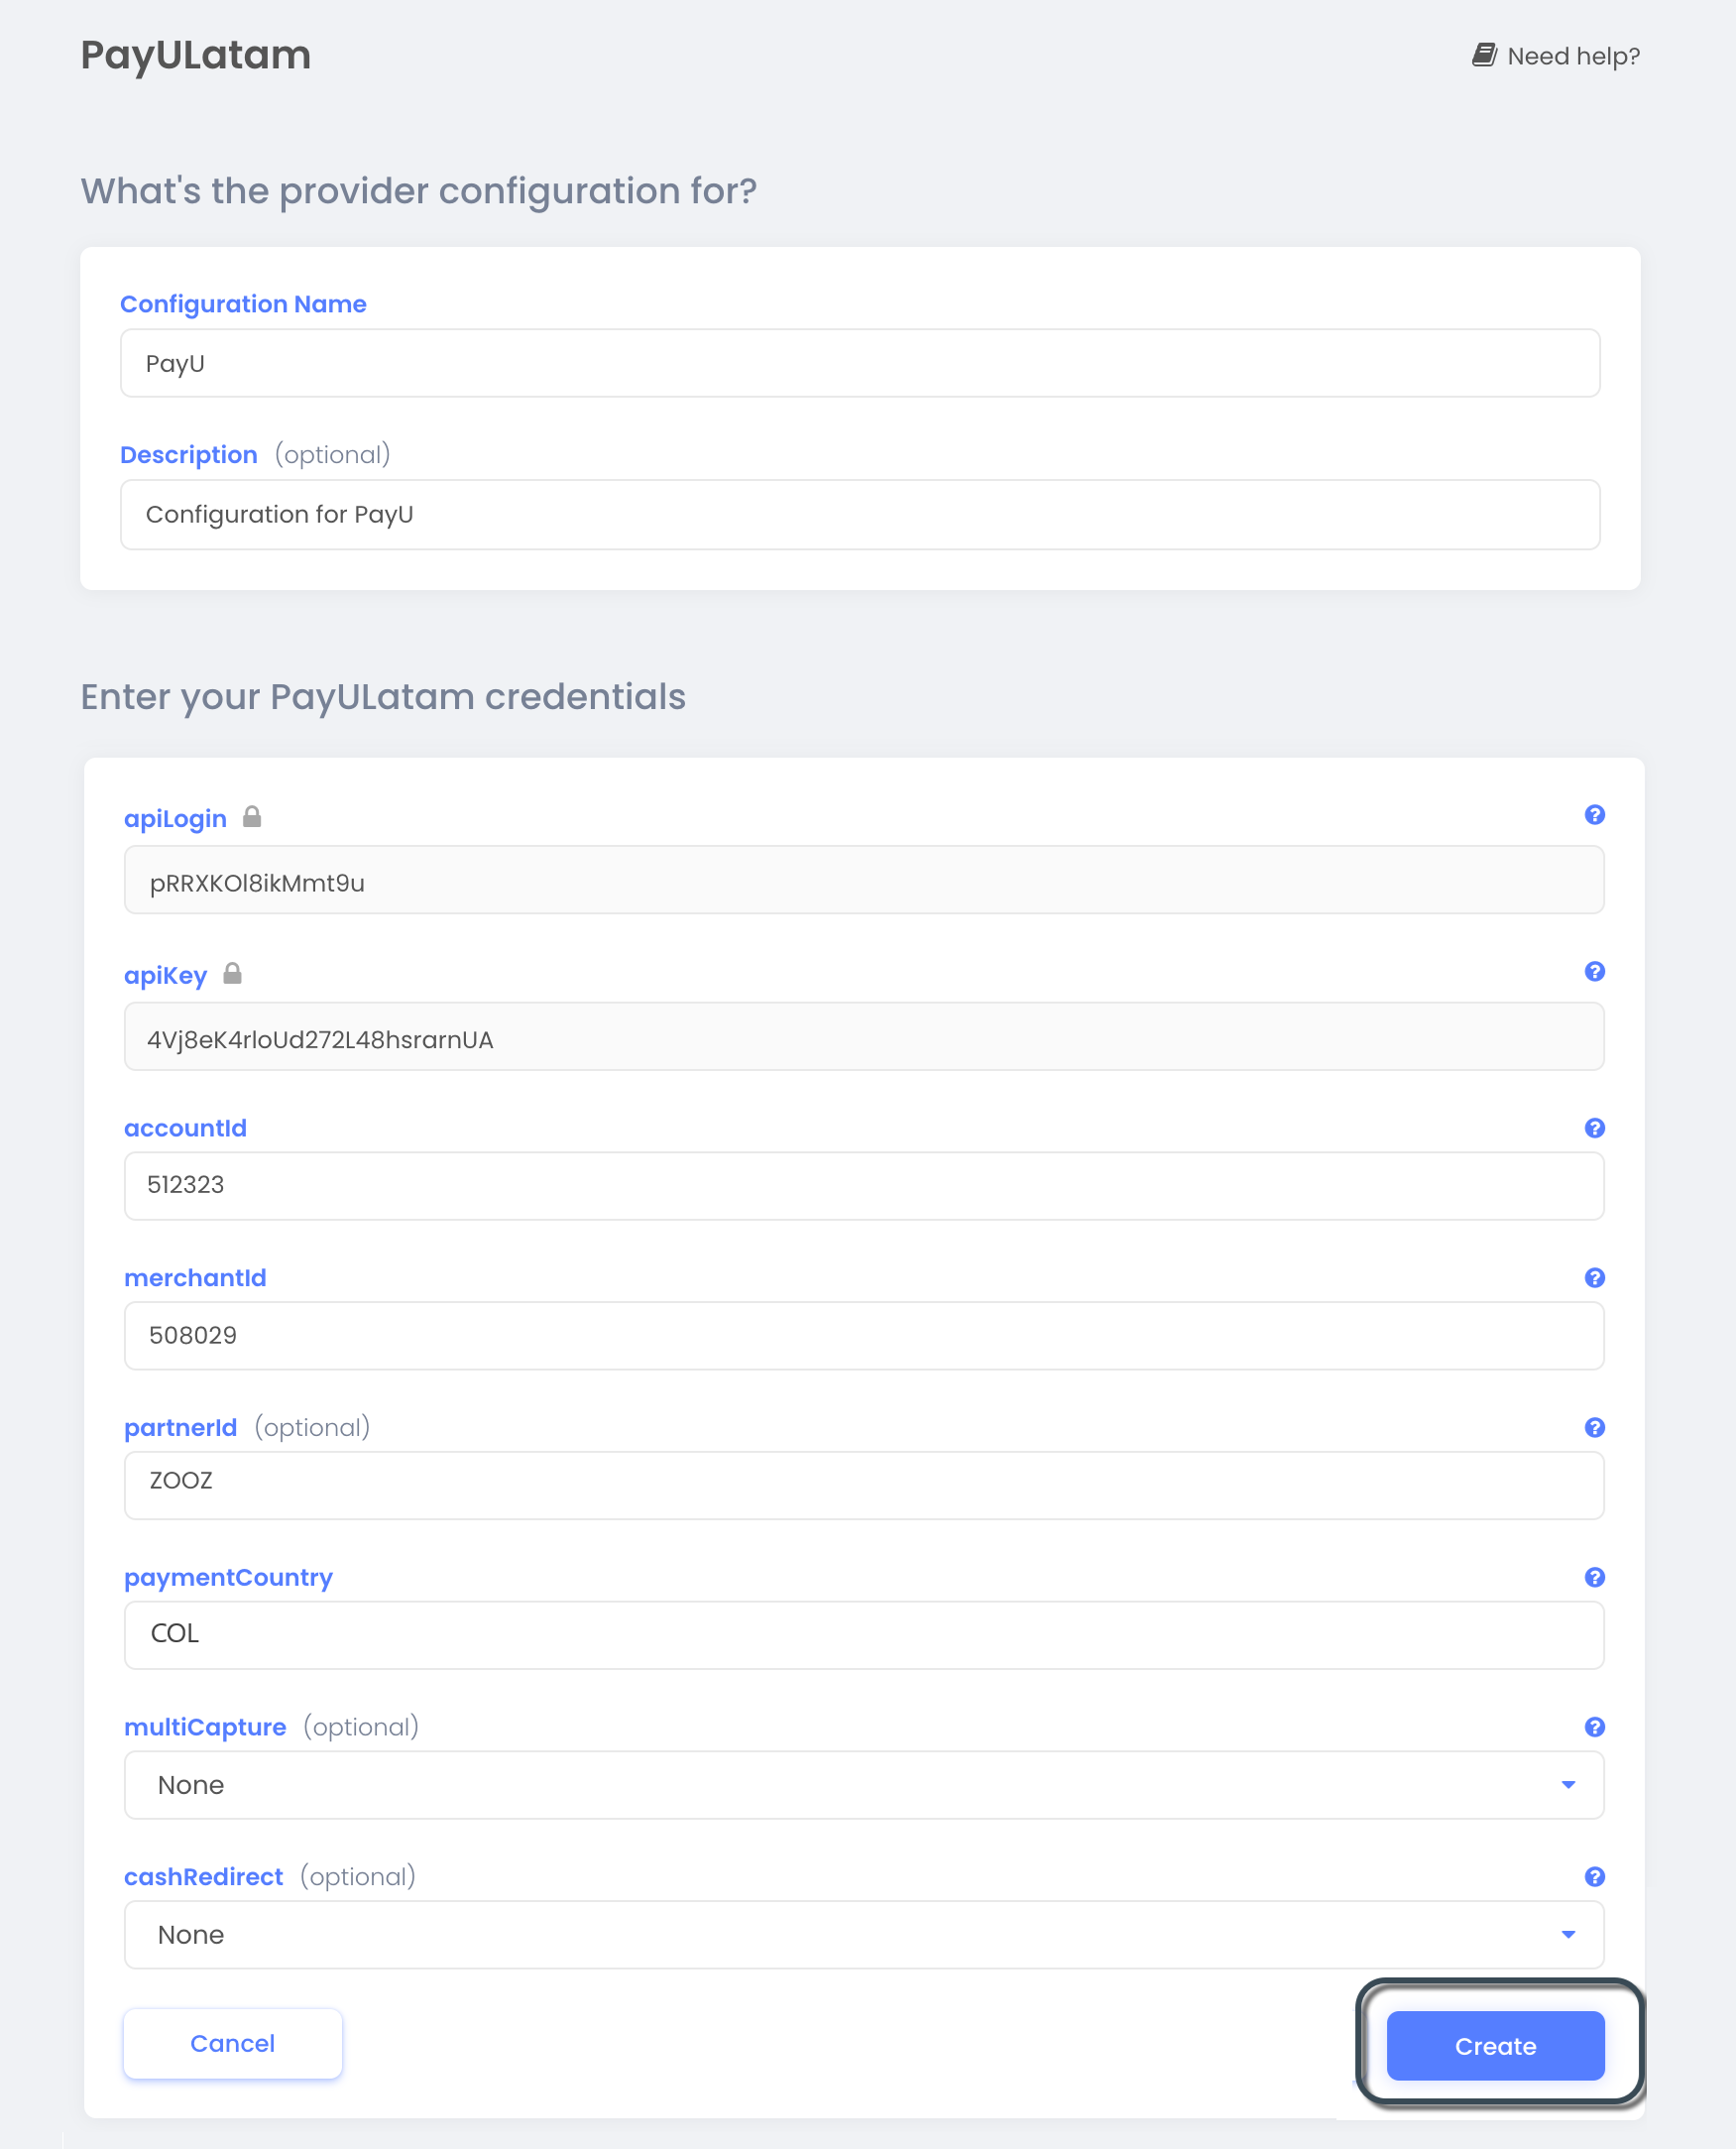
1.3 Complete the following fields:
| Field | Description |
|---|---|
| Configuration Name | Enter a name for the provider configuration. |
| Description | Provide an optional description. |
| apiLogin | Username or login provided by PayU. Get API Login |
| apiKey | Unique key of your commerce. Get API Key |
| accountId | PayU account ID based on your operating country. |
| merchantId | Your commerce ID in PayU Latam. |
| paymentCountry | The processing country in ISO 3166 Alpha-3 format. |
| cashRedirect | Select true to ensure the correct order flow for cash payments in VTEX.Note: This configuration is essential for merchants processing cash payments with VTEX. |
1.4 Click Create.
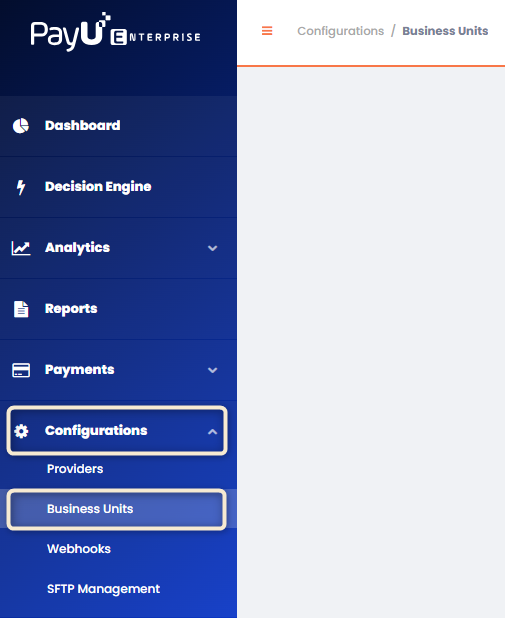
- Create the Business Unit
A business unit links the provider configuration with PayU Enterprise API credentials for processing transactions. Follow these steps:
2.1 In the dashboard, go to Configurations > Business Units.
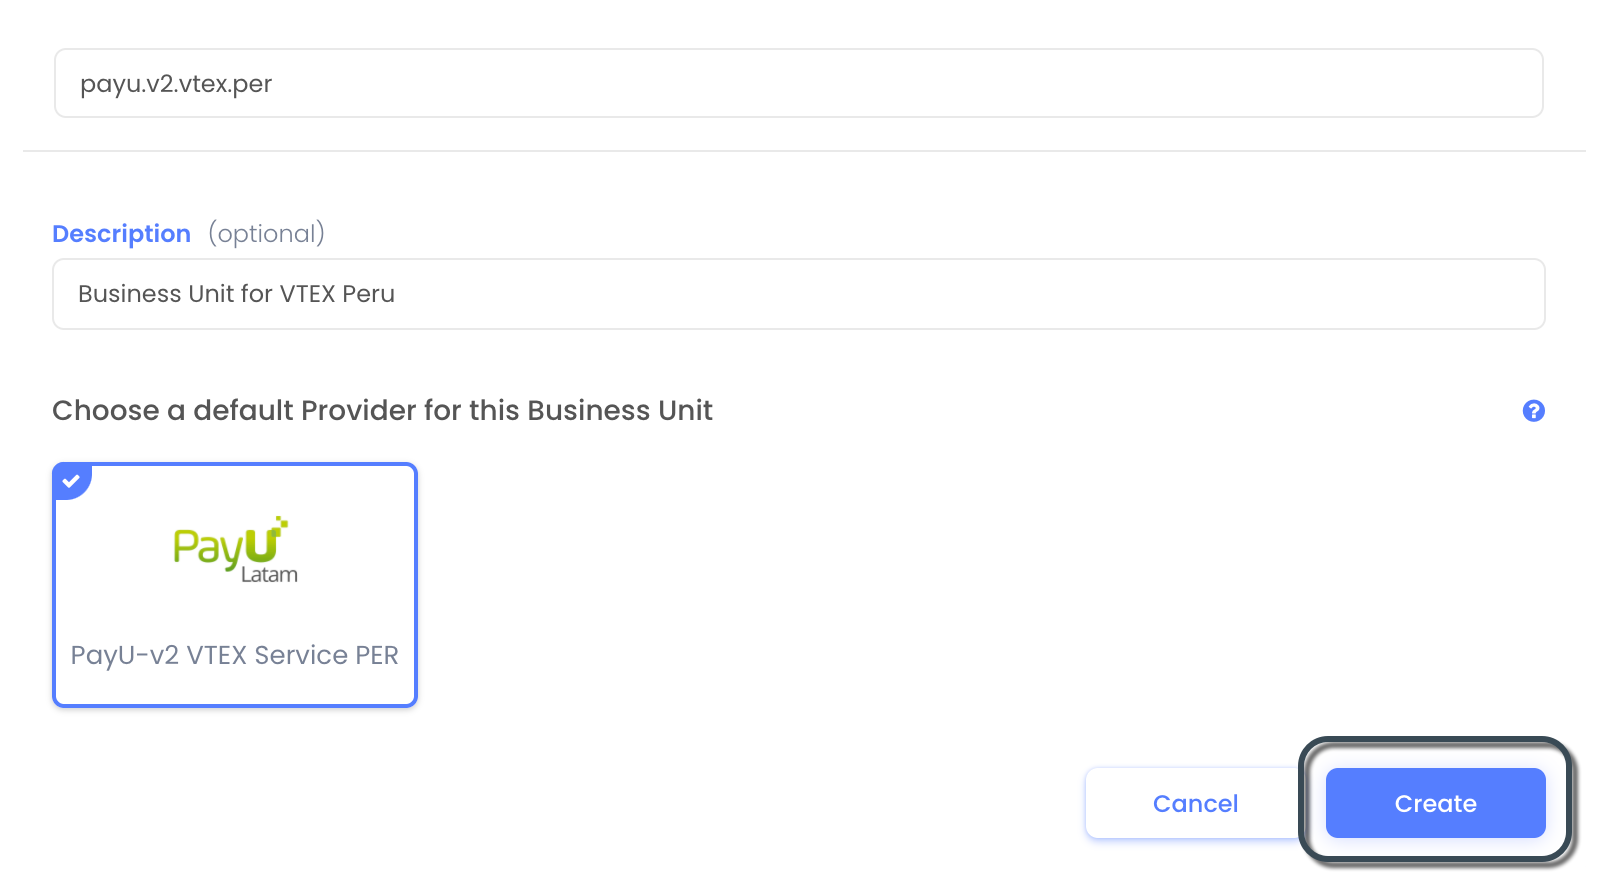
2.2 Click Create Business Unit and enter:
| Field | Description |
|---|---|
| Business Unit Name | Must be lowercase and contain no spaces. This value cannot be changed later, so ensure accuracy. |
| Description | Optional description. |
2.3 In the Choose a Default Provider for This Business Unit section, select the Provider Configuration created in Step 1. Once done, click Create.
- Create the Webhook
The webhook receives notifications from VTEX when a transaction changes status. Follow these steps:
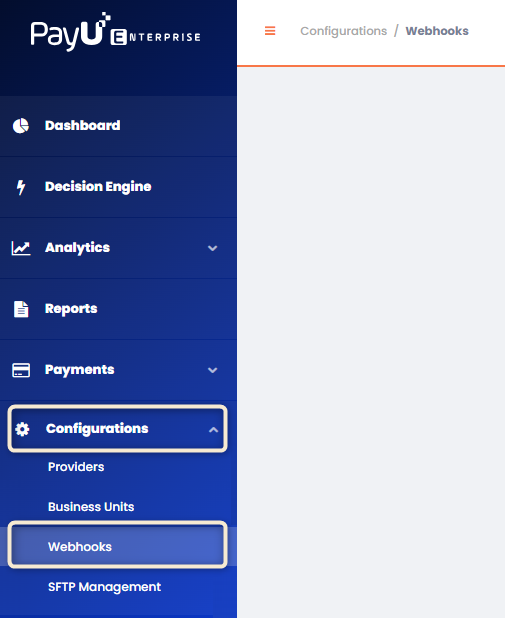
3.1 In the dashboard, navigate to Configurations > Webhooks.
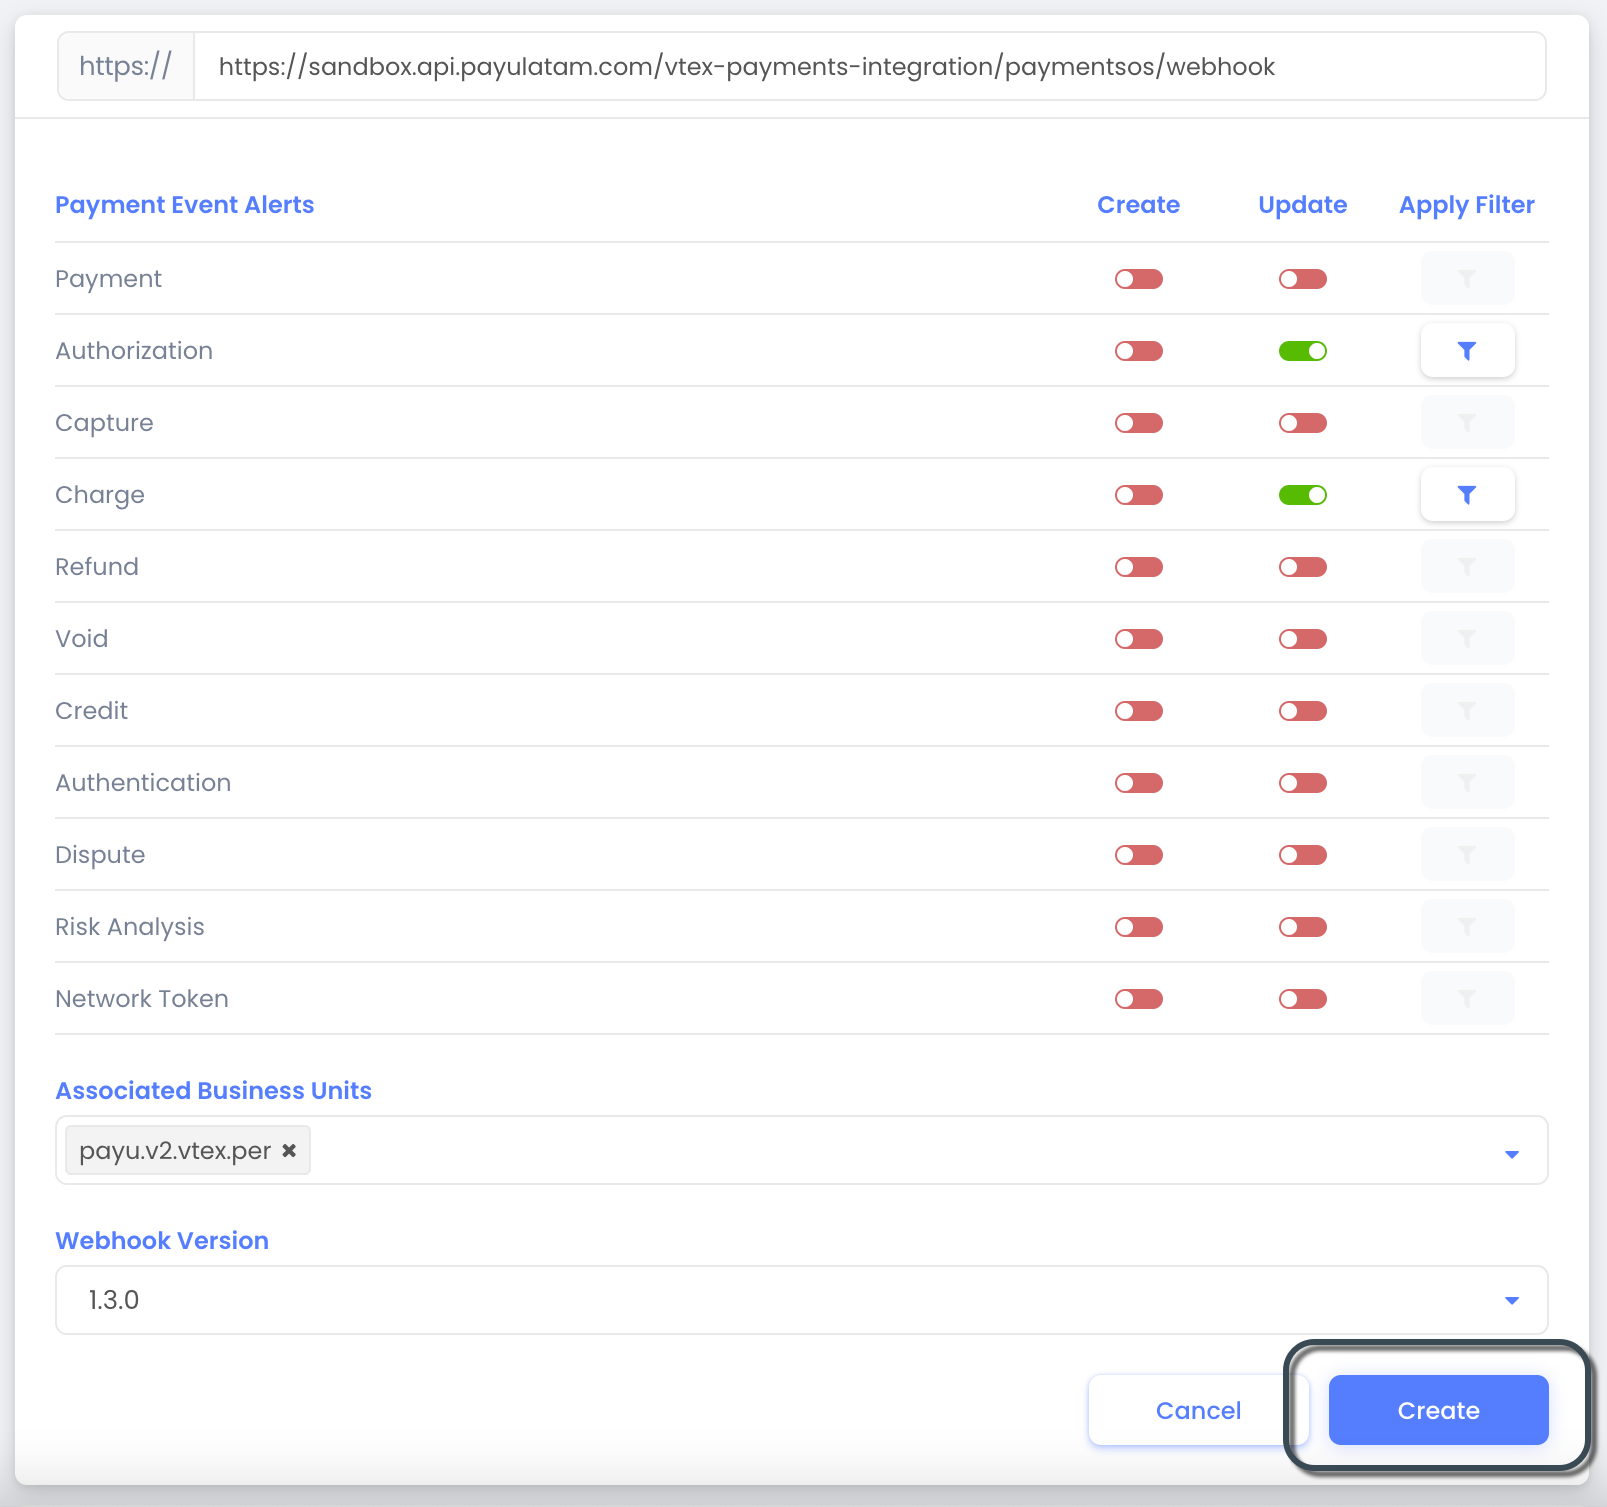
3.2 Click Create a Webhook Endpoint and enter the appropriate URL based on your environment:
- Test:
https://sandbox.api.payulatam.com/vtex-payments-integration/paymentsos/webhook - Live:
https://api.payulatam.com/vtex-payments-integration/paymentsos/webhook
3.3 In the Payment Event Alerts table, enable the Update slider for Authorization and Charge. Then, in the Associated Business Units field, enter the Business Unit created in the previous step. Finally, click Create.
At this point, your PayU Enterprise account using PaymentsOS is fully configured. The next step is configuring the VTEX provider.
2. Configuring the VTEX Provider
Once you have configured your PayU Enterprise account, the next step is to configure the VTEX provider for each payment method. To proceed, you must have a valid user account to access the VTEX admin.
Creating a New Provider
Note
Before creating the new provider, make sure you have configured fingerprint for PayU. To do so, refer to this guide.- Log in to the VTEX administration panel and go to Store Settings > Providers > New Provider:
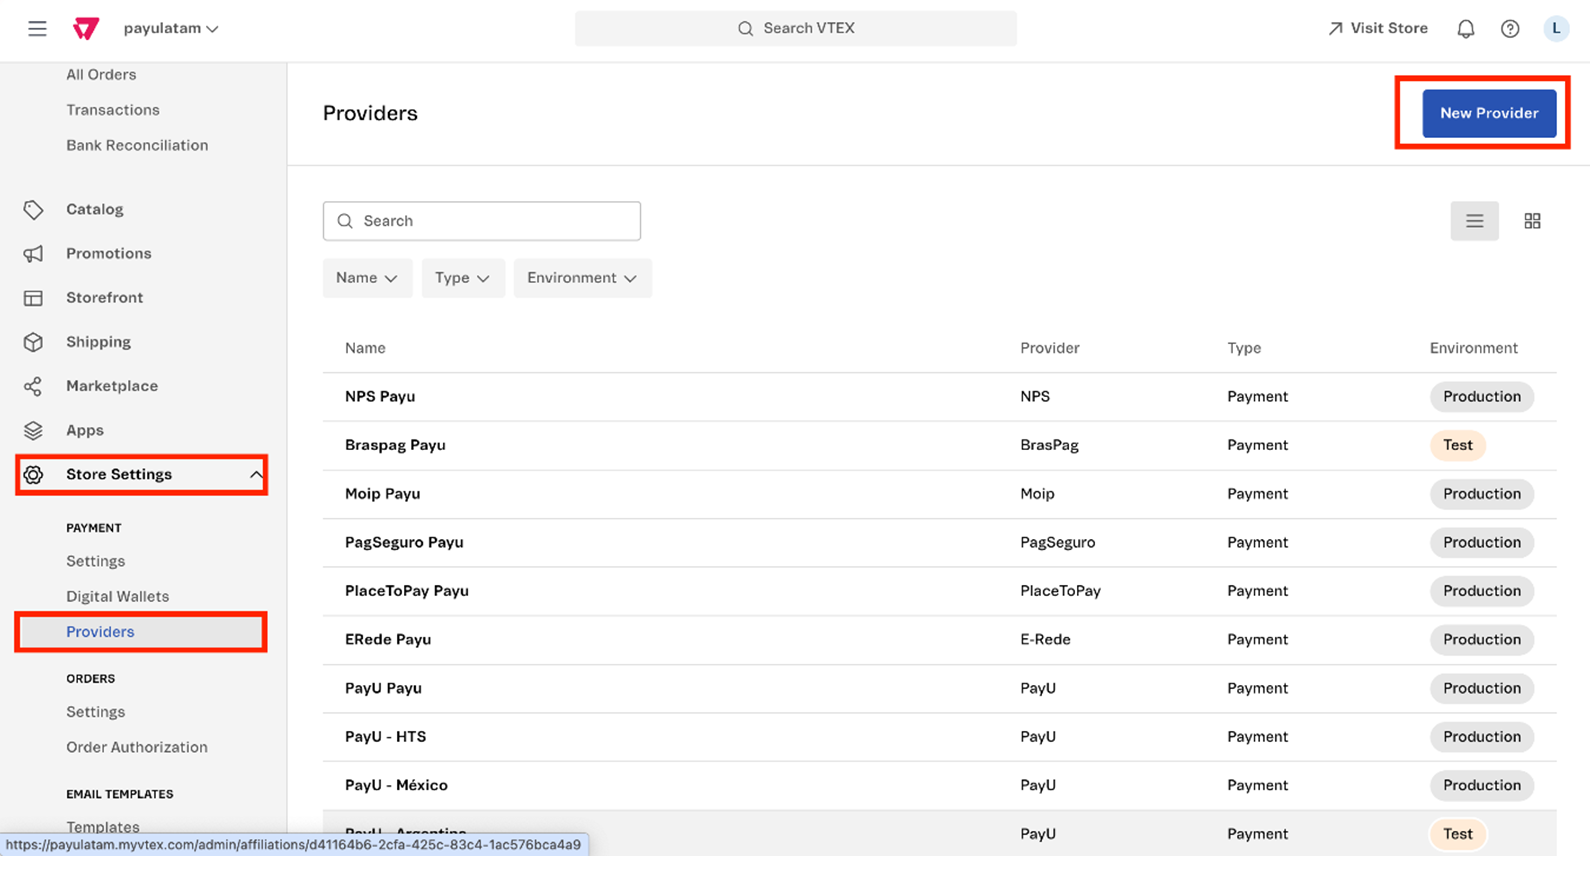
- Locate PayU, and select PayUv2:
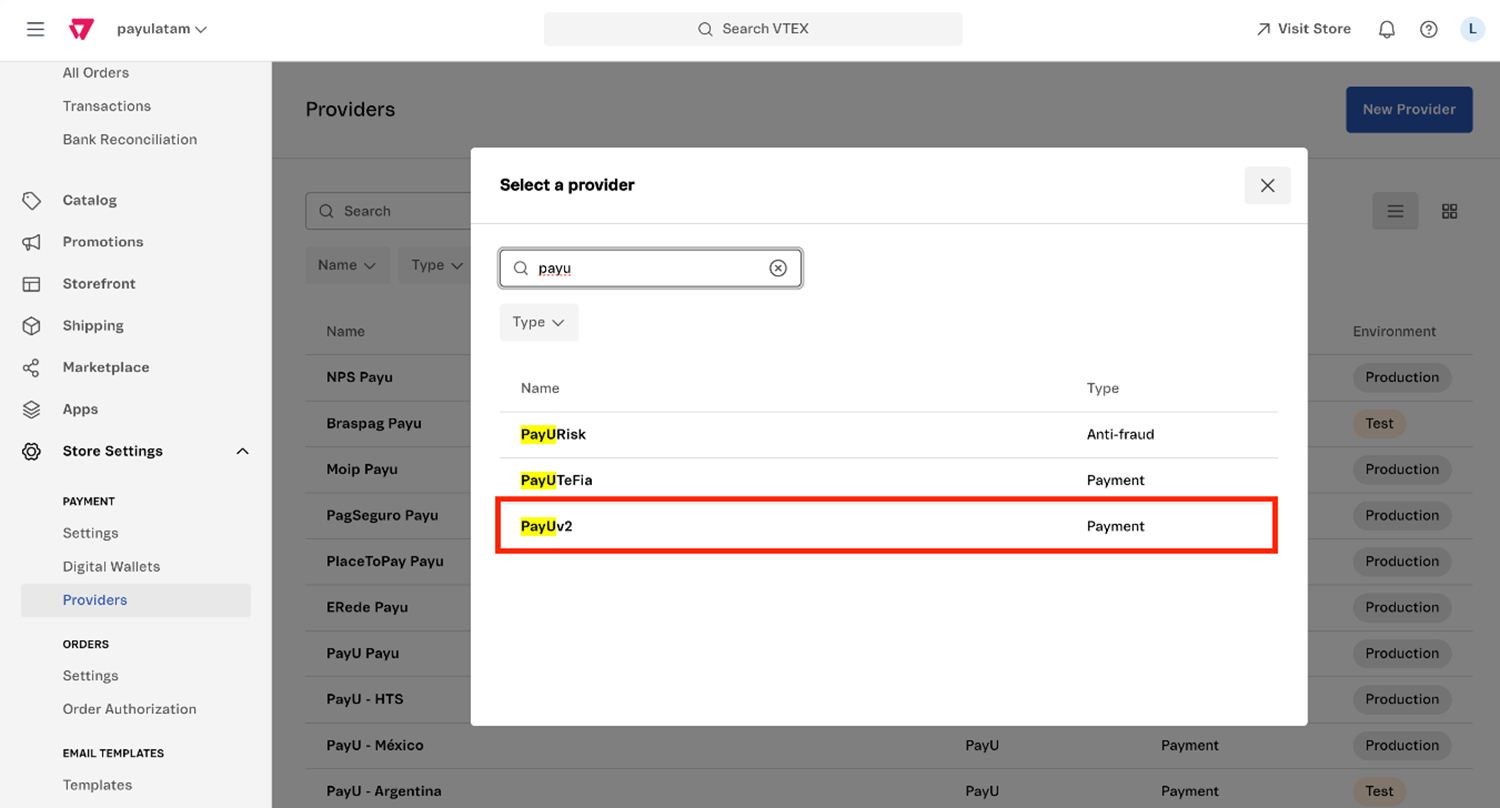
Important
Ensure you select PayUv2, as this guide applies specifically to this version.- Complete the following form:
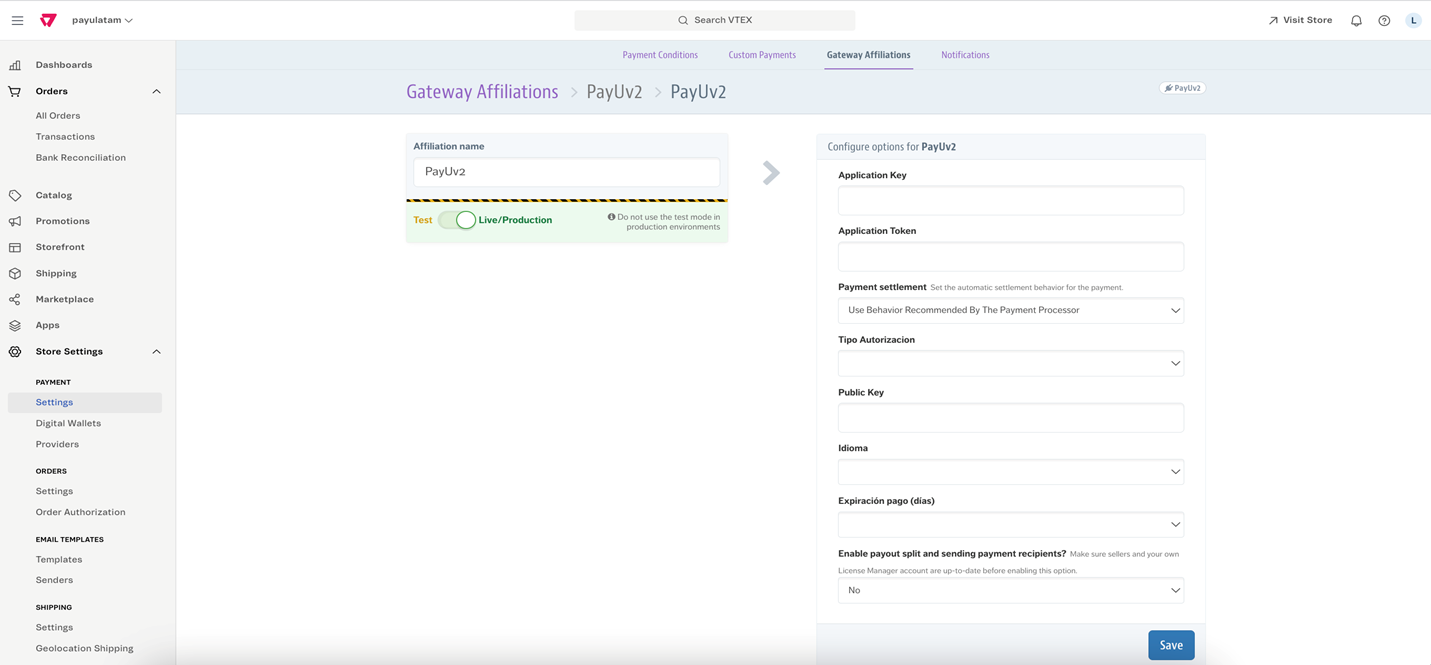
Note
Provider information can be obtained from either:
- Postman collection: Run the Retrieve Authentication Keys method, setting the global parameter
envtotestorlive, depending on your processing environment. - PayU Enterprise dashboard: Navigate to Account > Business Units, and select the Business Unit created in Configuring Your PayU Enterprise Account. Use the selector at the top to choose the processing environment.
Some values are hidden by default; click the eye icon to reveal them.
| Field | Description |
|---|---|
| App key | App ID of the Business Unit. |
| App token | Private API key of the Business Unit. |
| Name | Name used to identify the Gateway affiliation. |
| Enable test mode | Check this box to perform test transactions. |
| Automatic settlement | Choose how to settle (charge) payments:
For more details, refer to Custom Auto Capture Feature. The default auto-capture timeframe is seven (7) days after approval. |
| Enable payout split and send payment recipients? | Select No. |
| Tipo Autorizacion | Choose between one-step and two-step payment flows:
Refer to Payment flows for more information. |
| Tipo de devolución | Determines how the refund is processed when a return is initiated from VTEX:
|
| Public Key | Public API key of the Business Unit. |
| Idioma | Select the language for order issuance. Supported languages:
|
| Expiración pago (días) | Defines the validity period for cash payments. Important: This value must match the Promissory note validity field in the Configure cash payment methods section. |
- Click Save to complete the setup.
Configuring Captures in a Two-Step Flow
This section explains how to capture authorized orders in VTEX V2 using a two-step payment flow (authorization followed by capture). It includes a step-by-step guide for capturing either the full or a partial amount of an order.
Prerequisites
Before you can capture orders, ensure the following settings are in place:
- PayU Account Configuration: Your PayU account must be enabled for two-step processing. For more information on how to enable this payment flow, contact your PayU sales representative.
- VTEX Payment Affiliation (PayUv2): The PayUv2 provider payment affiliation in VTEX must be configured for two-step processing, which involves authorization followed by settlement (capture).
- Automatic settlement: Set to
Disabled. - Authorization type: Set to
Pre-Authorization.
- Automatic settlement: Set to
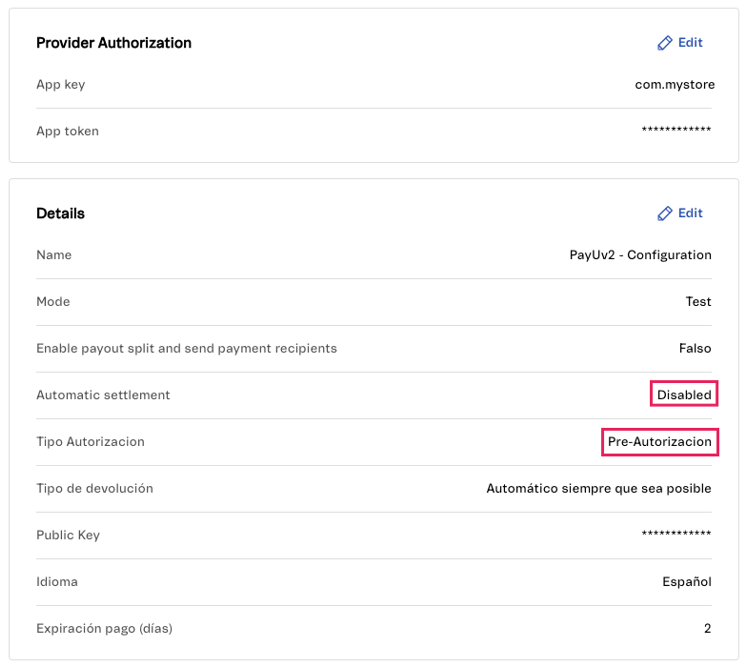
Note
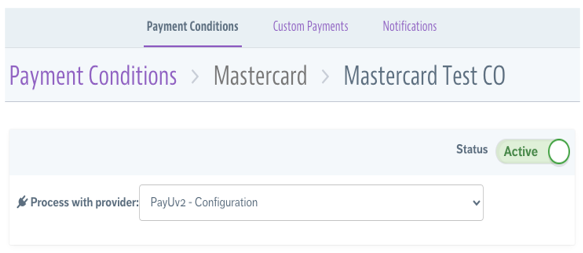
If you don’t intend to capture amounts that are lower or higher than the original authorization, you can enable Automatic settlement to capture the order immediately after authorization, or schedule the capture by defining a timeframe in hours.- Payment Condition: Ensure the relevant payment condition is enabled with the PayUv2 affiliation.
Initiating a Capture
Once an order has an approved authorization, follow these steps in your VTEX Admin:
- Access the Order: Open your VTEX Admin panel and select the authorized order.
- Update Order Status:
- If the order’s status is “Cancellation window,” click the “Ready for handling” button to update it.
- Next, update the order using the “Start handling” option.
After completing these steps, the order’s status will change to “Handling,” indicating it’s ready for capture. You can then capture the full amount, or a modified (lower or higher) amount.
Capturing the Full Amount
To capture the entire authorized amount:
- Select the Invoice option on the order.

- Choose Send single invoice.
- Enter the invoice number in the details section.
- Click Save invoice.
Upon completion, the settlement process will finalize, and the full authorized order amount will be captured.
Capturing a Lower or Higher Amount
VTEX offers two methods to capture an amount different from the original authorization:
A) Changing Order Items
This method allows you to adjust the items in the order to reflect the desired capture amount.
- Navigate to pending invoicing within the order.
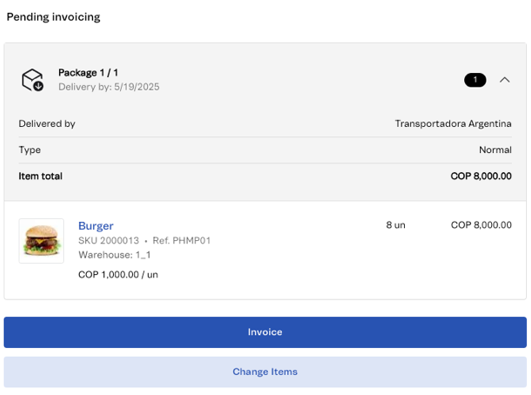
- Select the Change items option.
- Adjust Items:
- To capture a lower amount, decrease the number of existing items or remove them.
- To capture a higher amount, increase the number of items or add new ones.
- Finalize Capture:
- After modifying the items, select the Invoice option on the order.
- Choose Send single invoice.
- Enter the invoice number in the details.
- Click Save invoice.
This action will complete the settlement, and the integration will capture the modified amount.
B) Changing the Final Order Amount
This method allows for a direct adjustment of the order’s total value.
- Go to the order and select the Change final amount option.
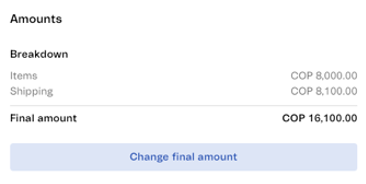
- Adjust Amount:
- To capture a lower amount, enter the value you wish to discount from the total.
- To capture a higher amount, enter the value by which you want to increase the order.
- Finalize Capture:
- After modifying the amount, select the Invoice option on the order.
- Choose Send single invoice.
- Enter the invoice number in the details.
- Click Save invoice.
This will complete the settlement in VTEX.
Understanding PayU Transactions after Capture
Here’s how transactions will appear in PayU based on your capture actions:
- Full Amount Capture (No Adjustment): If you did not adjust the order value, you will see two transactions in PayU: an authorization and a capture for the total value.
- Lower Amount Capture: If you adjusted the order to capture a lower amount, you will see two transactions in PayU: an authorization and a partial capture.
- Higher Amount Capture: If the captured amount is higher, you will see four transactions: the initial authorization and its capture, plus an additional authorization for the excess amount and its respective capture.
Configuring Payment Methods
Configure the payment methods that will be displayed on the website during checkout. View the available payment methods.
Important
- Changes to payment conditions may take up to 10 minutes to reflect in the checkout flow.
- PIX is not available for Brazil when using VTEX.
Configuring Credit or Debit Cards
Depending on your processing country, you can configure the affiliation you created to use credit or debit cards*. Follow the steps below to add this payment method to your VTEX store.
* The availability of debit cards depends on your processing country.
Important
Click here to learn how to configure Co-branded or Private Label cards.-
Log in to the VTEX administration panel and go to Transactions > Payments > Settings.
-
Select the Payment Conditions tab and click the plus icon.
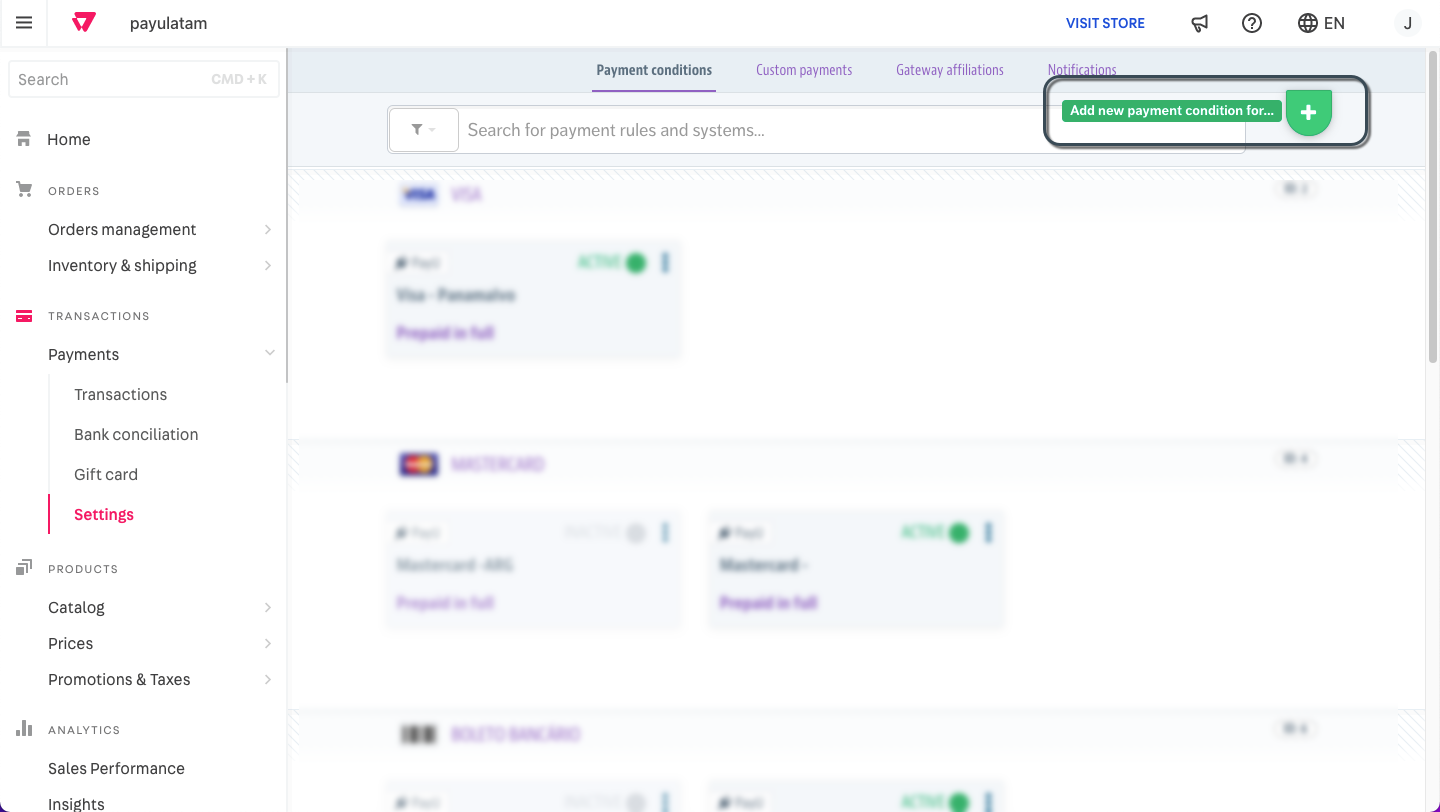
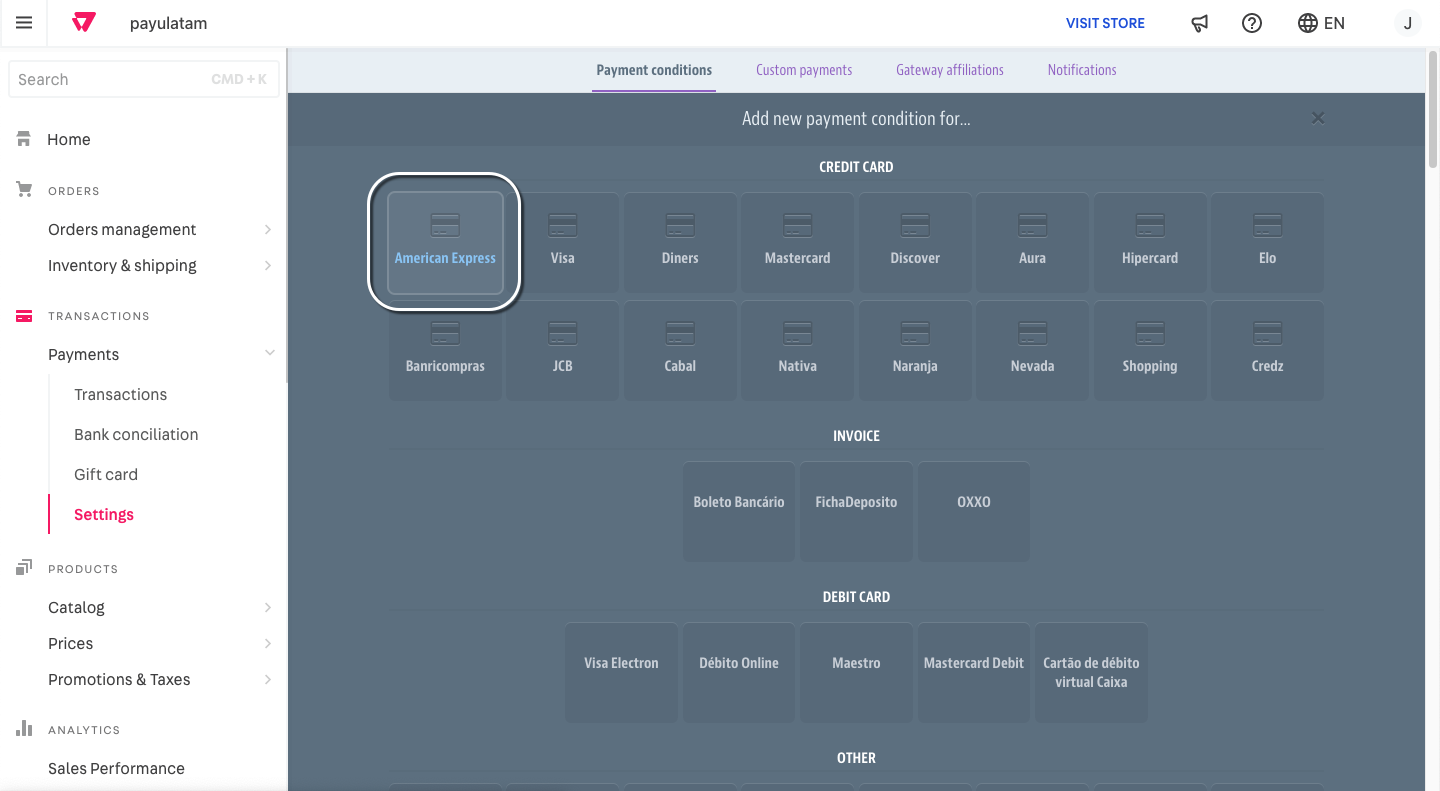
- Select the payment method you want to add. Payment methods are grouped by type.
For this example, we select American Express under the Credit Card section.
- Provide the following details:
- Rule Name (to help you quickly identify): Enter a descriptive name for the payment condition.
- Status: Set the payment condition’s status. You can have only one active payment condition per payment method.
- Process with affiliation: Select the previously configured gateway affiliation.
- Prepaid in full or in installments?: Select Prepaid in full.
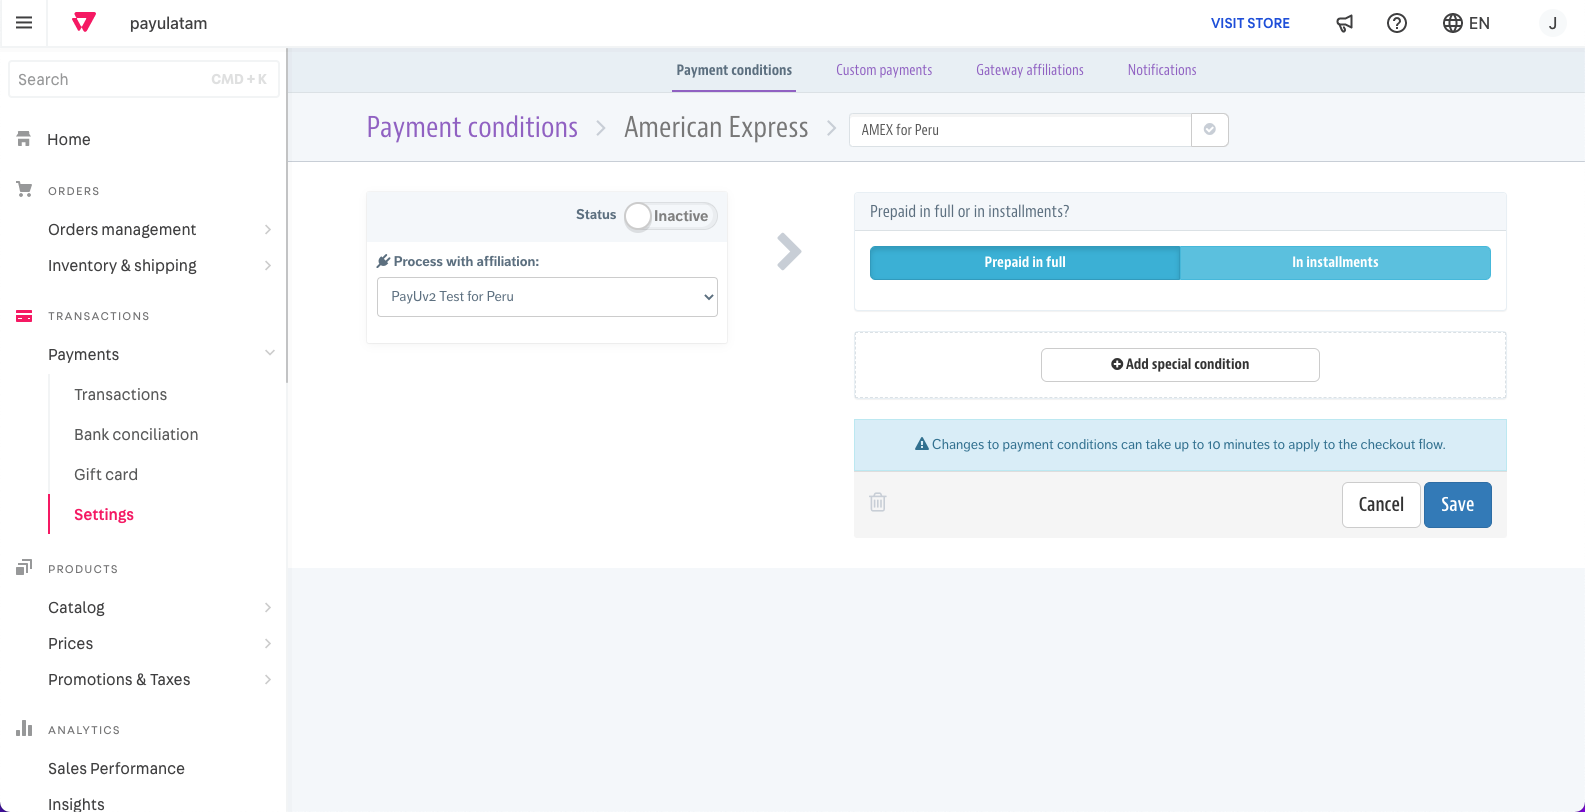
- Click Save. The new payment condition will now be listed in the Payment Conditions tab.

Configuring Co-Branded or Private Label Cards
Co-branded and private label cards are credit cards issued by a store or brand, sometimes in partnership with networks like AMEX, VISA, or MasterCard. Follow these steps to add this payment method to your VTEX store.
-
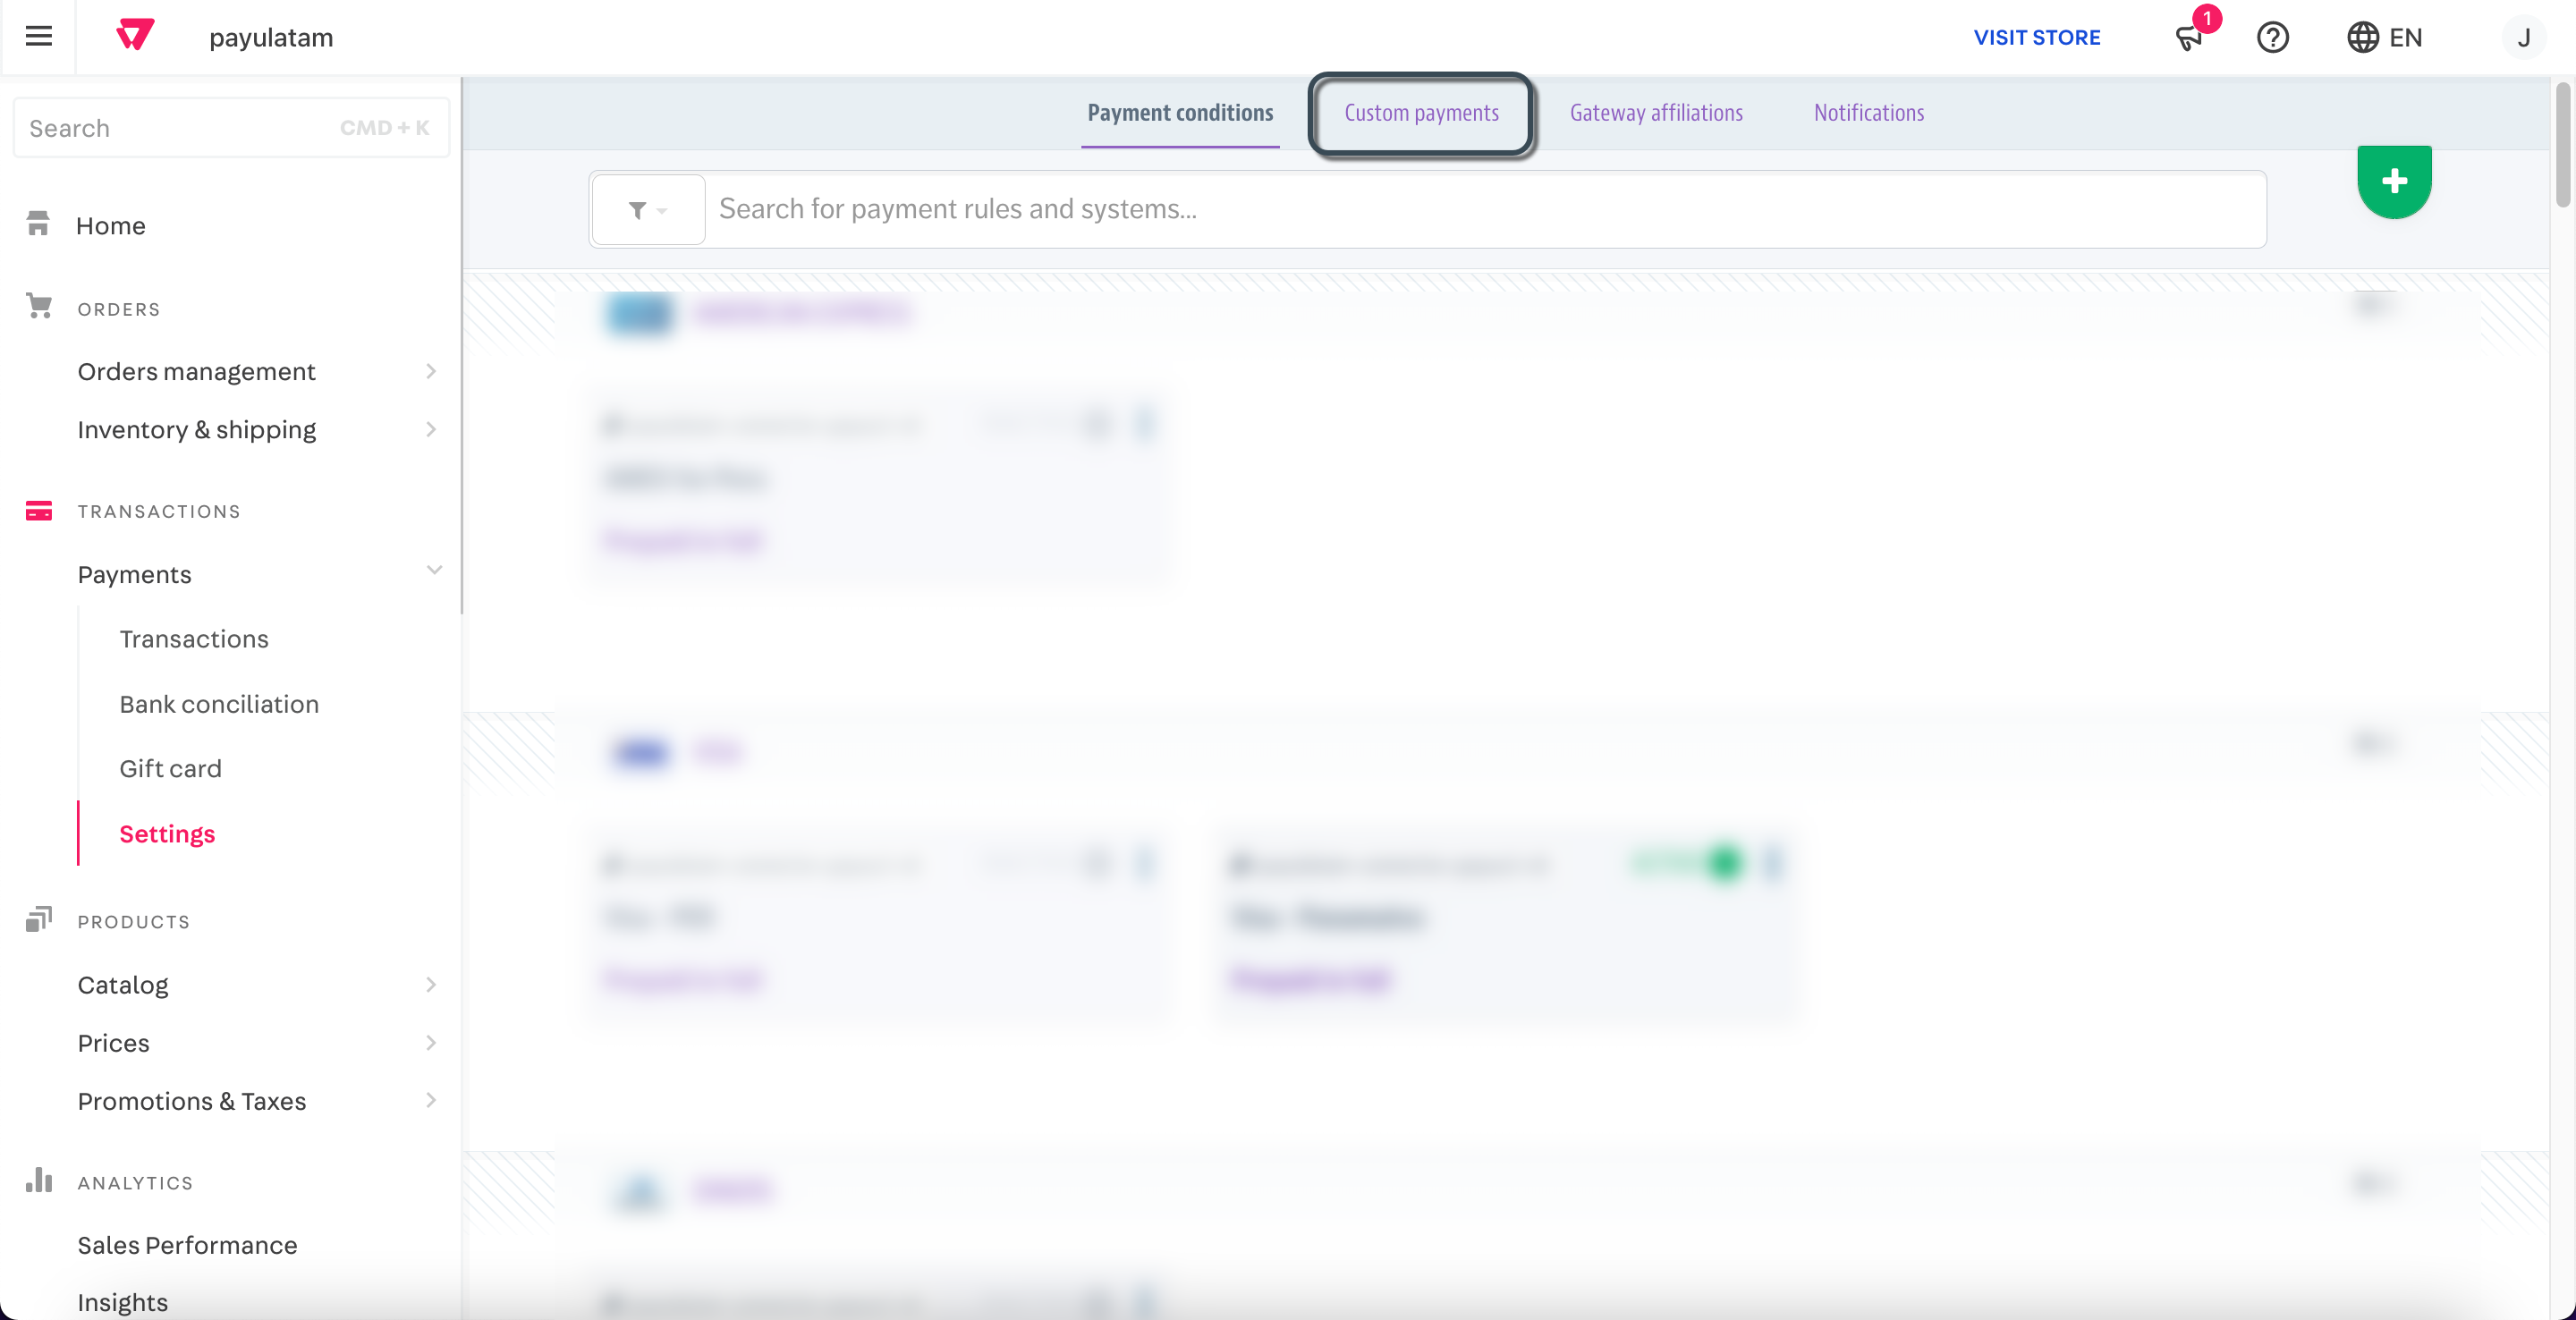
Log in to the VTEX administration panel and go to Transactions > Payments > Settings.
-
Select the Custom Payments tab.
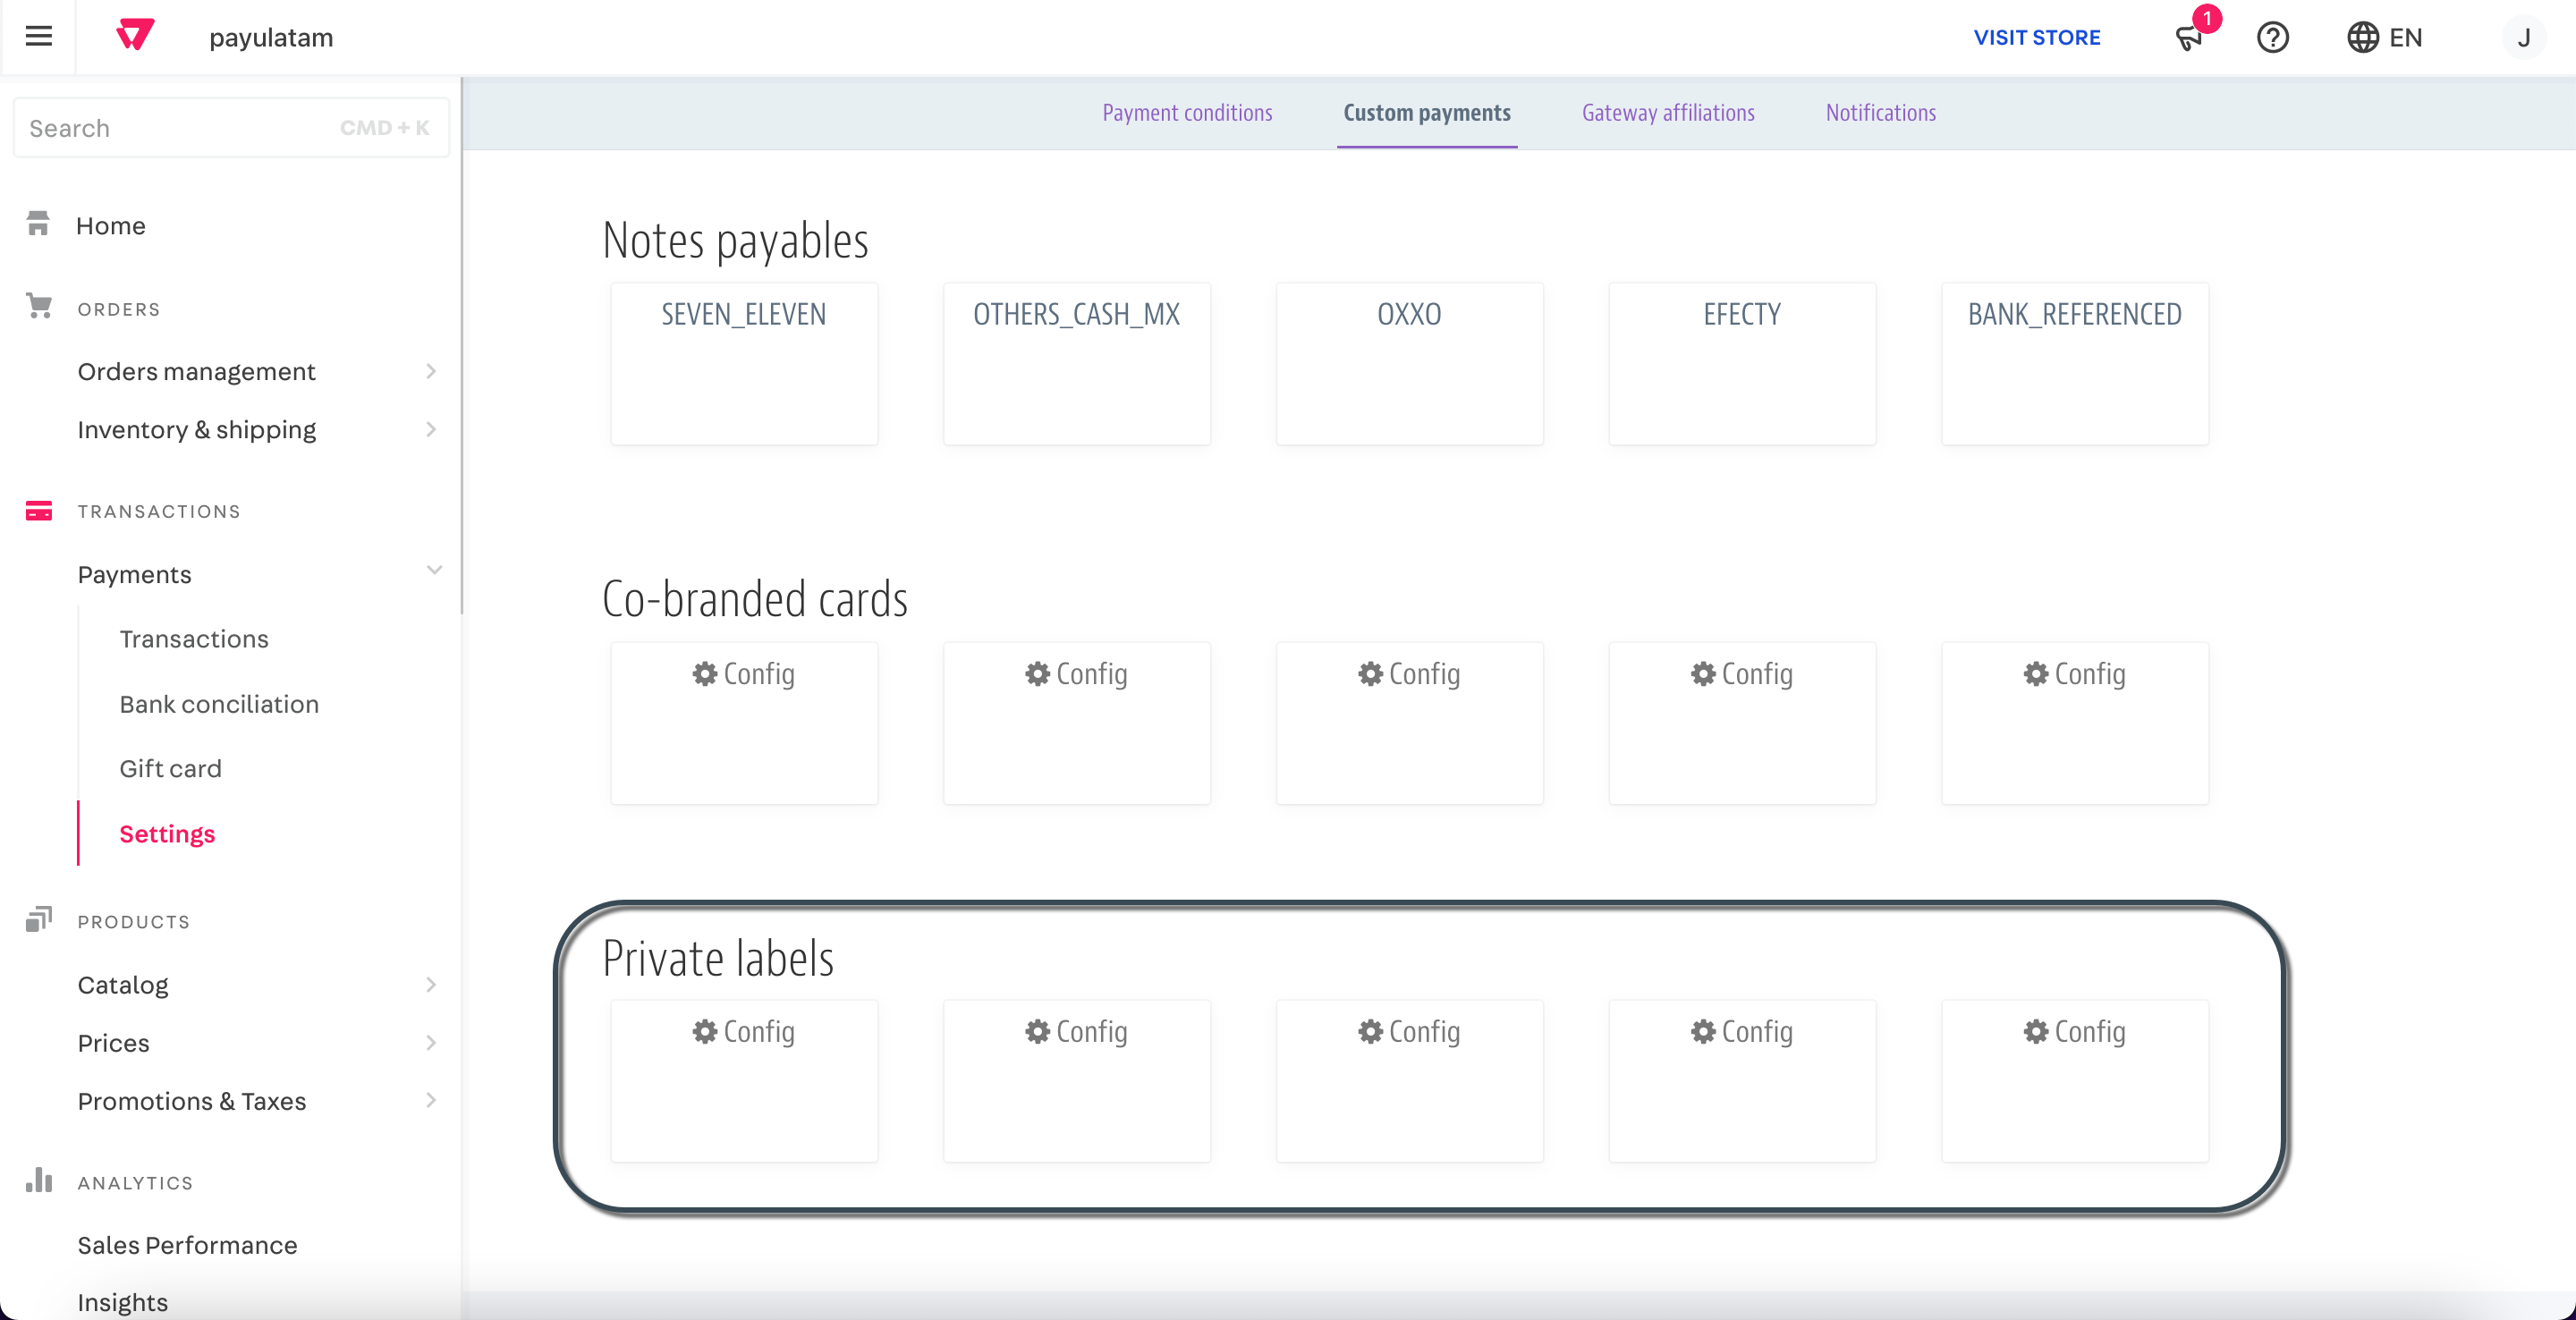
- The Custom Payments tab provides five (5) slots for configuring co-branded and private label cards. In this example, we configure the Colombian card Codensa, which is a private label card.
Click any available box in the Private Labels section.
- Enter the following card details, maintaining the exact formatting:
- Name:
Codensa. - Description:
Codensa - BIN ranges:
590712-590712 - Acquirer payment code:
codensa
Note
For co-branded cards, you must also select the card brand.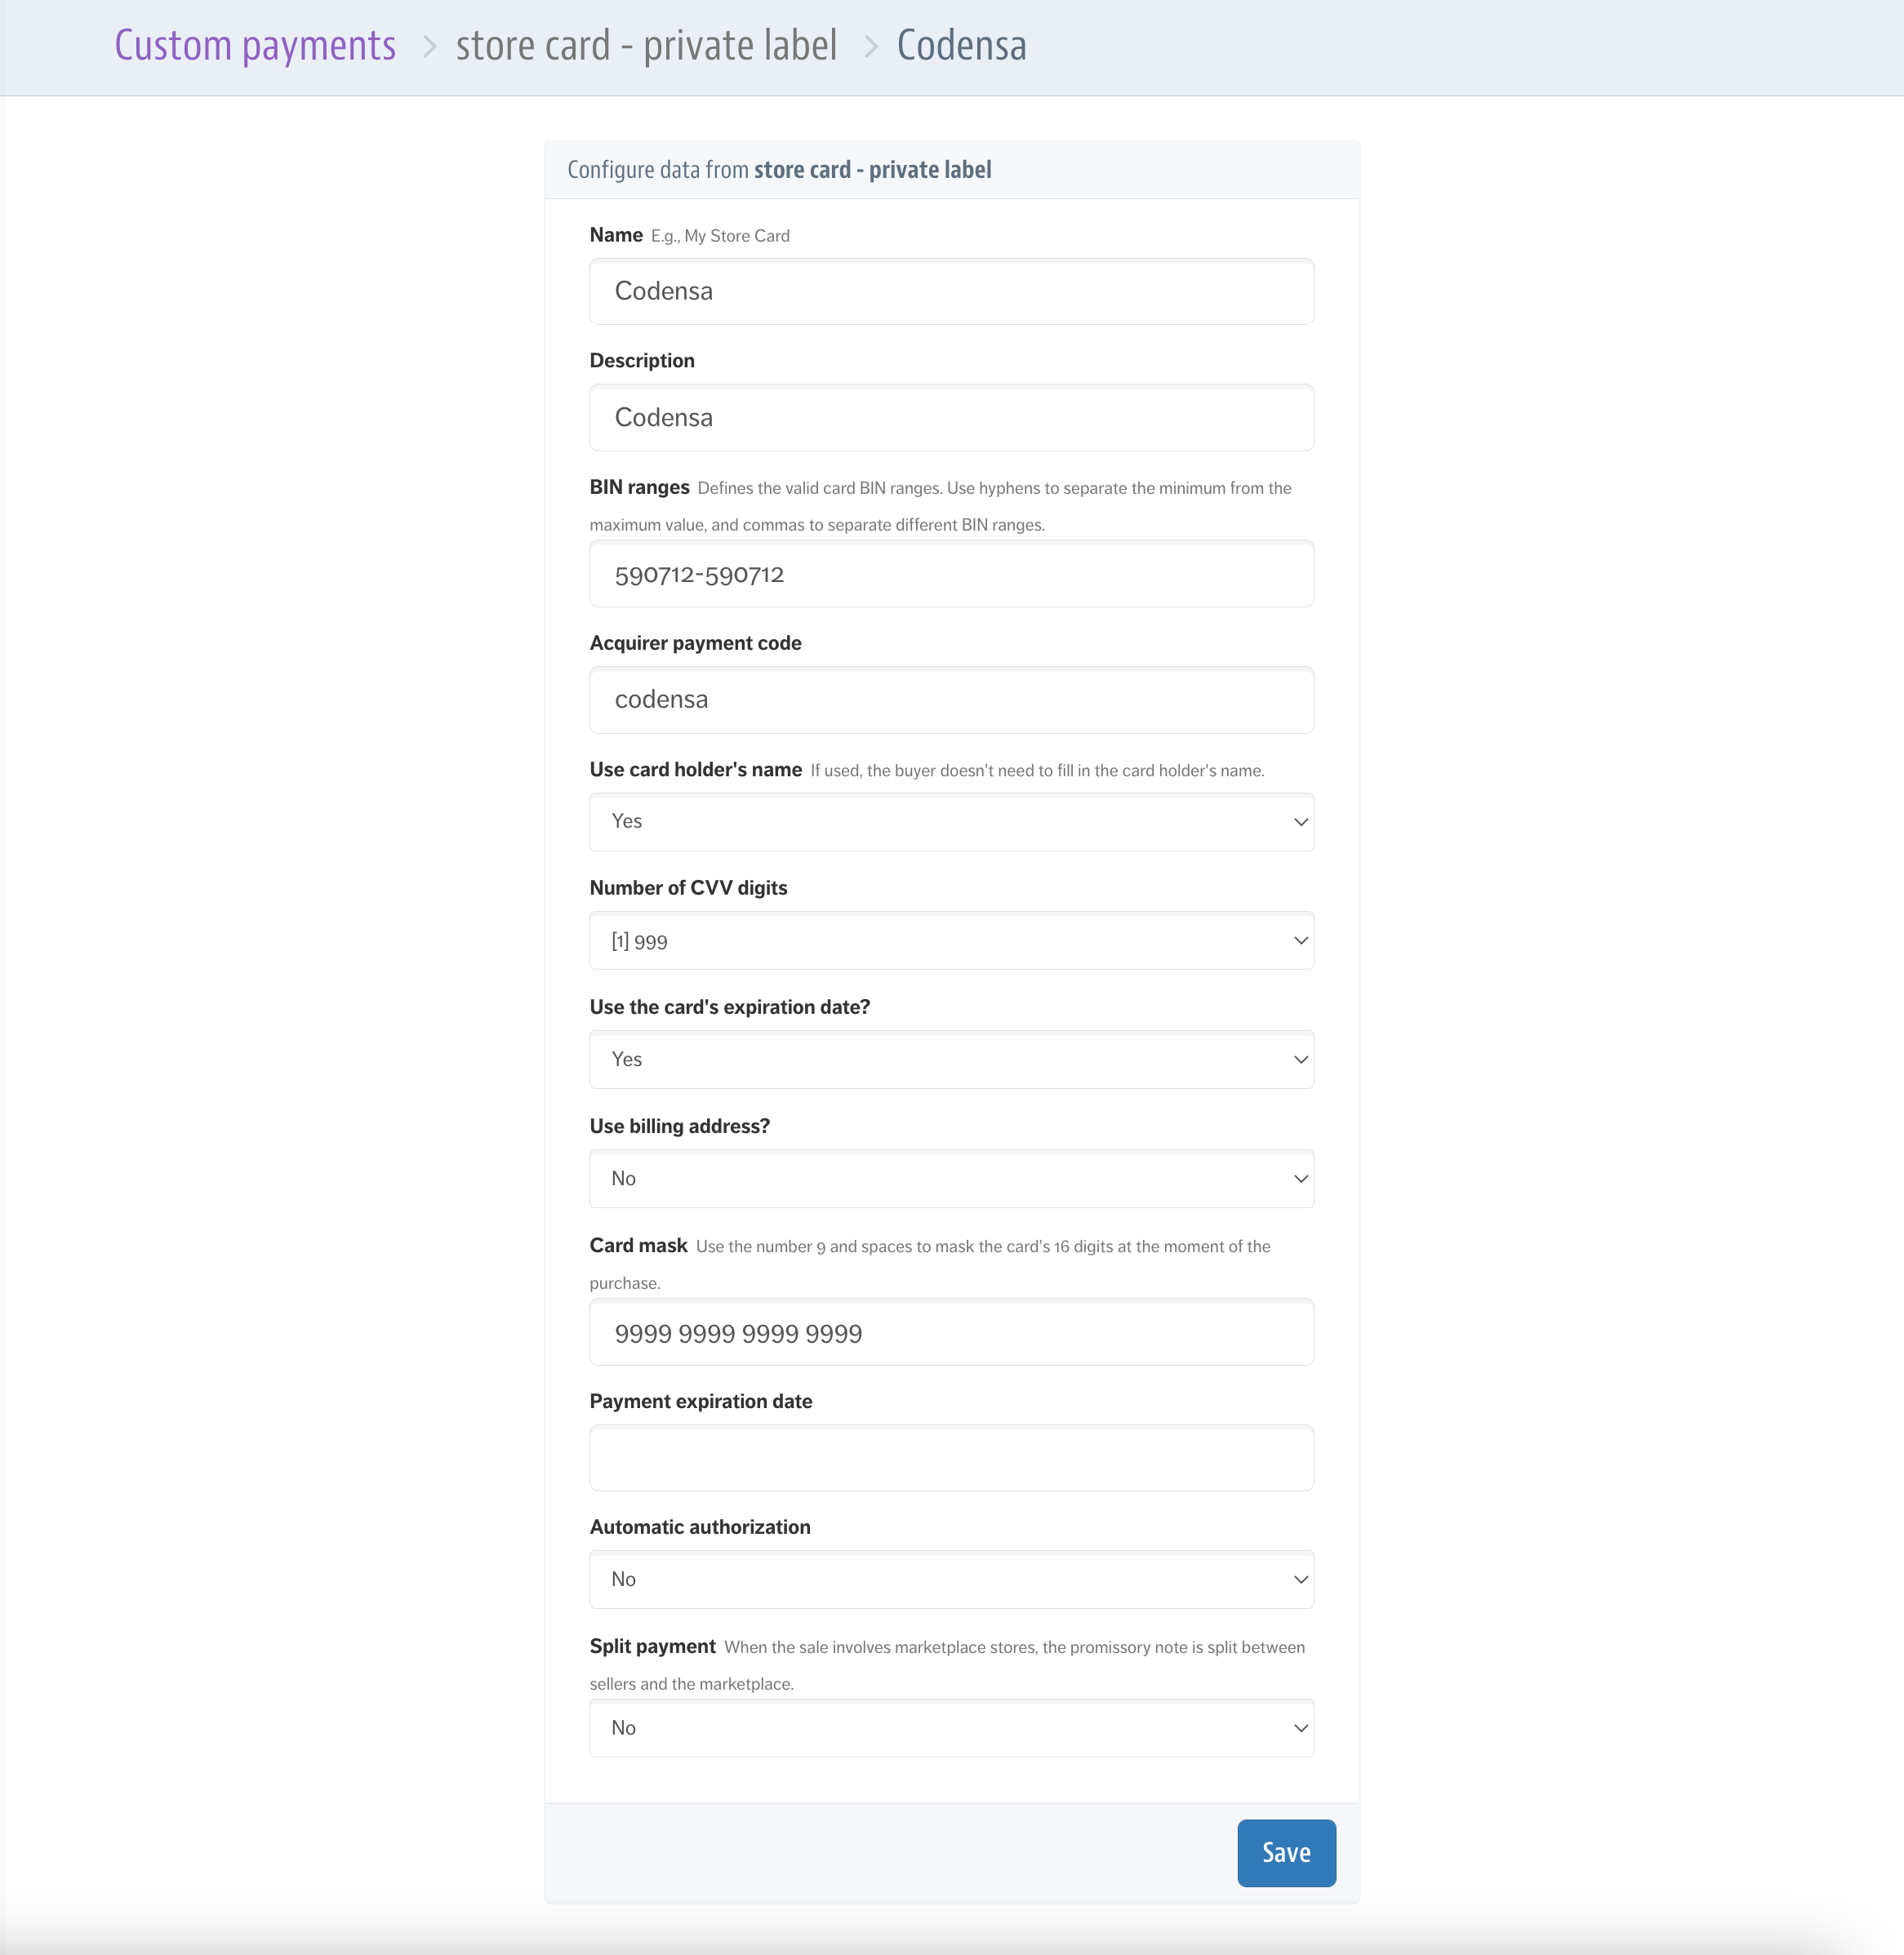
Use the table below to configure co-branded and private label cards, you can leave the remaining values with their default input.
| Country | Name | Description | BIN ranges | Acquirer payment code |
|---|---|---|---|---|
|
Argencard | Argencard | 501105-532362 |
argencard |
|
Cabal | Cabal | 60423,60400,589657 |
cabal |
|
Cencosud | Cencosud | 603493-603493 |
cencosud |
|
Naranja | Naranja | 589562 |
naranja |
|
Shopping | Shopping | 603488 |
shopping |
|
Codensa | Codensa | 590712-590712 |
codensa |
For more details on configuring co-branded and private label cards, visit the VTEX Help Center.
- Click Save. After creating the custom payment, you will be redirected to the option for creating a Payment Condition. Follow the instructions in the Configuring Credit or Debit Cards section to complete this step.
Configuring Google Pay
Google Pay is a digital wallet that enables customers to complete transactions quickly and securely using cards saved in their Google accounts. Integrating Google Pay into your VTEX store via PayU helps enhance the shopping experience, reduce checkout friction, and boost conversion rates.
Note
When customers pay using Google Pay, PayU processes the transaction as a standard credit or debit card payment, depending on the card type. No additional fees apply beyond those already agreed upon.Prerequisites:
- Ensure Google Pay is active in your PayU account. Contact your PayU account executive or email tecnico.co@payu.com if you have questions about this requirement, mentioning that you are a VTEX merchant requesting Google Pay.
- Card payments must be enabled in your VTEX configuration.
- PayU must be configured as the payment provider for your credit card transactions in your VTEX store.
Step by Step:
-
Log in to the VTEX administration panel and go to Store Settings > Digital Wallets.
-
Find the Google Pay option and toggle the slider to enable it.
-
When prompted, confirm the activation by clicking Activate.
Once activated, Google Pay will be available as a payment option at your store’s checkout. It may take up to 10 minutes for the payment method to appear.
For more information and best practices, refer to VTEX’s official guide on enabling digital wallets on the VTEX Help Center.
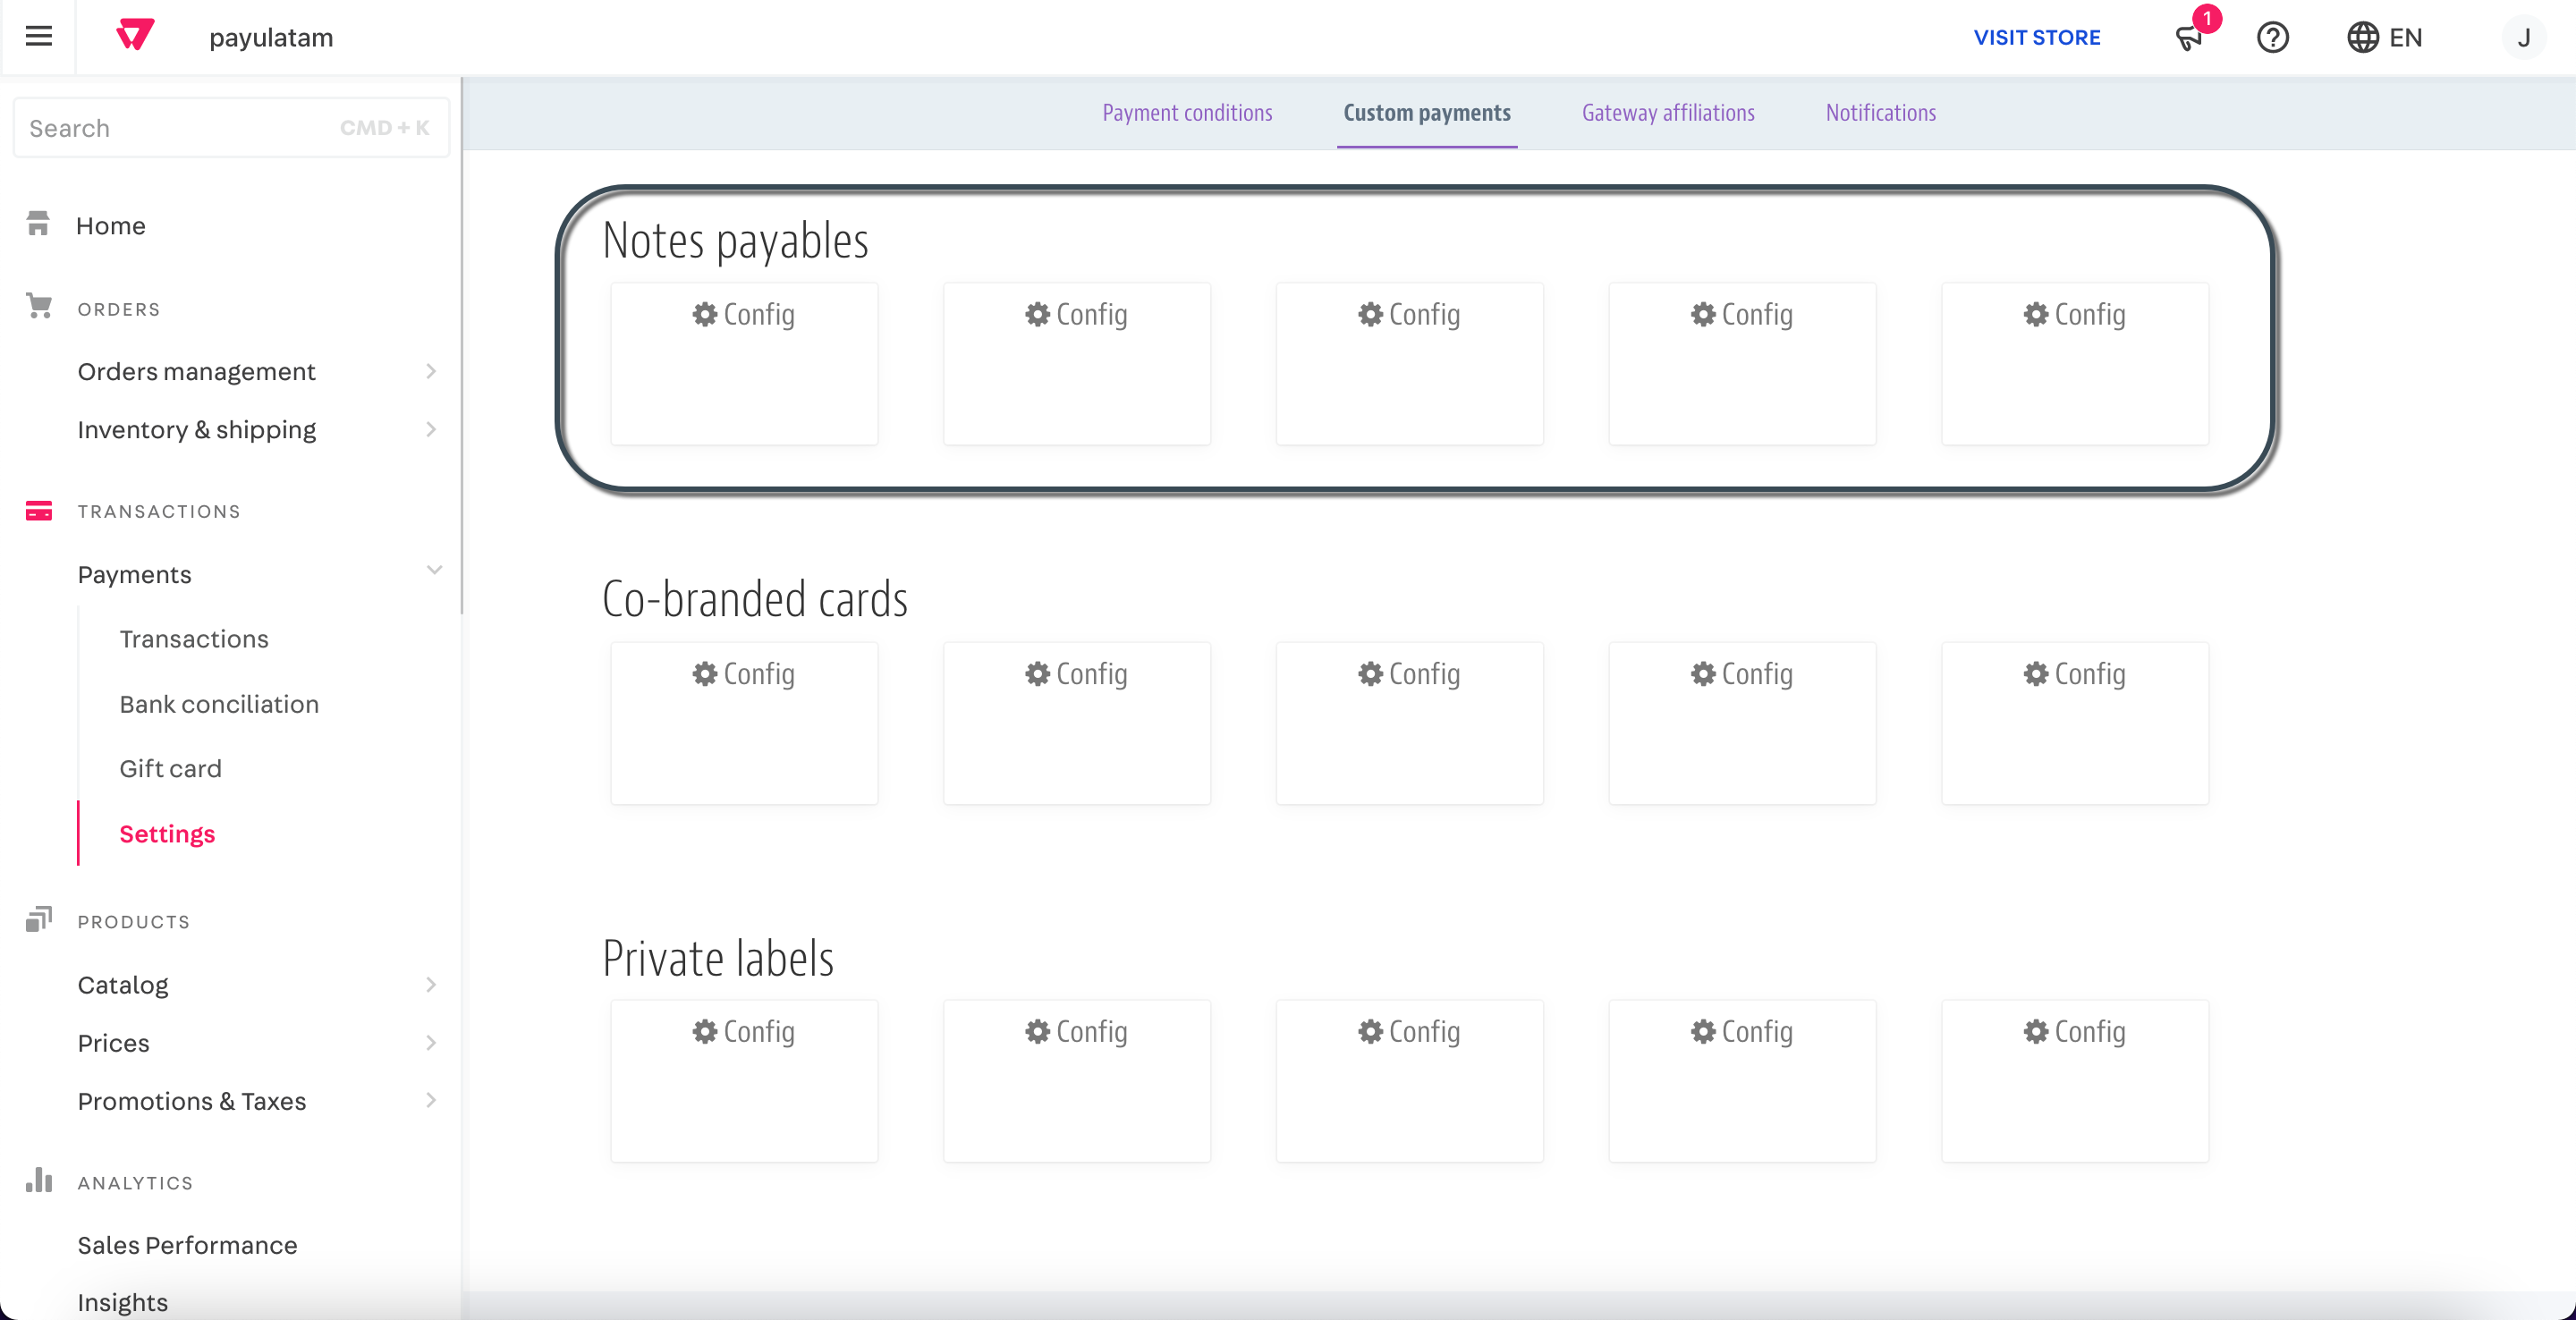
Configuring Cash Payment Methods
Since cash payments require customers to pay at physical locations, you can configure this payment method in VTEX as promissory notes (Notes Payables).
When you configure a cash payment method, customers are redirected to PayU’s checkout, where they can download the payment voucher and pay it at the corresponding physical location. Follow the instructions below to add this payment method to your VTEX shop.
Considerations:
- Ensure that all payment methods you intend to configure are enabled in your PayU account, and that their names exactly match the ones registered with PayU. Mismatched or inactive methods will cause transaction errors. If you need assistance enabling specific payment methods, contact us.
- For Boleto Bancário in Brazil, this procedure is not required. Simply locate and configure this payment method as a payment condition.
Step by Step:
-
Log in to the VTEX administration panel and go to Transactions > Payments > Settings.
-
Select the Custom Payments tab.
- In this tab, you have five (5) available slots to configure cash payment methods. In this example, we will set up OXXO, a Mexican cash payment method.
Click any available box in the Notes Payables section.
- Provide the following information:
- Name: Use the value listed here in the
paymentMethod parametercolumn. For this example, enterOXXO.- Description: Enter a description to display when the customer selects this payment method (optional).
- Notes Payable Expiration Date: Specify the number of days before the cash payment expires. The default is 7 days. Ensure this value matches the Payment Expiration (days) setting configured in the VTEX affiliation to prevent processing issues.
Leave the remaining fields with their default values.
- Click Save. Once the custom payment is created, you will be redirected to set up a new Payment Condition. Follow the instructions in the Configuring Credit or Debit Cards section.
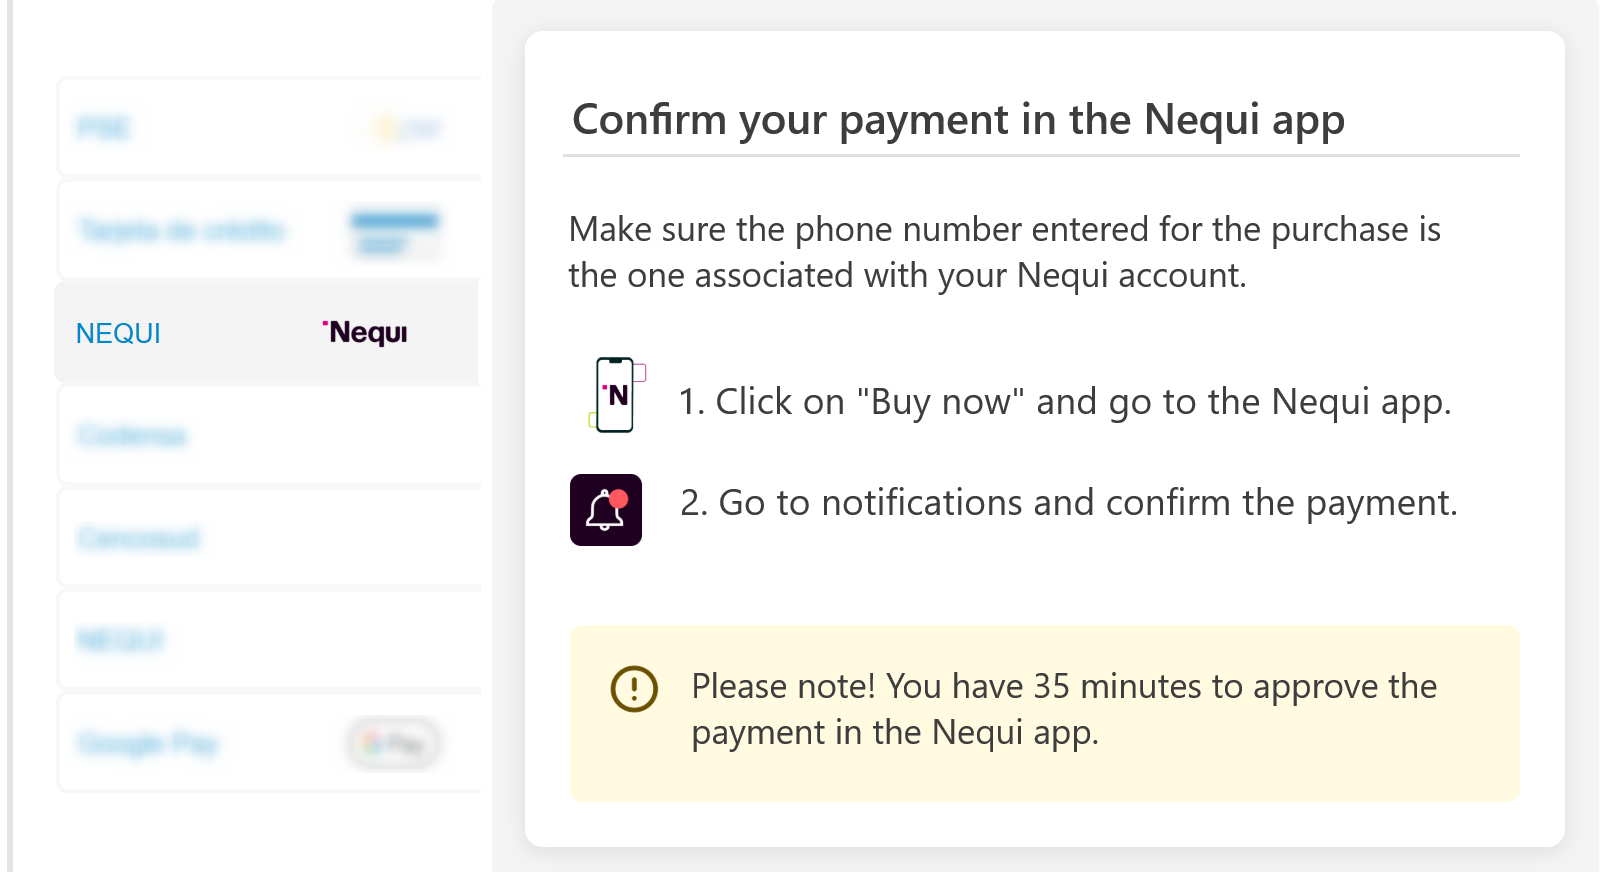
Configuring Nequi
Adding Nequi as a payment method allows your business to reach millions of users who prefer digital wallets, offering them a faster, safer, and more convenient way to pay. This can help boost sales, strengthen customer loyalty, and ensure secure transactions.
Before you begin, make sure that Nequi is enabled in your PayU account and that the payment method name matches exactly as registered with PayU. Any mismatch or inactive status will result in transaction errors. If you need help enabling Nequi, please contact us.
Step by Step:
-
Log in to the VTEX administration panel and go to Transactions > Payments > Settings.
-
Select the Payment Conditions tab and click the plus icon.
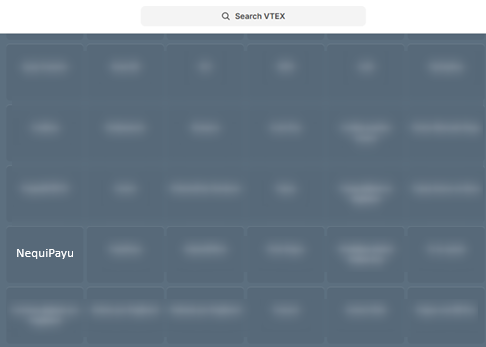
- Search for NequiPayu using the search bar, then select it to open the settings interface.
- In the settings interface:
- Set NEQUI as the condition name
- Choose the provider
- Enable the payment method
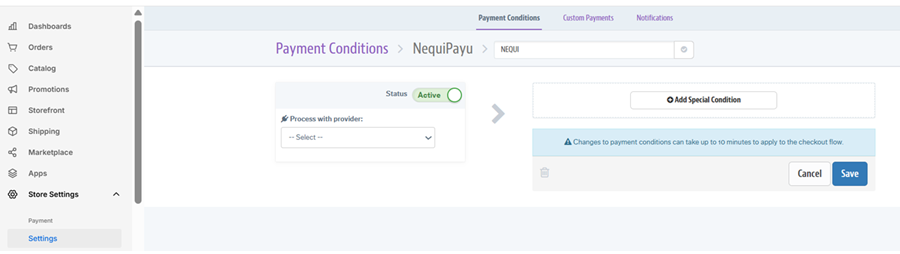
- Click Save. Confirm that Nequi appears in the Payment Conditions tab.
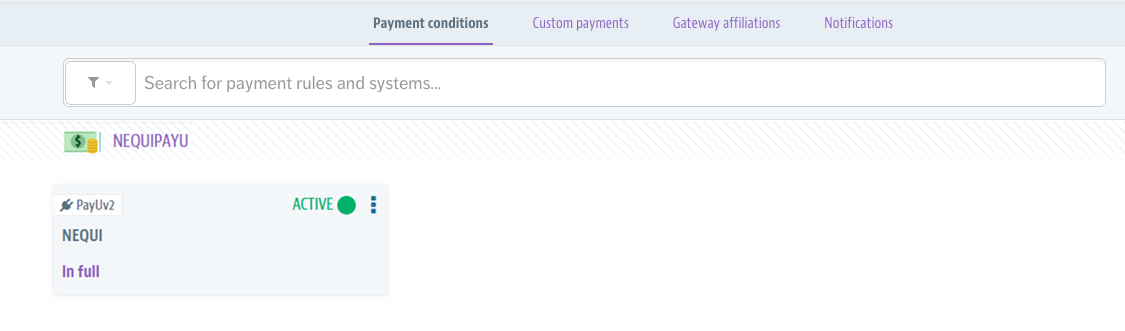
- Once configured, Nequi will be available as a payment option at VTEX checkout. Please note that it may take up to 10 minutes for the option to become visible.
Testing in Sandbox
For information on how to simulate Nequi transactions in the Sandbox environment, refer to the Payments API documentation.
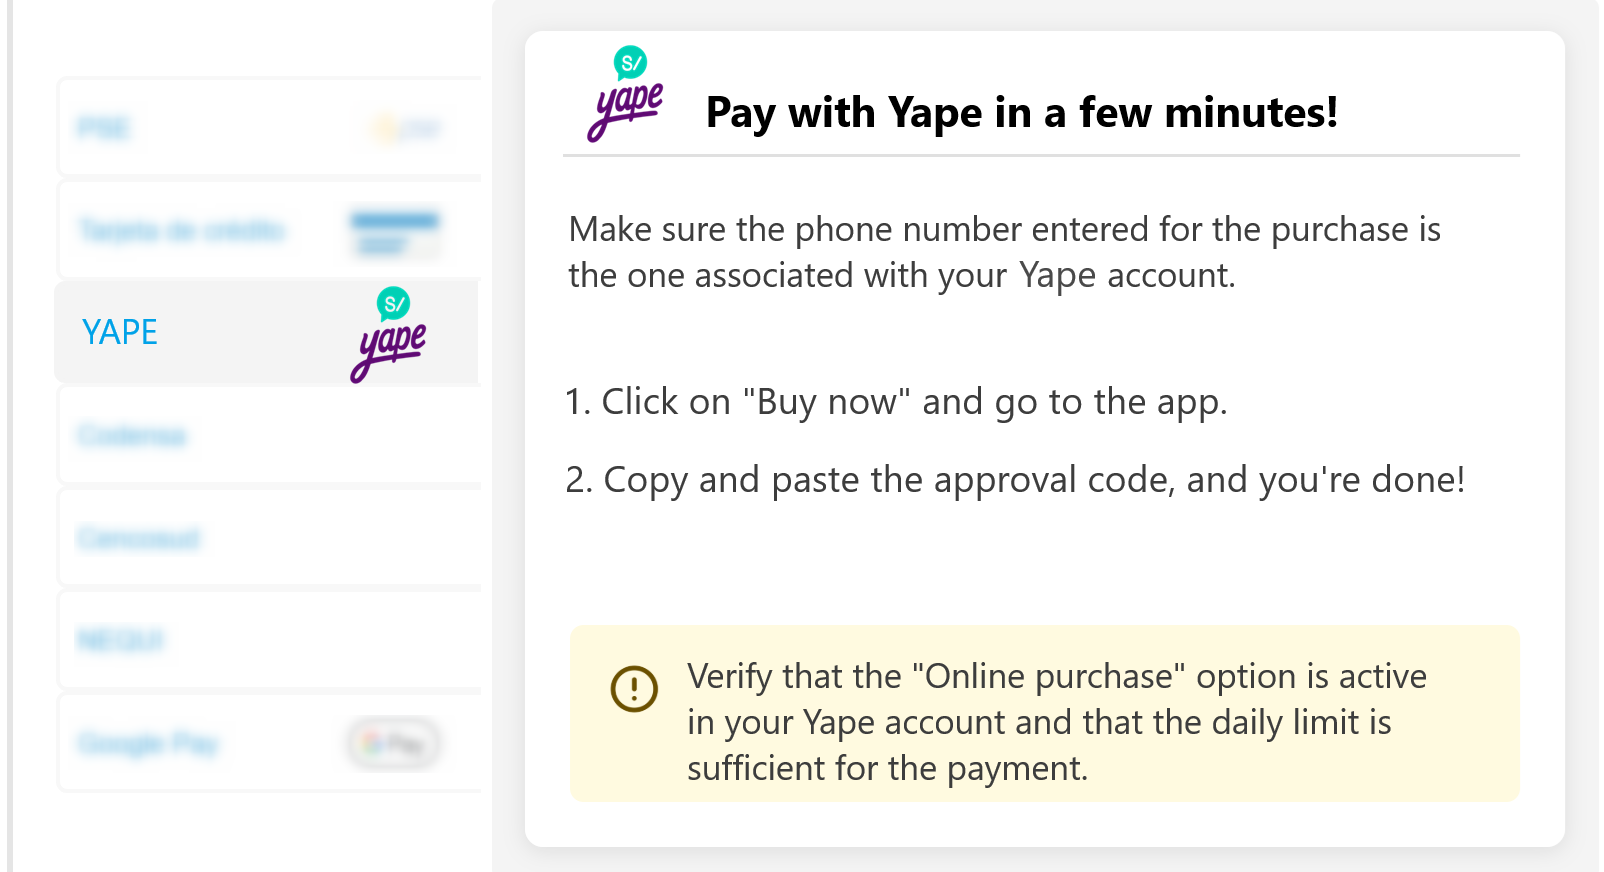
Configuring Yape
Adding Yape as a payment method allows your business to connect with millions of users in Peru who prefer digital wallets. With Yape, customers can pay easily and securely using only their phone number—helping you increase sales, attract new customers, and ensure trusted transactions backed by BCP (Banco de Crédito del Perú).
Considerations:
- Ensure that Yape is enabled in your PayU account and that the payment method name matches exactly as registered with PayU. Any mismatch or inactive status will result in transaction errors. If you need help enabling Yape, please contact us.
- Ensure your VTEX store is built with VTEX IO or FastStore. Then, install the Pop-up for Online Payment with Yape app by accessing the setup URL. Replace
{vtexaccount}in the URL below with the name of your VTEX account (i.e., the subdomain you use to access your VTEX Admin panel):https://{vtexaccount}.myvtex.com/admin/apps/payulatam.yape-payment-app-payuv2@1.3.0/setup
Example:
If your VTEX account ispayulatam, the URL would be:https://payulatam.myvtex.com/admin/apps/payulatam.yape-payment-app-payuv2@1.3.0/setup
Step by Step:
-
Log in to the VTEX administration panel and go to Transactions > Payments > Settings.
-
Select the Payment Conditions tab and click the plus icon.
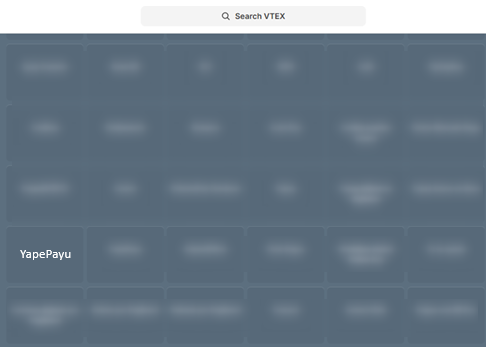
- Search for YapePayu using the search bar, then select it to open the settings interface.
- In the settings interface:
- Set YAPE as the condition name
- Choose the provider
- Enable the payment method
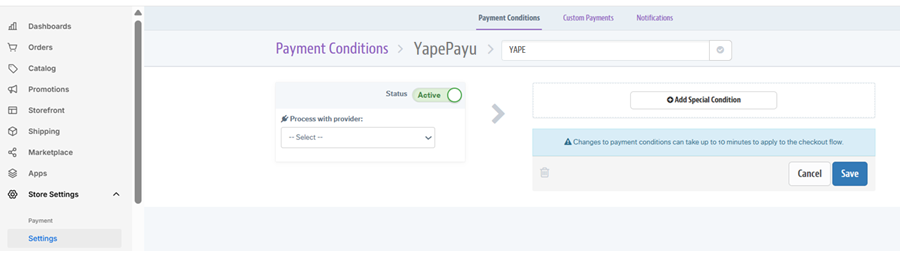
- Click Save. Confirm that Yape appears in the Payment Conditions tab.
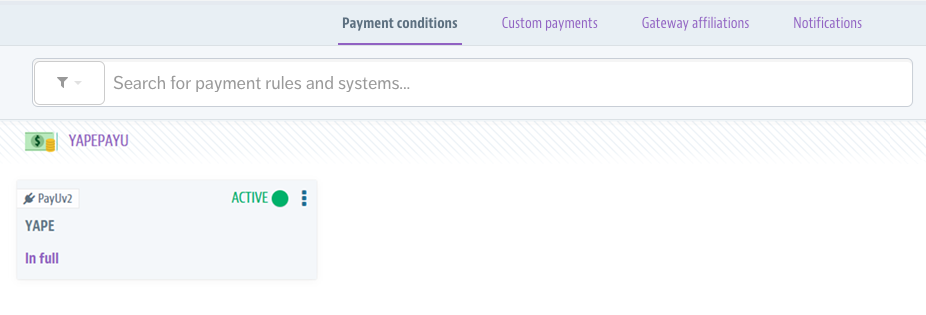
- Once configured, Yape will be available as a payment option at VTEX checkout. Please note that it may take up to 10 minutes for the option to become visible.
Testing in Sandbox
For information on how to simulate Yape transactions in the Sandbox environment, refer to the Payments API documentation.
Configuring PSE
Prerequisites:
- This payment method is only available for merchants processing in Colombia.
- To offer PSE as a payment method, you must install the PSE App developed by VTEX. If you haven’t done so, go to Account Settings > Applications > App Store and search for Banks for PSE.
If the app is unavailable in the store, you can request its installation from the VTEX team by submitting a ticket at VTEX Support. - If you are using a VTEX Legacy integration, VTEX must perform an additional configuration before you can set up this payment method. Contact your VTEX representative or request assistance via VTEX Support.
Note
For additional information, refer to the following VTEX resources:
Step by Step:
- Log in to the VTEX administration panel and go to Store Settings > Payments > Settings > Payment Conditions. Then, follow these steps:
1.1 Click the + button.
1.2 Under the Other category, locate PSE.
1.3 Complete the following fields:
• Rule Name: Enter a descriptive name to identify this payment method.
• Process with Affiliation: Select the gateway affiliation configured to process payments with PayUV2.
• Status: Activate the payment condition.
1.4 Click Save to apply the settings.
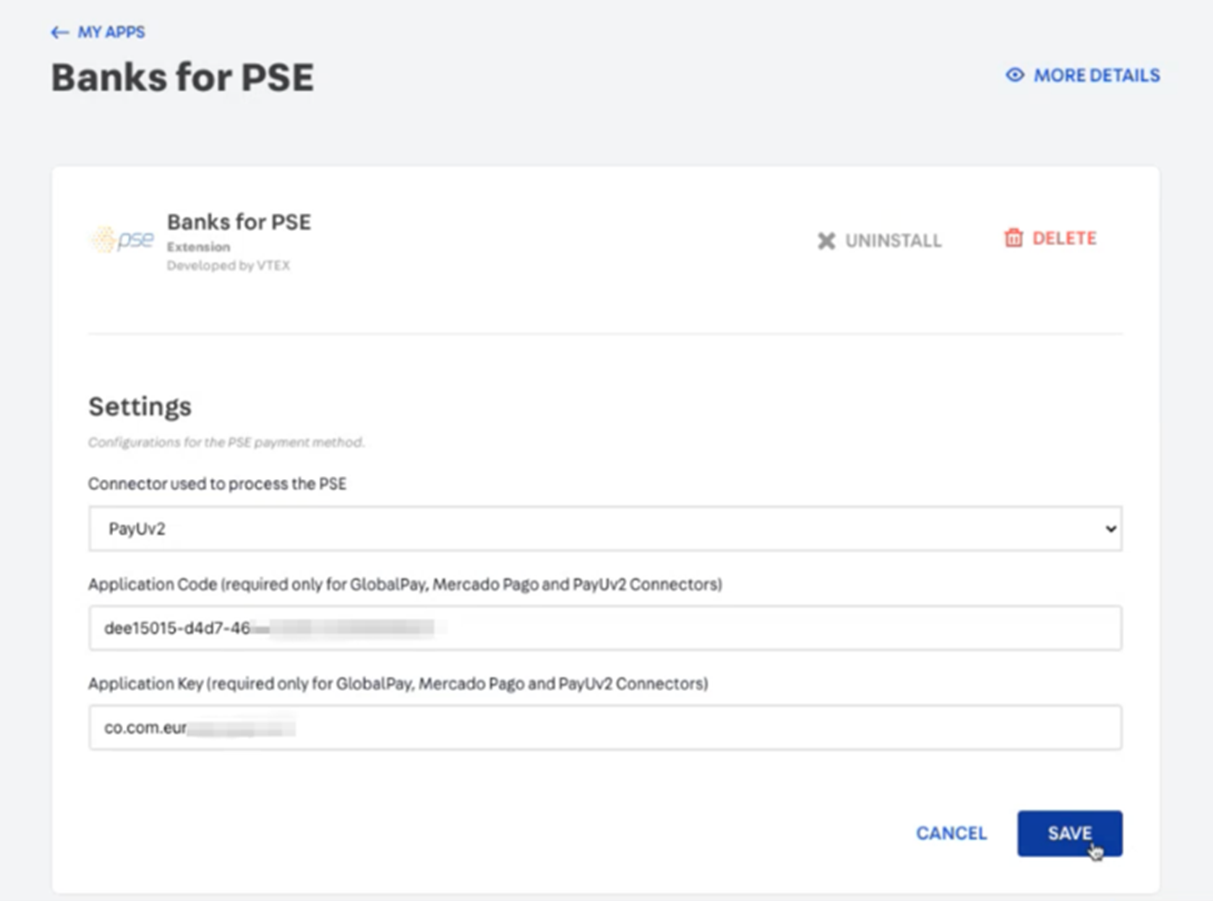
- Configure the Banks for PSE app with your PayU credentials by following these steps:
2.1 Log in to the VTEX administration panel and go to Apps > Installed Apps > Banks for PSE.
2.2 Complete the form and click Save.
| Field | Description |
|---|---|
| Connector Used to Process the PSE | Select PayUv2 from the dropdown list. |
| Application Code | Enter the Business Unit Private API Key. This information is available in the PayU Enterprise Control Panel, as explained here. Note: This field corresponds to the Application Token of the VTEX affiliation. |
| Application Key | Enter the ID of the Business Unit Application. This information is available in the PayU Enterprise Control Panel, as explained here. Note: This field corresponds to the Application Key of the VTEX affiliation. |
- Once the configuration is complete, you can process transactions in a production environment with PSE.
Important
To test PSE in a sandbox environment, ensure that your VTEX affiliation is in test mode and that you have an additional VTEX configuration specific to PSE. For further guidance, contact your implementation agency or VTEX Support.Testing the Integration
Once you have configured the payment conditions for your payment methods, it is strongly recommended to test your integration before processing real transactions.
Prerequisites for Successful Testing:
- Ensure your PayU Enterprise account is in
TESTmode. - Verify that the Environment Selector in your VTEX Gateway Affiliation is set to
TESTmode. - Use the appropriate test credentials when setting up the VTEX Gateway Affiliation. You can find the test credentials here.
- After completing your tests, update the configuration with production information, including your PayU Enterprise account, environment selector in VTEX affiliation, and credentials.
Steps to Perform a Test Transaction
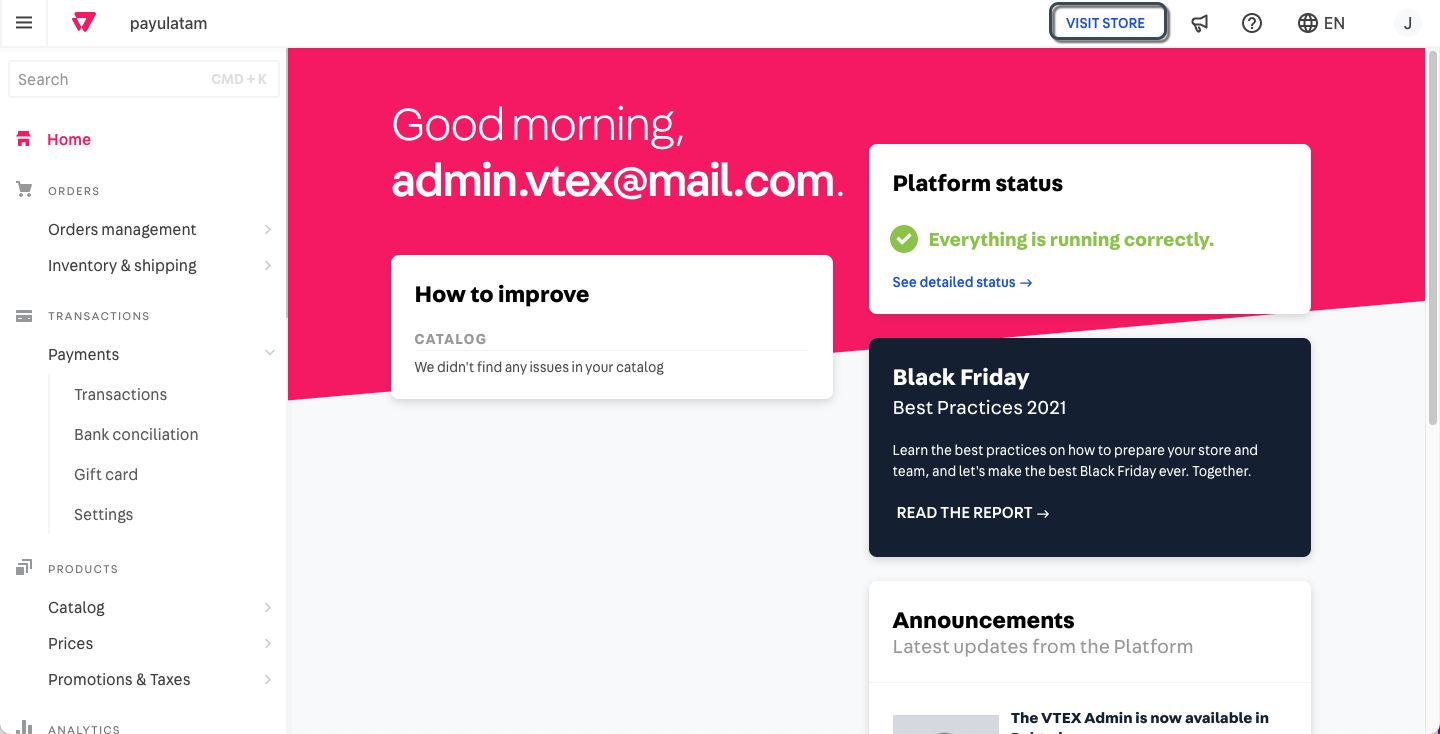
-
Log in to the VTEX administration panel and click VISIT STORE in the top menu.
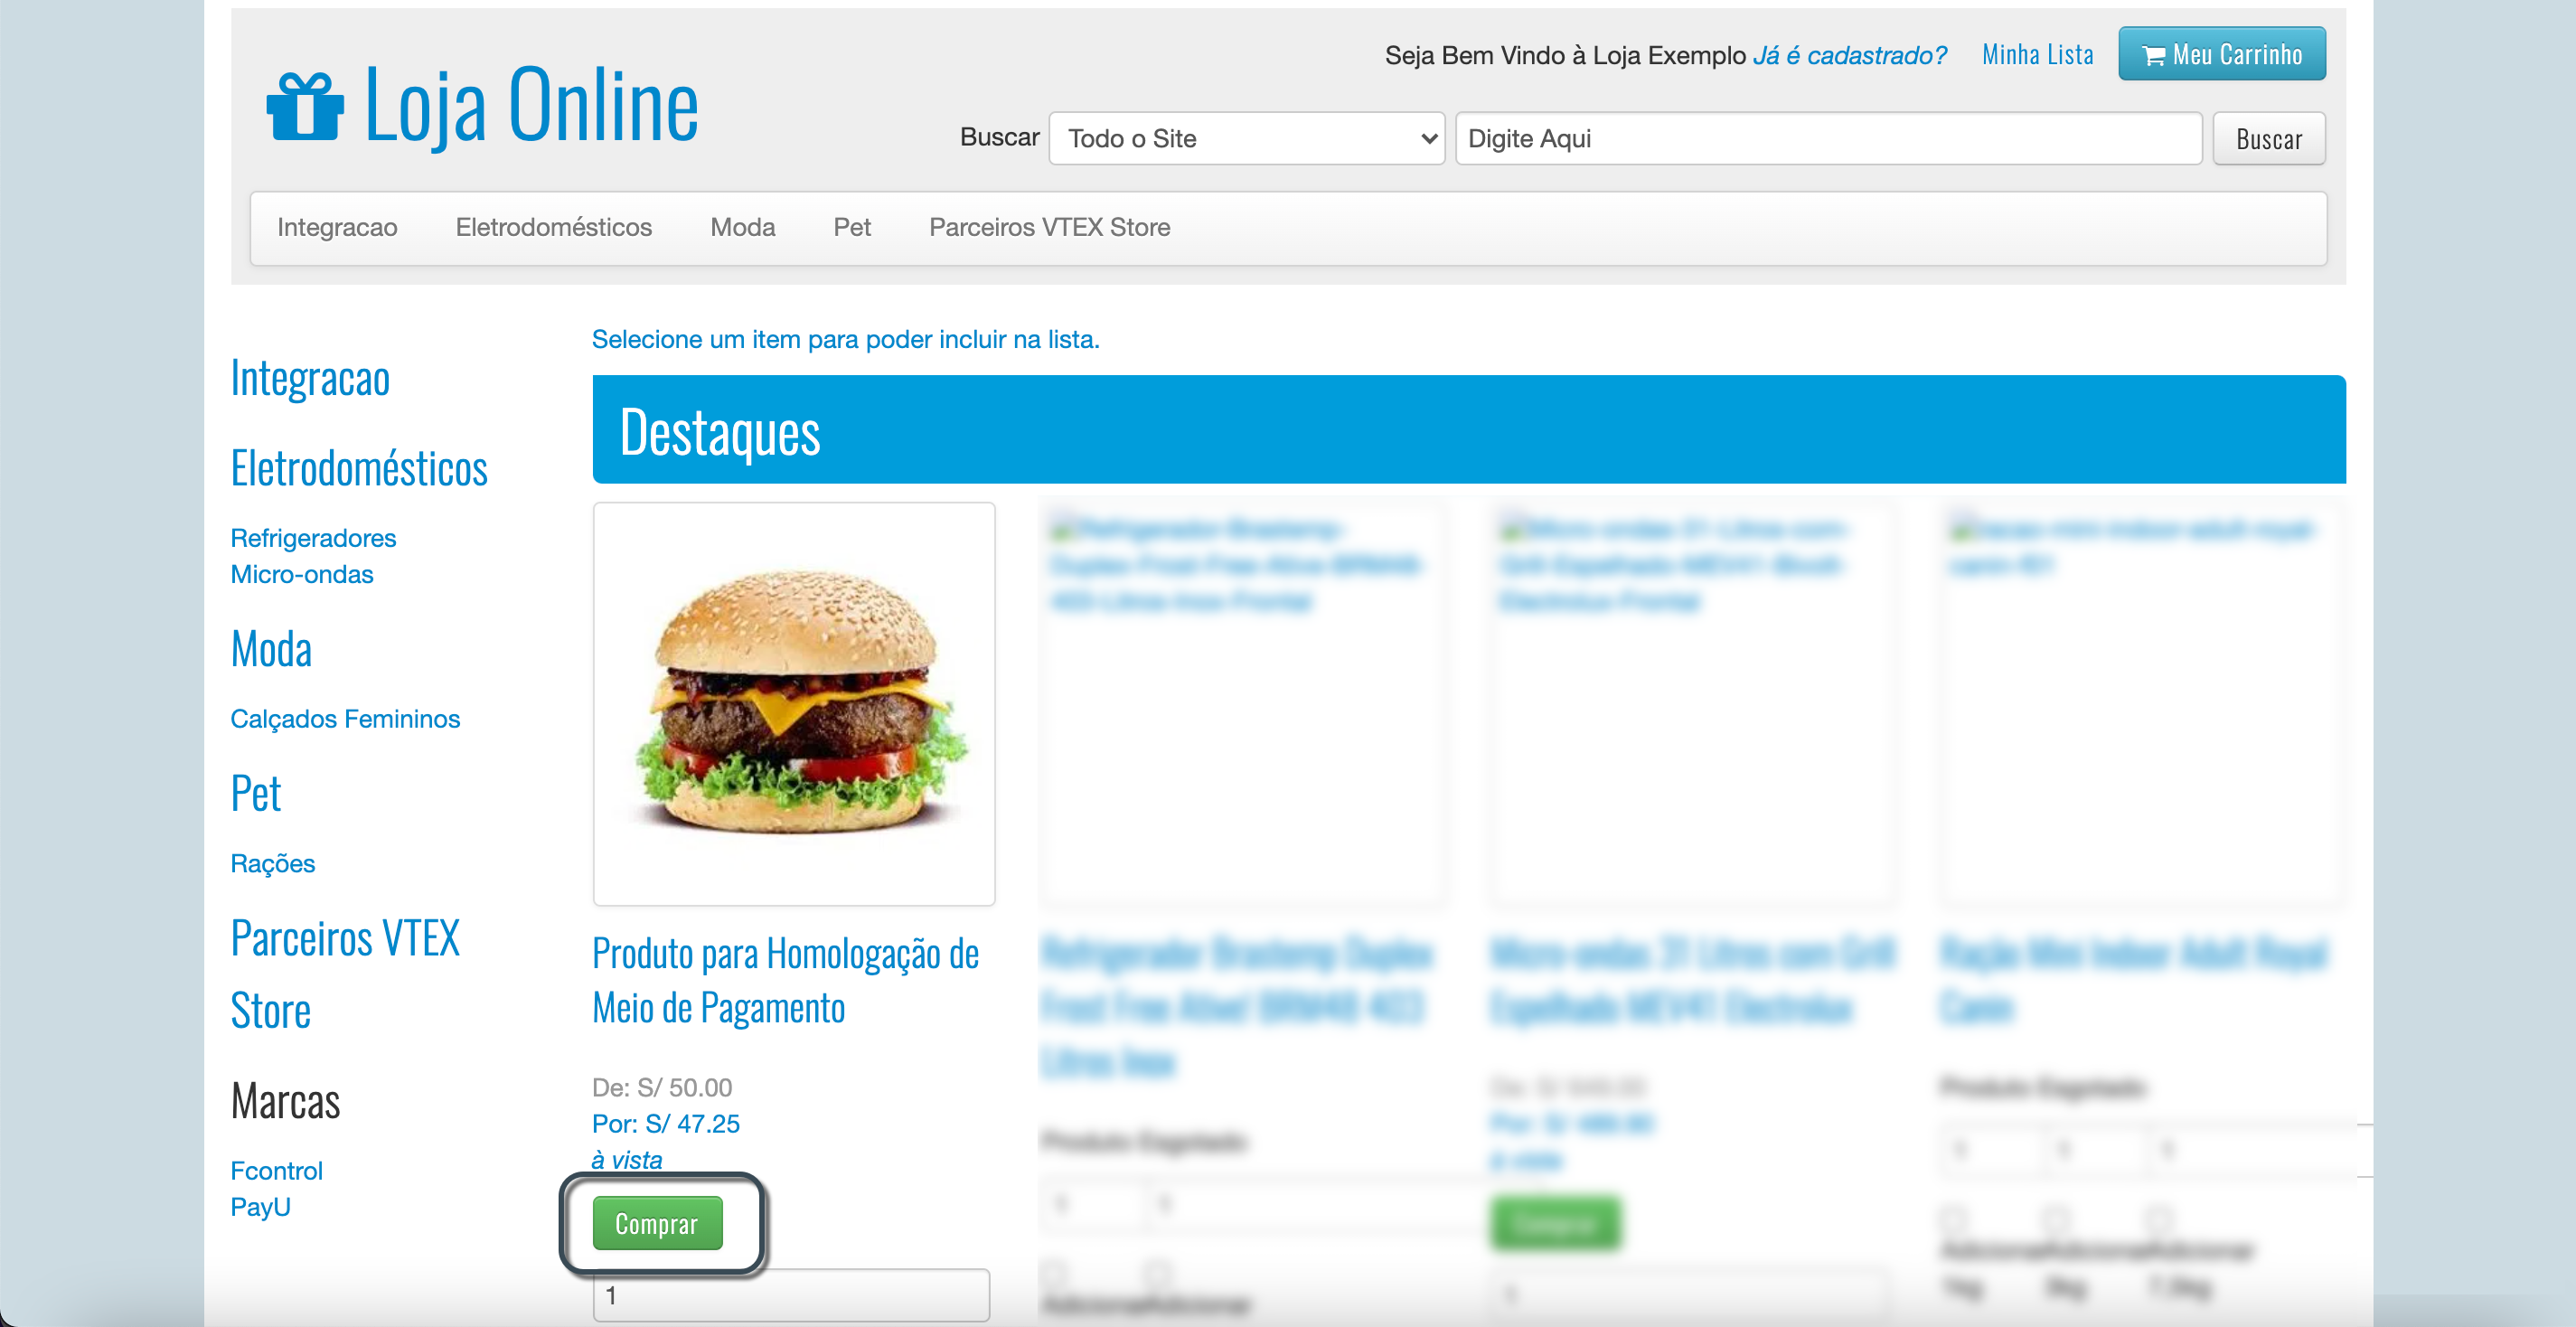
-
The store configured for your VTEX account opens. Select any product and proceed to purchase.
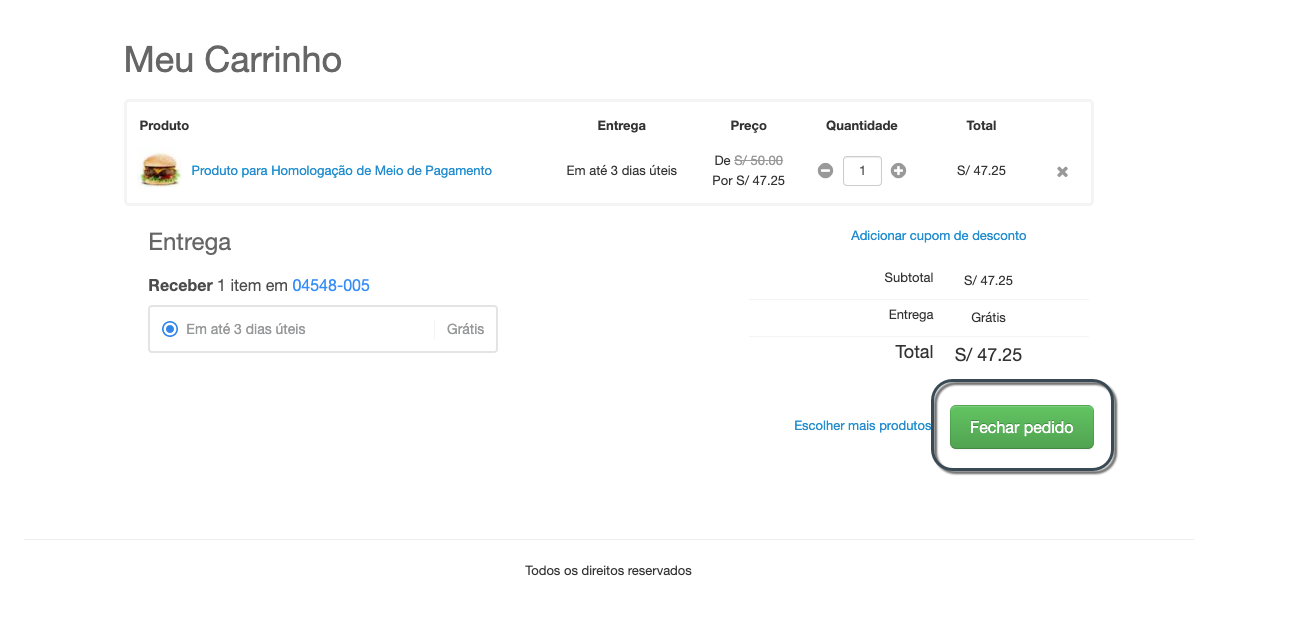
-
In the shopping cart, click the Place Order button.
-
In the payment section, the available payment methods appear grouped by type. Select the one you want to test and enter the test data. You can find test card numbers and relevant information here.
Finally, click Complete Purchase.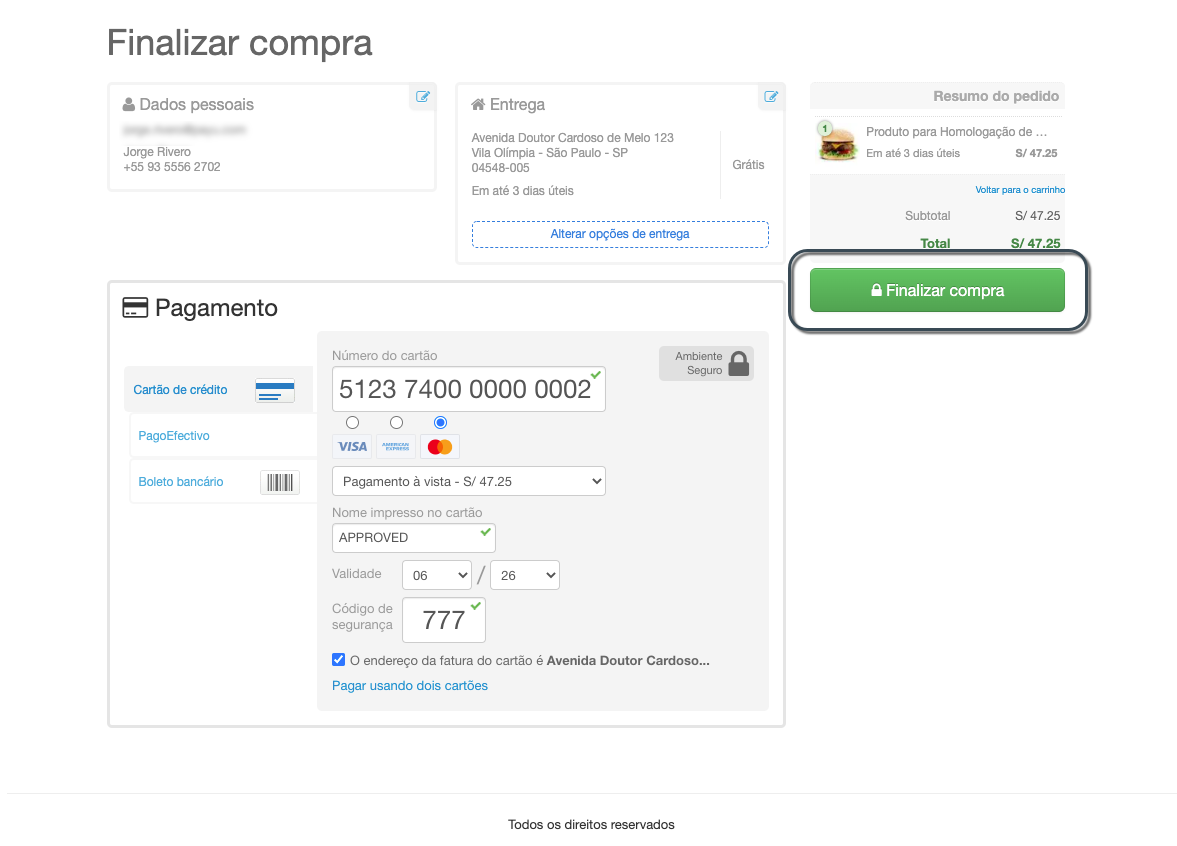
Verifying the Transaction
Once the purchase is approved, you can verify the transaction in the following locations:
-
VTEX Admin: Navigate to Payments > Transactions.
-
PayU Enterprise Dashboard: Go to Payments > Search.
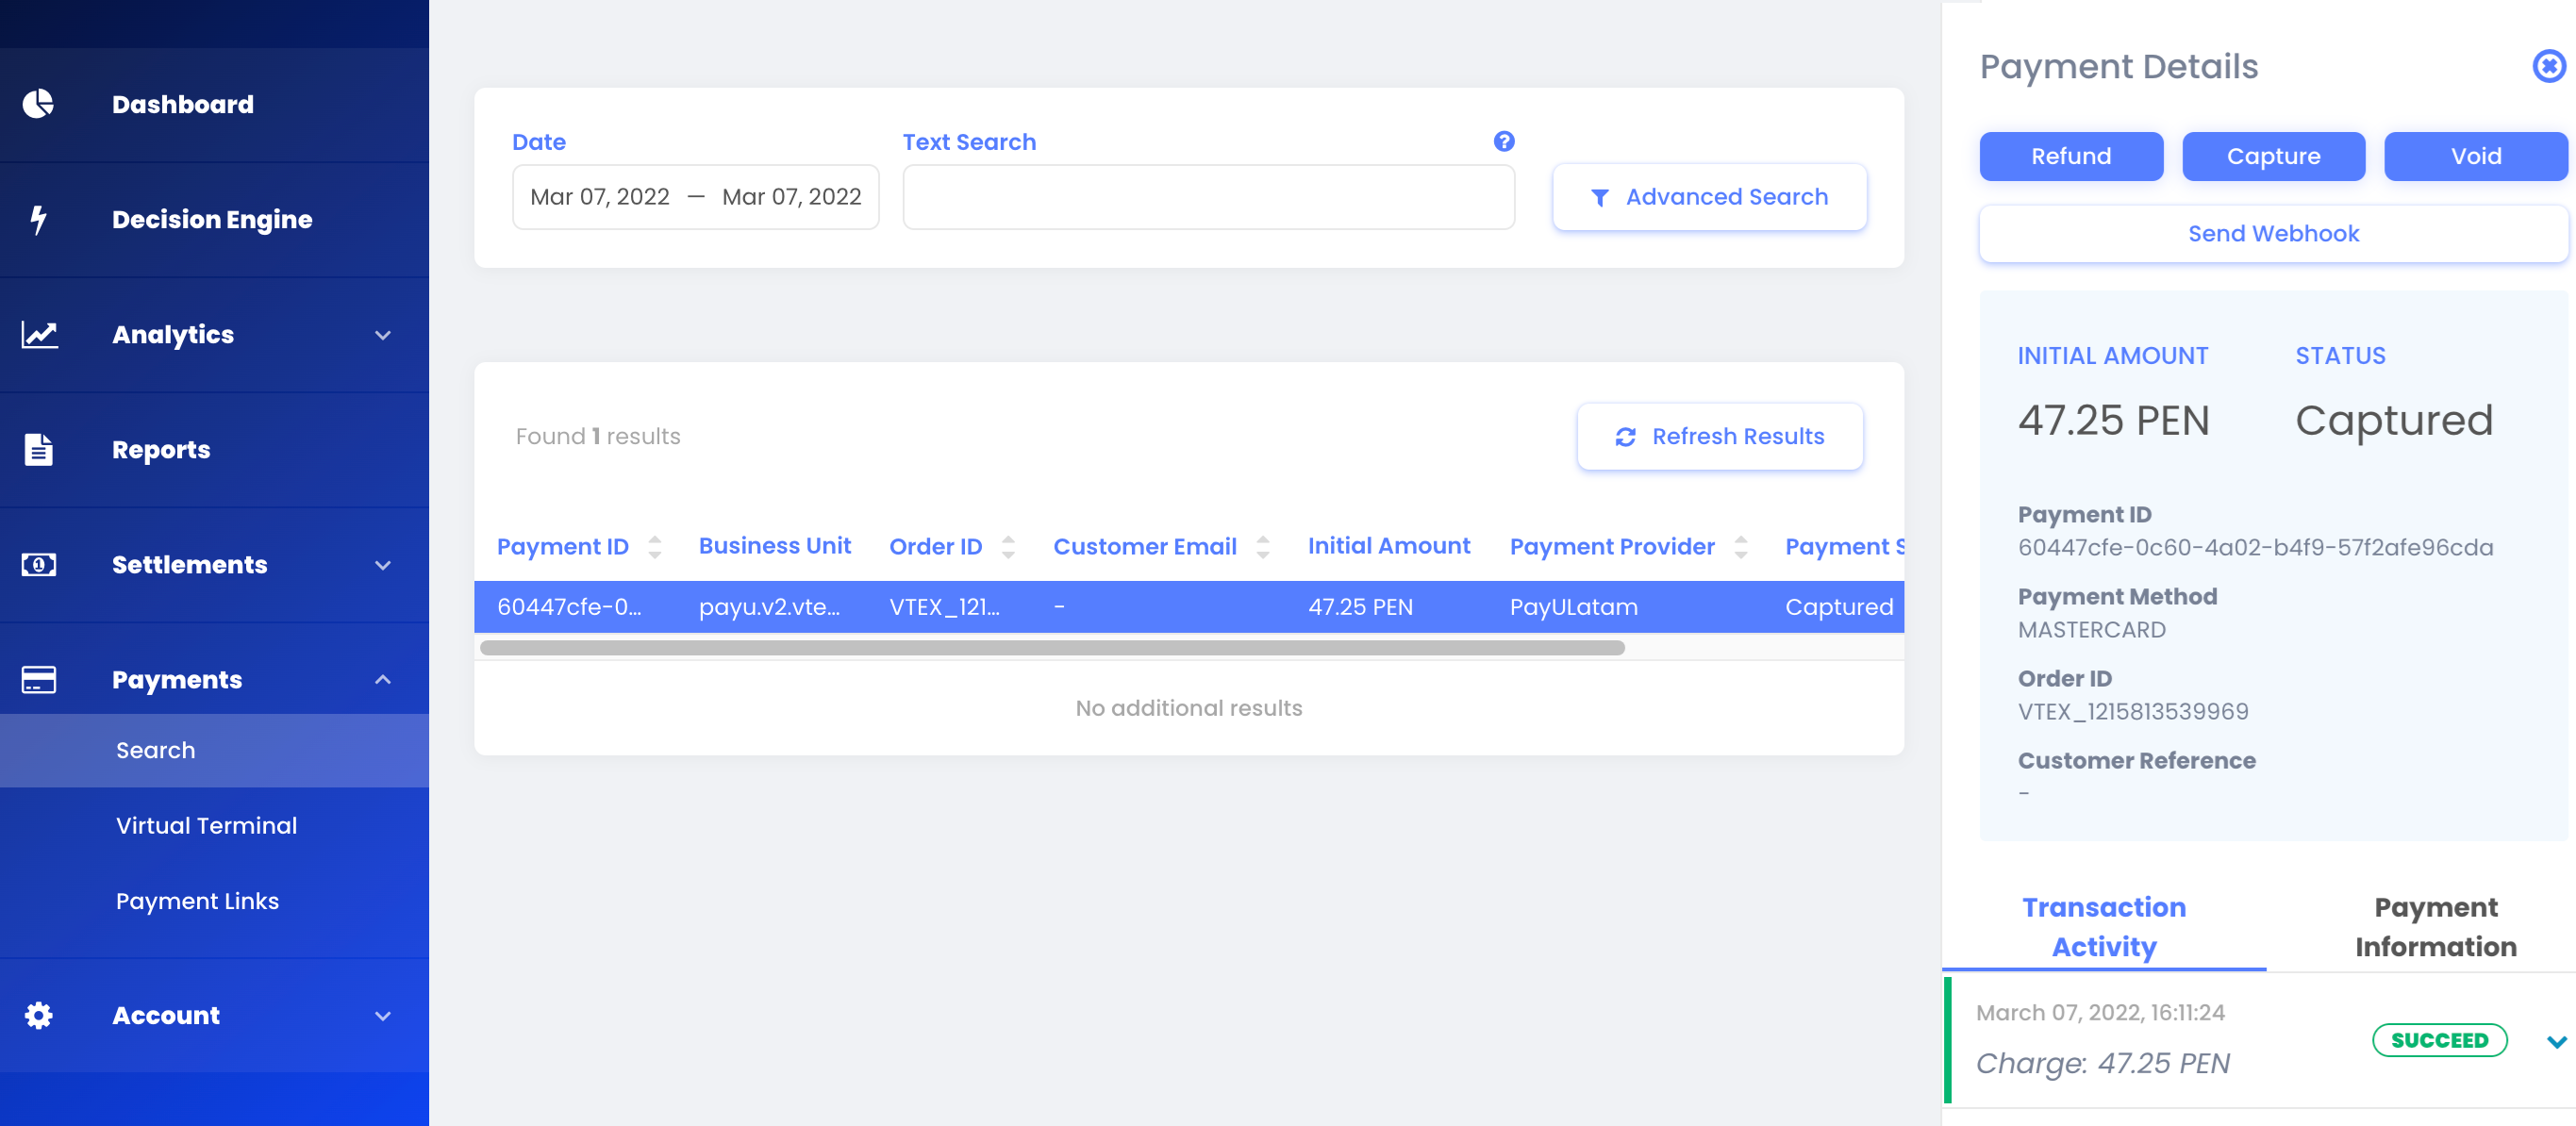
Note
The parameter External Transaction ID within Transaction Activity corresponds to the Order ID in PayU. -
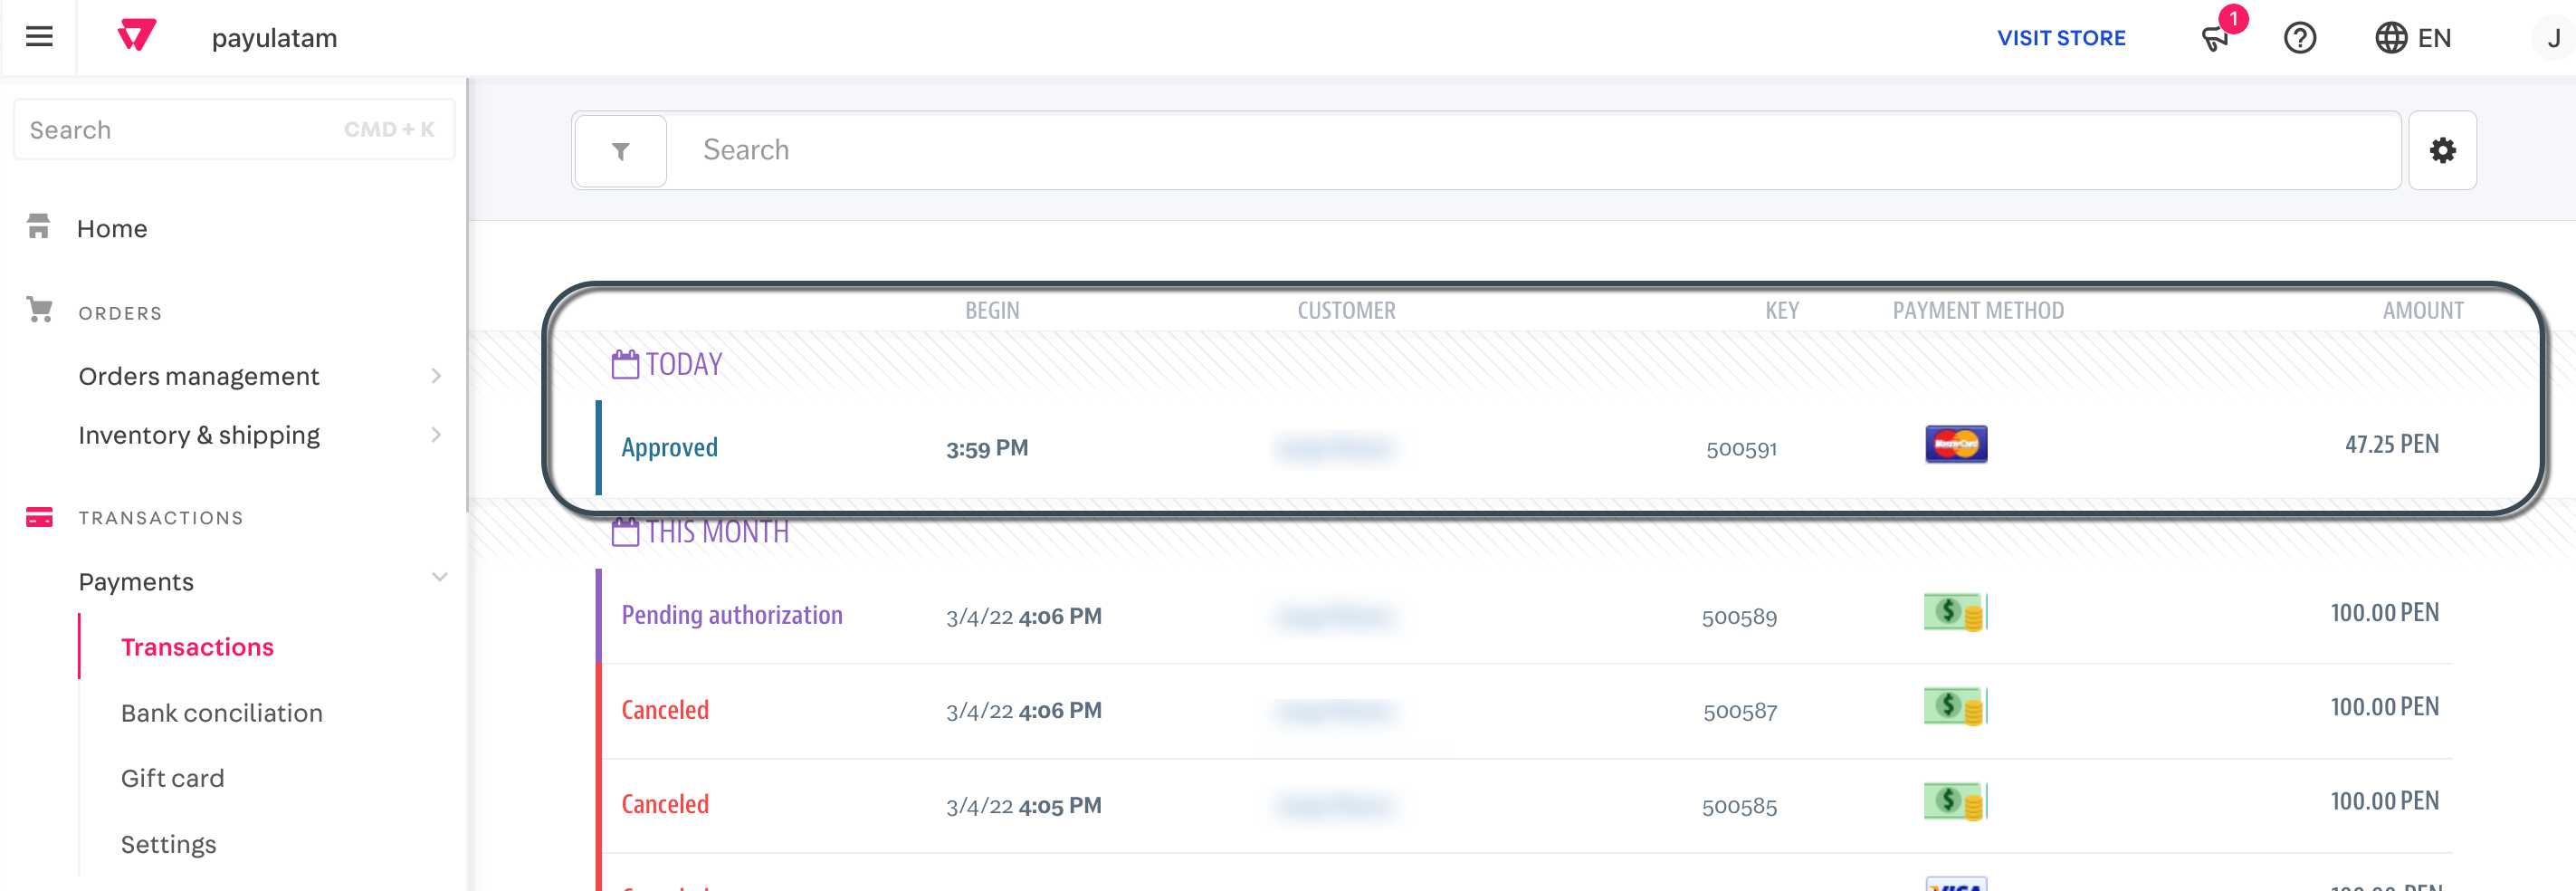
PayU Management Panel: Check the transaction in the Sales Report module.
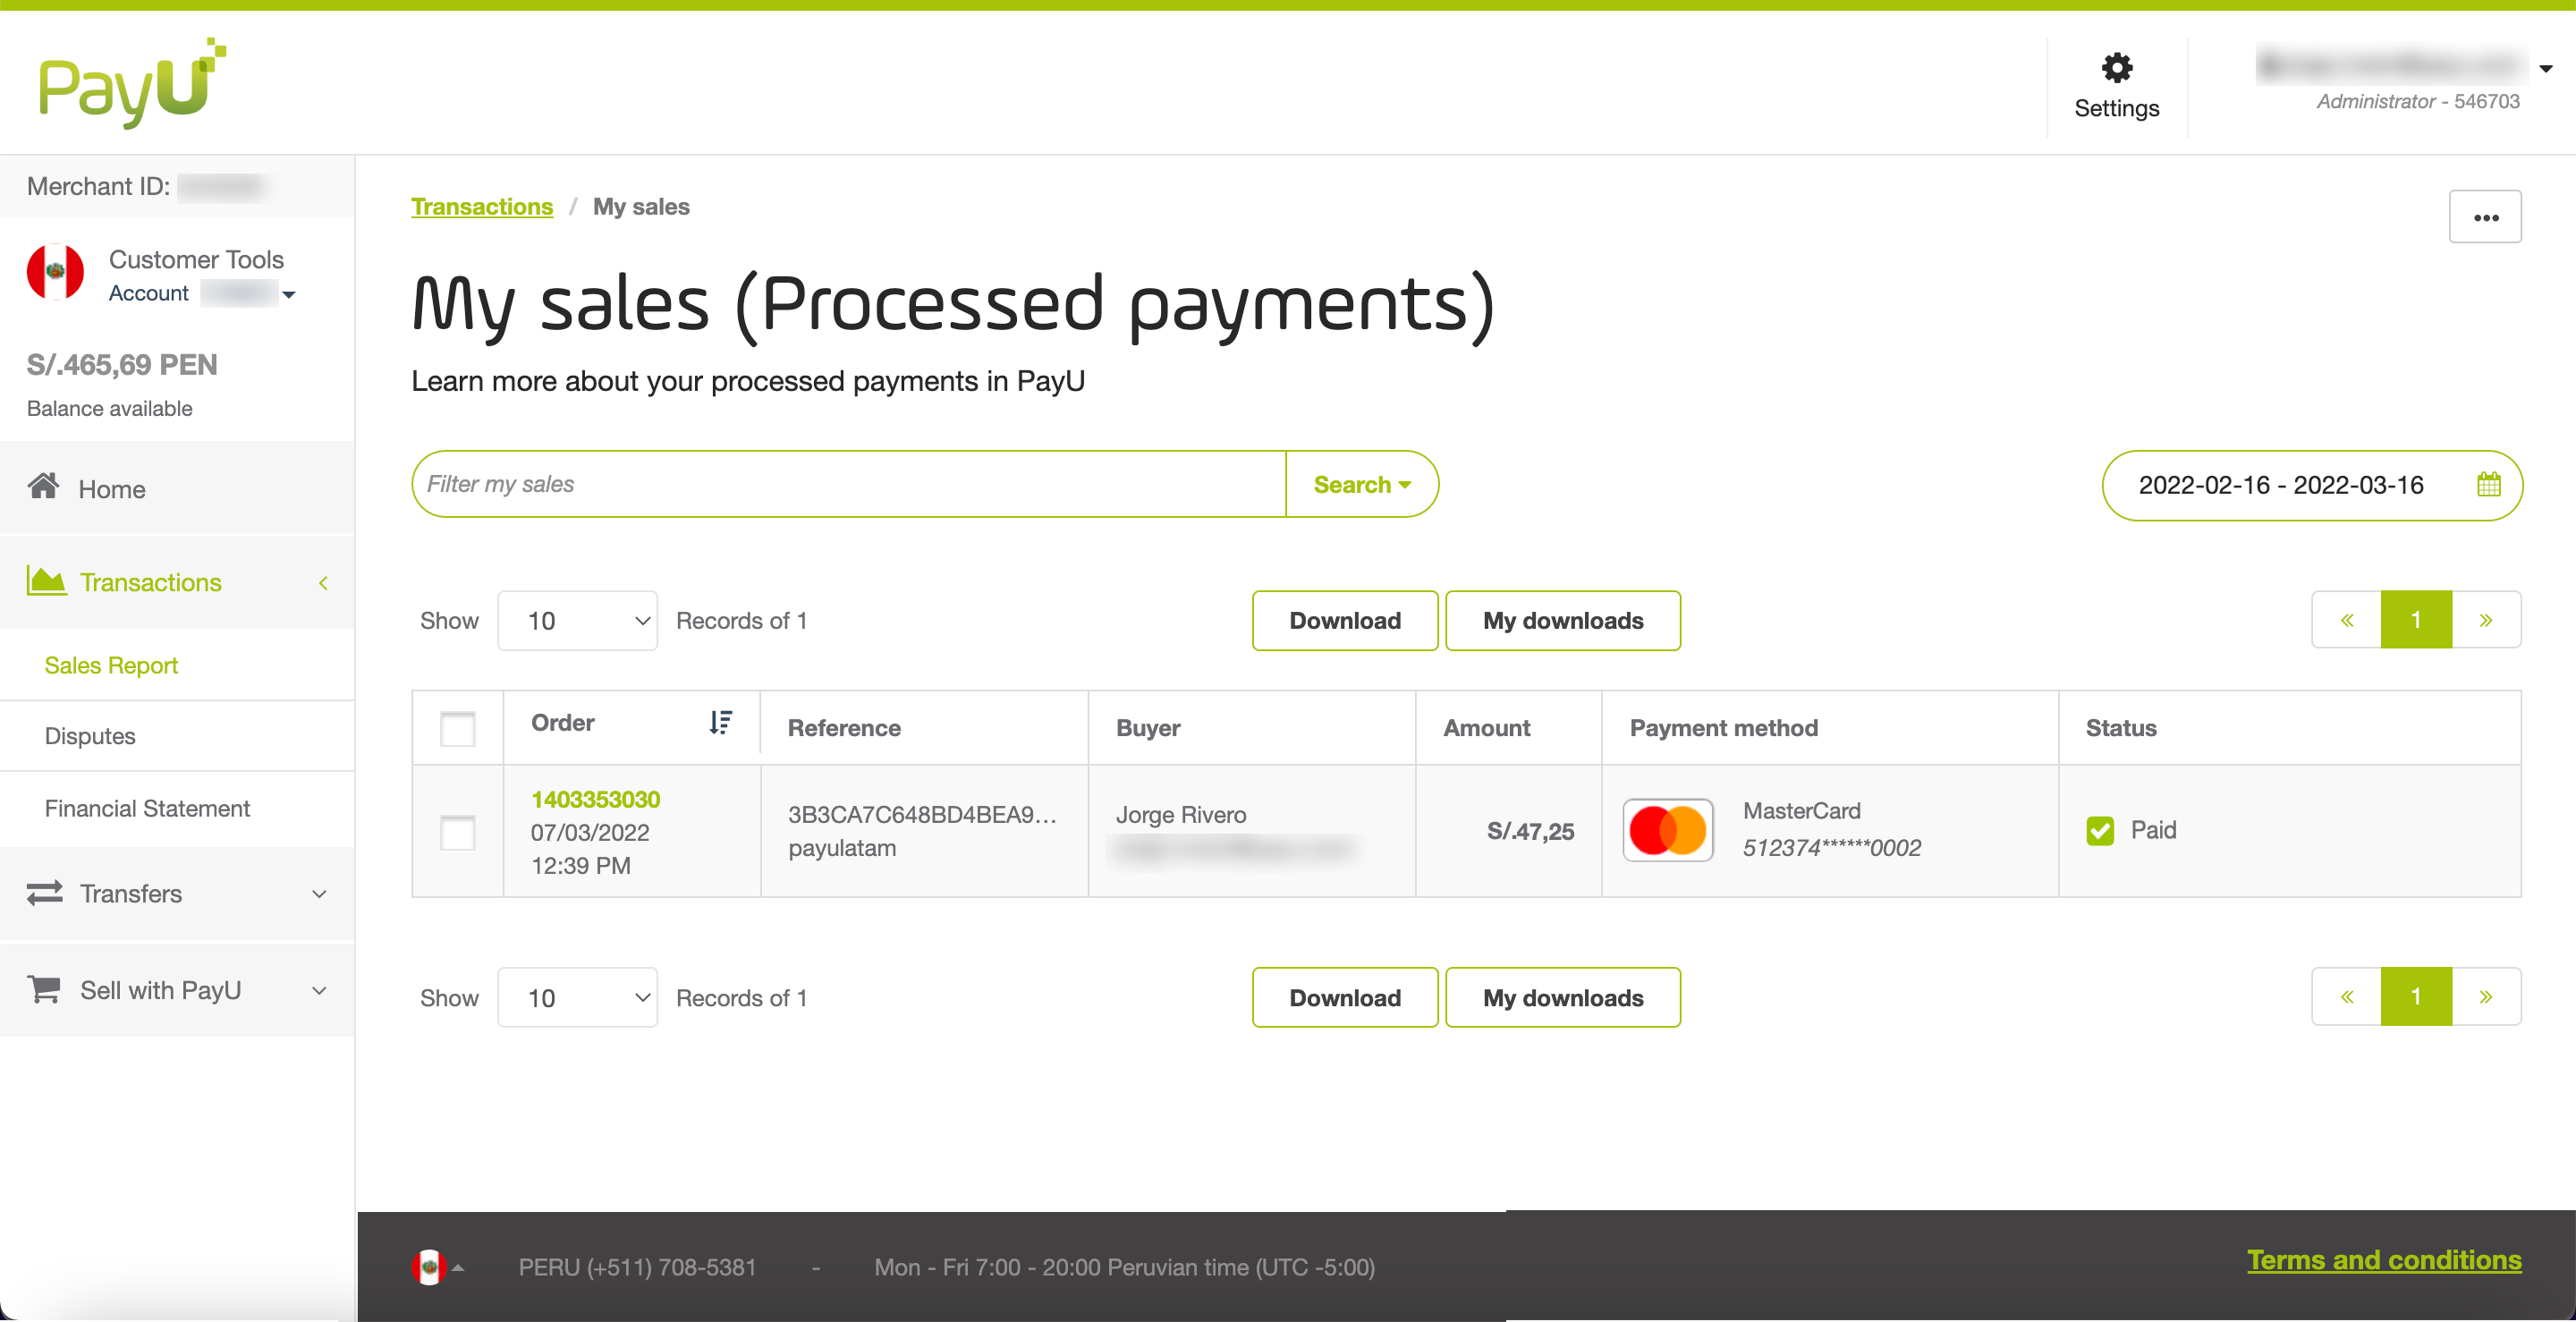
-
Queries API: Use the External Transaction ID as the
OrderIDparameter.
Testing Two-Step Flows
If your Gateway Affiliation is configured to process transactions using a two-step flow, the funds authorized on the credit card are not settled until you explicitly request the settlement. To complete the settlement, you must invoice the order.
Steps to Invoice an Order
-
Locate the transaction in VTEX Admin under Payments > Transactions, and click on it.
Then, click the Order button at the top right corner.
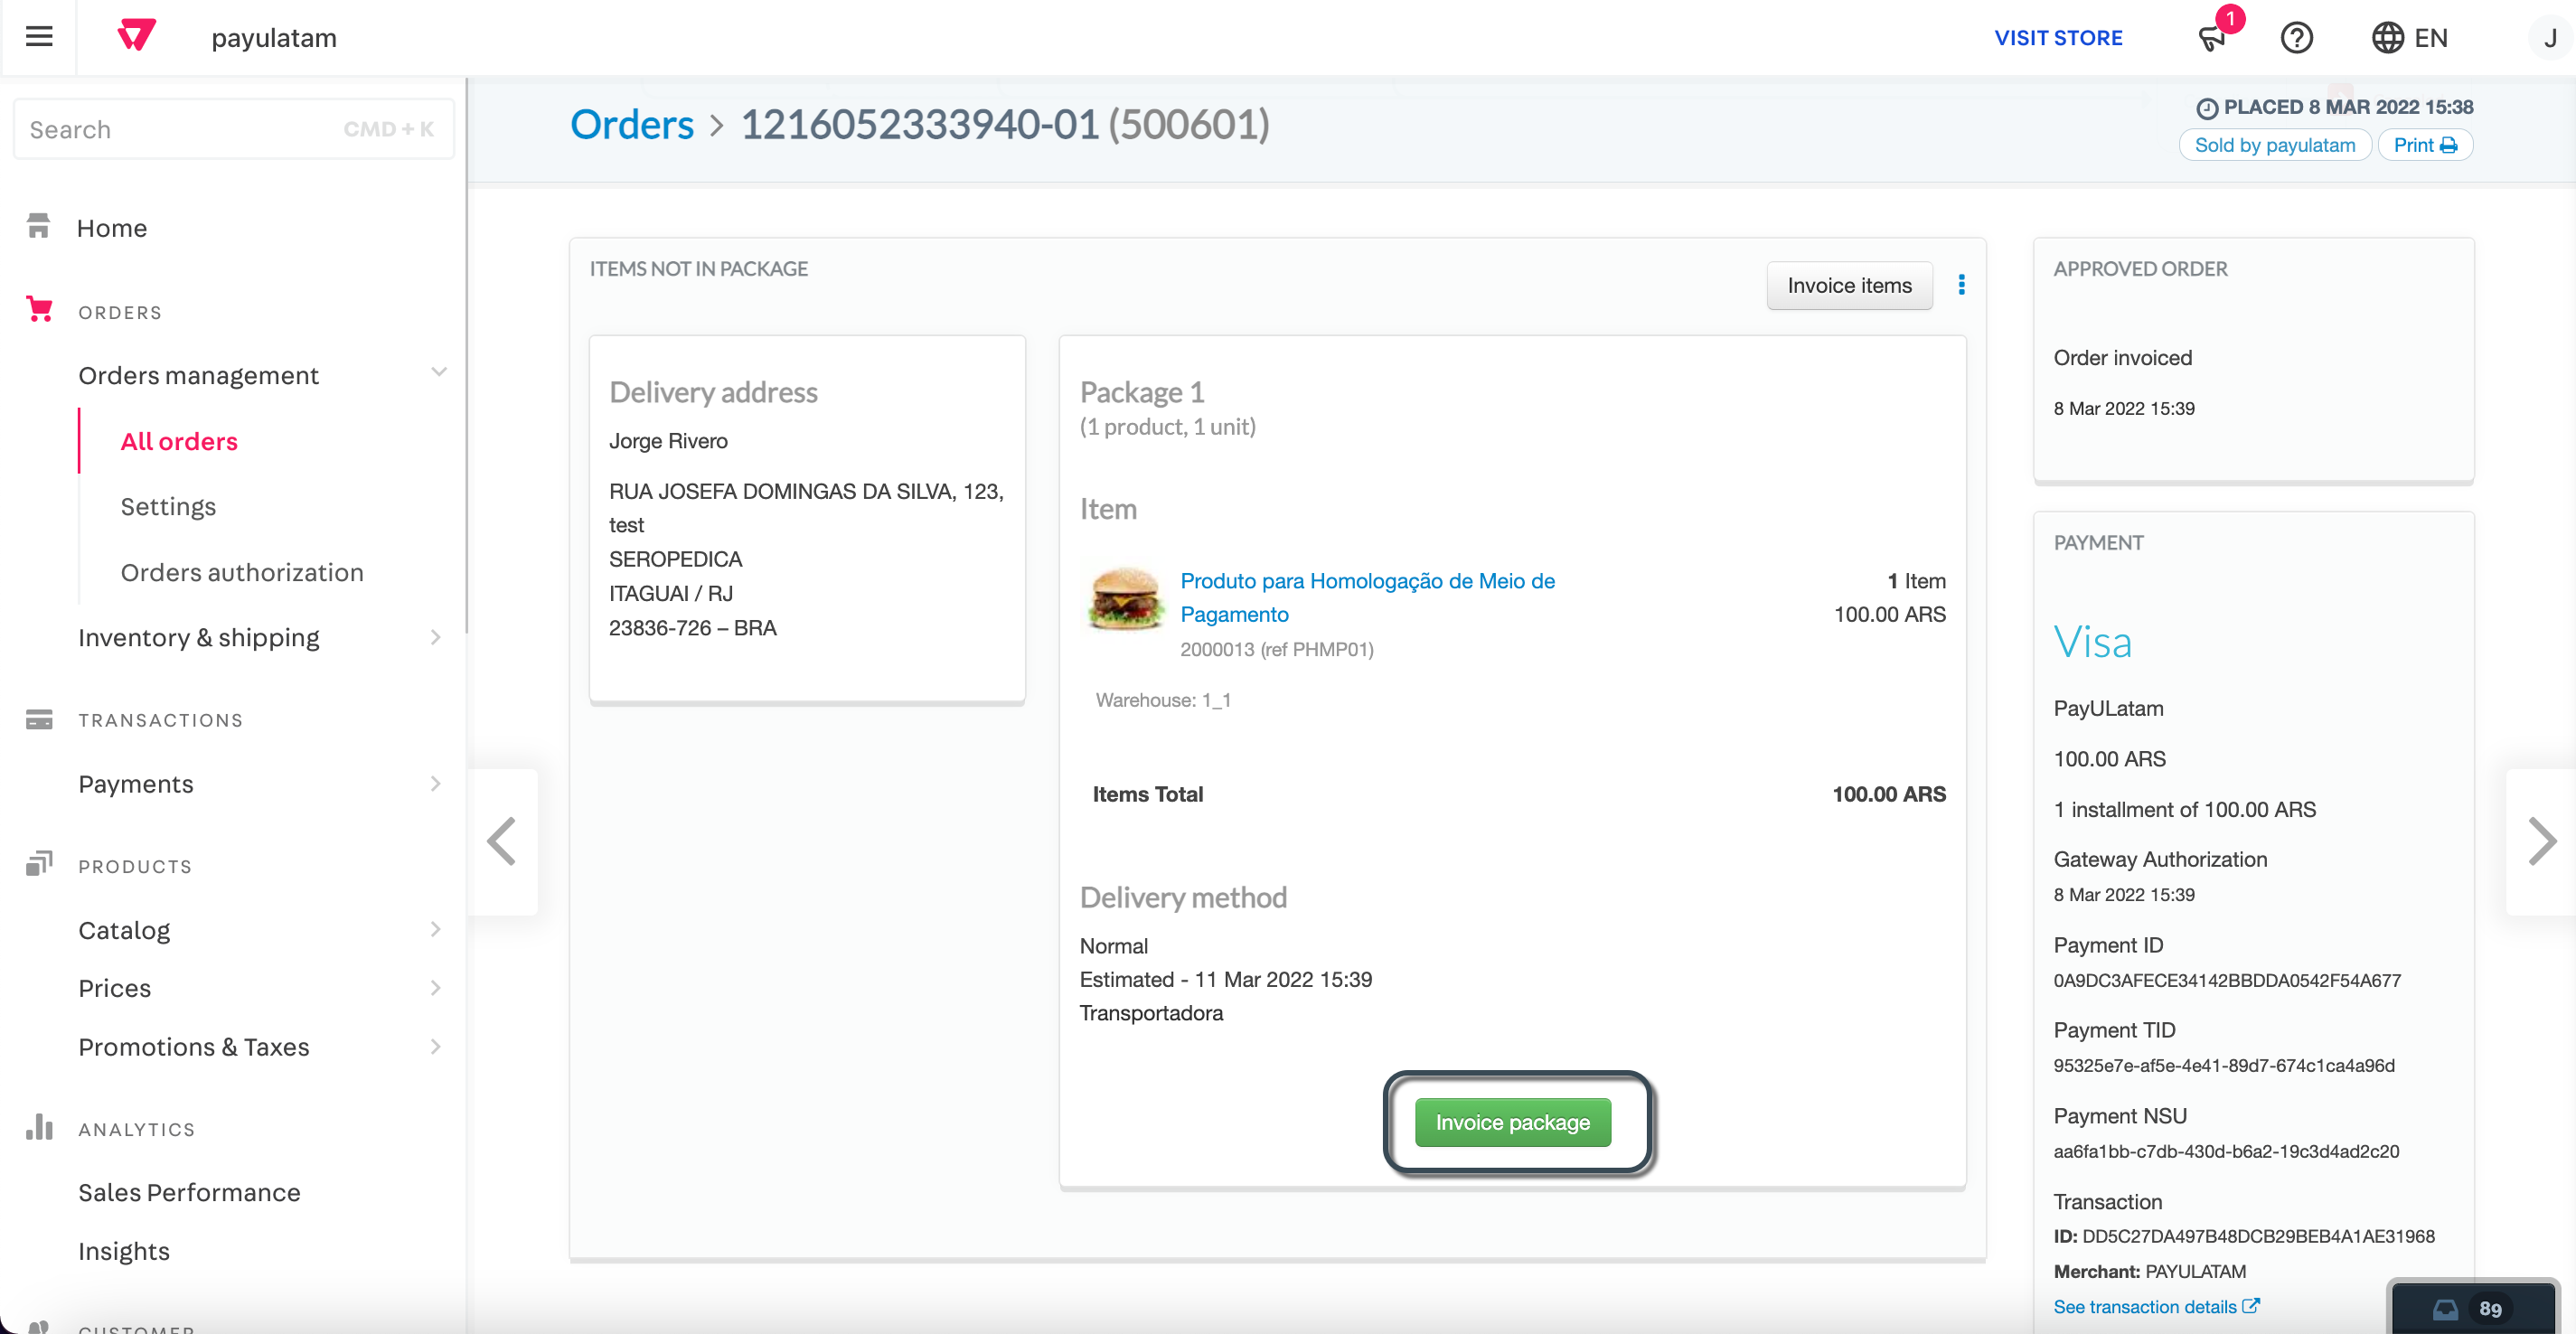
-
Scroll down to the Package section and click Invoice Package.
-
Enter the invoice details and click Send Invoice.
Once the invoice is sent to the customer, the authorized amount is charged from the customer’s card.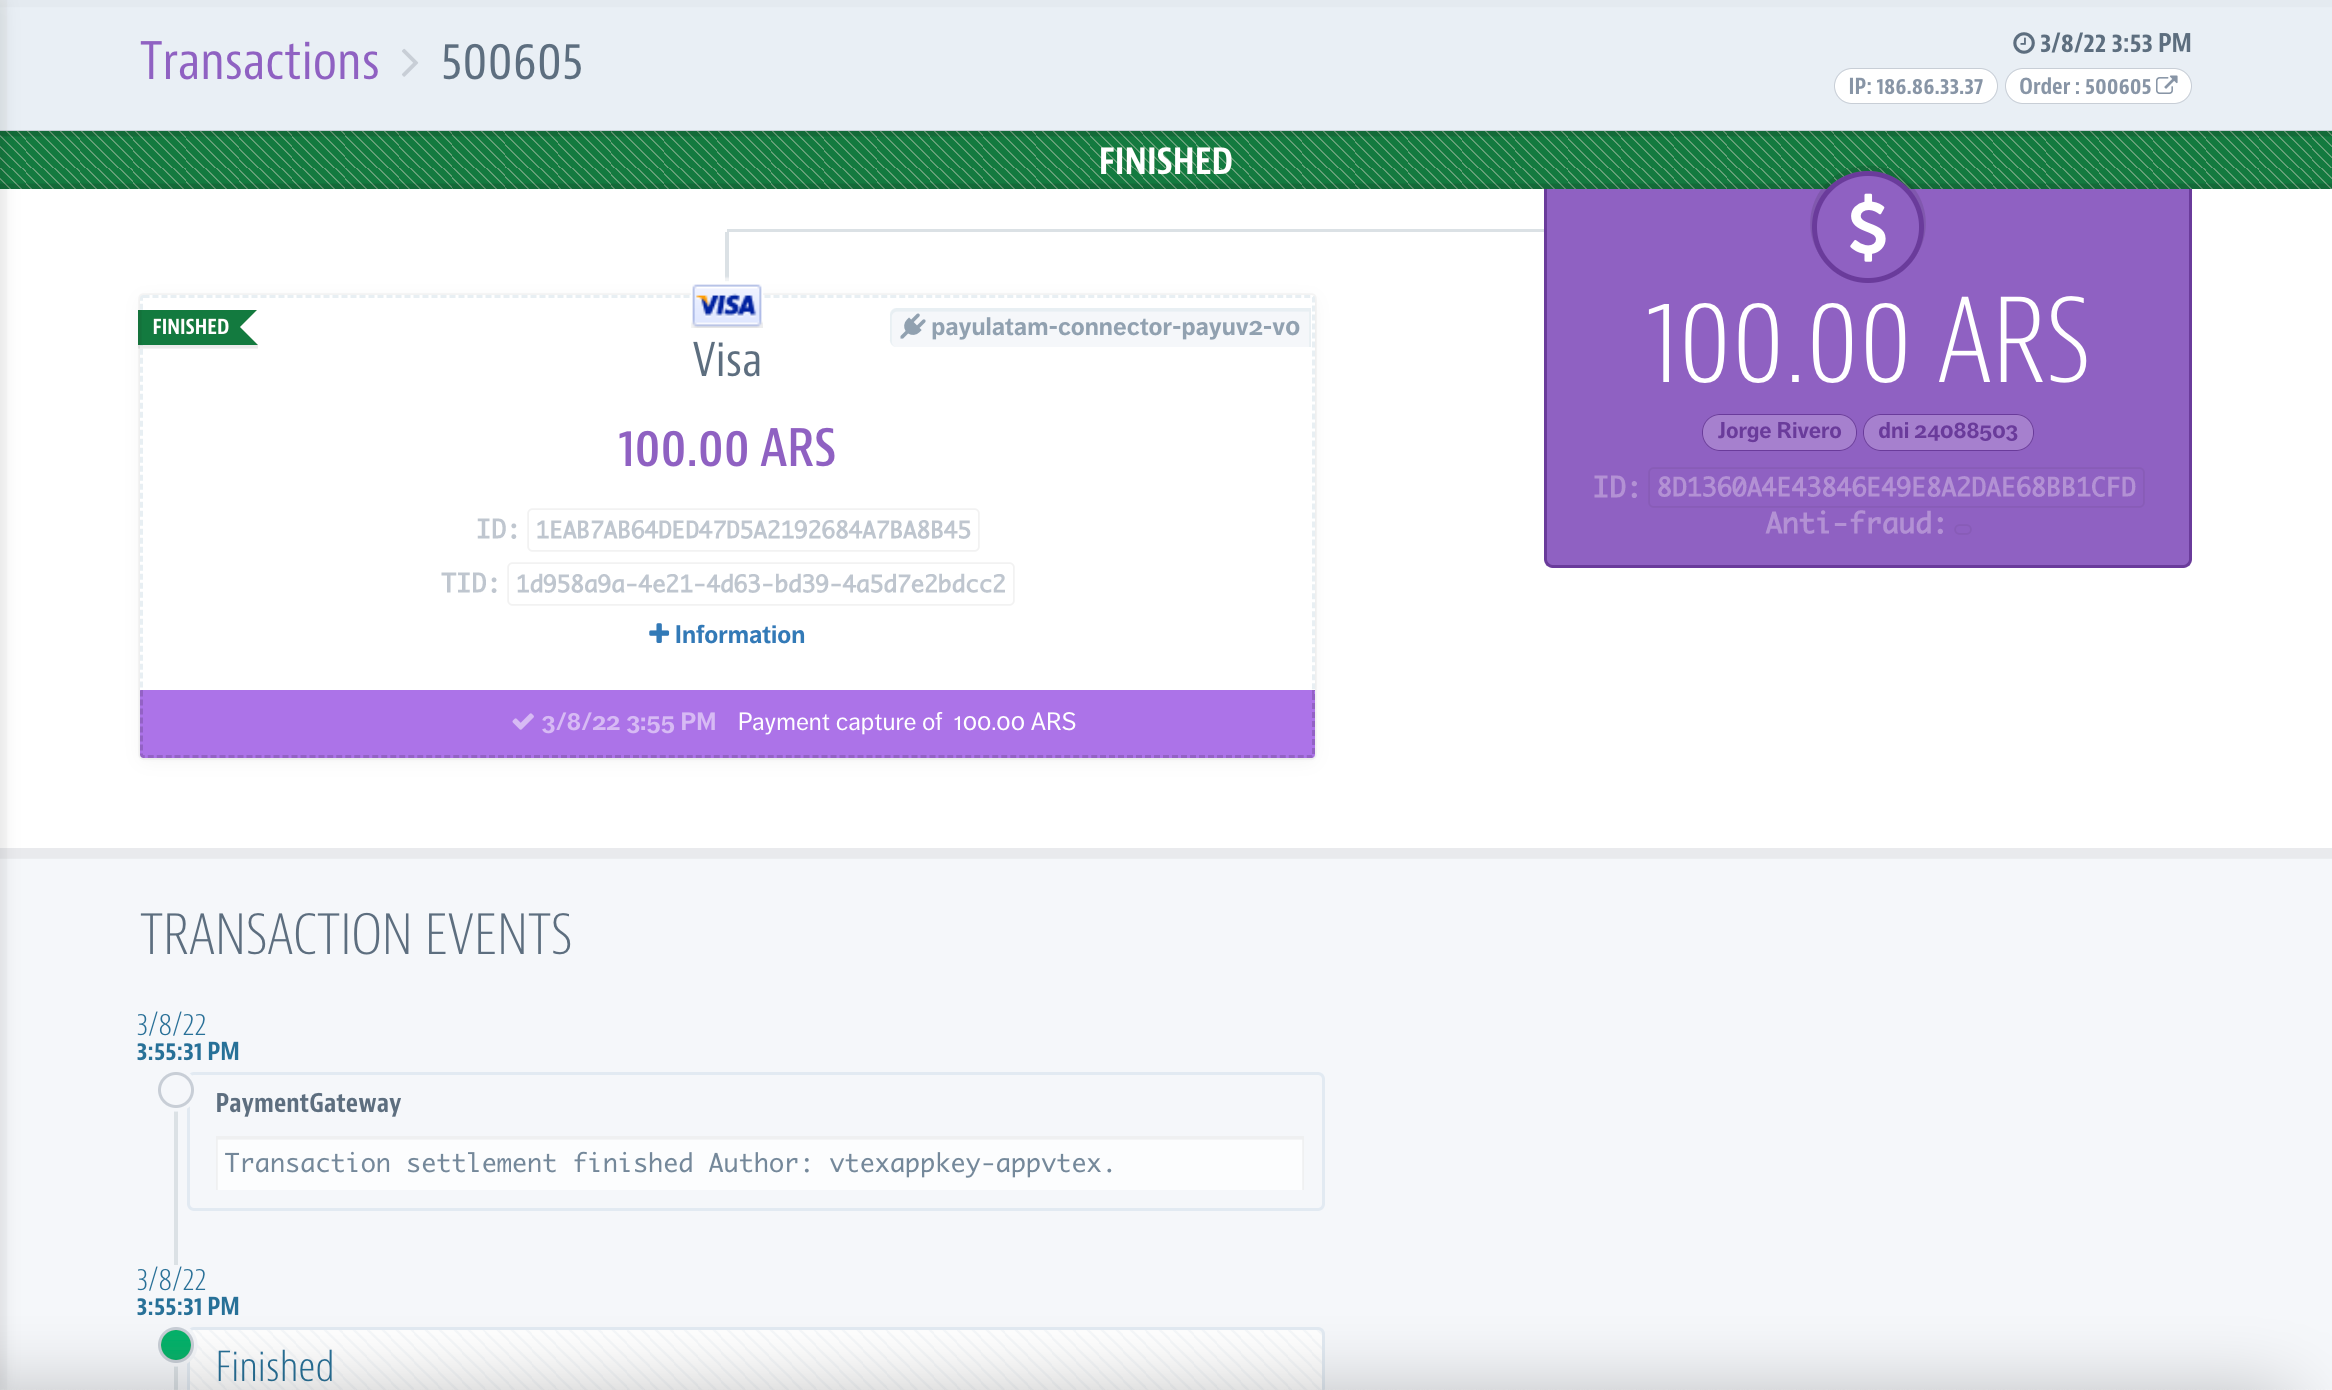
Note
An authorized order can be canceled using the Cancel Order button in the order details.When an order is canceled, PayU sends a void transaction, which is recorded in both PayU Enterprise and PayU Latam.